
Contour Install instructions
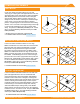

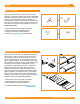
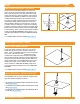
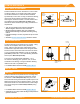
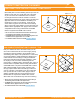
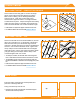
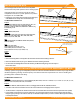
Table Of Contents

©
2022 IRONRIDGE, INC. VERSION 3.5 FLUSH MOUNT INSTALLATION MANUAL - 17
CONDUIT MOUNT
Remove the tile that the mount will be installed on, and the
tiles in the course above it. Lift the bottom of the tile and
slide the bottom clamp over the bottom edge of the tile.
Insert the 4" tap bolt through the slot into the threaded hole
and use a 7/16" socket to thread the screw. Tighten until
the top clamp hook end unbends and forms a 90 degree
angle with the tile. Use the Cap Screw (included) to attach
your pipe clamp (not included) to bottom clamp. Insert
conduit and tighten with 7/16" socket.
➢ The clamp is reversible, use the wider hook end on tile greater
than 1" thick and the thinner hook end on tiles less than 1" thick.
➢ The installation process is the same on curved tile, make sure
that the Conduit Mount is installed on the crown(high point) of the
tile.
➢ Install mounts as required to support conduit across the roof.
➢ For additional details refer to the full QM Installation Manual.
QM CONDUIT MOUNT - TILE
Place conduit mounts along path of conduit. Lift shingle
above mount location and insert ashing into position.
Mark center for drilling, remove ashing and drill pilot
hole with 1/8" bit. Clean area, ll hole with roong
manufacturer's approved sealant. Lift shingle and slide
Conduit Mount into place. Prepare the lag bolt with sealing
washer and pipe clamp (not included). Insert lag through
hole in block and drill with 7/16" socket until block is tight.
➢ Install mounts as required to support conduit across the roof.
➢ For additional details refer to the full QM Installation Manual.
QM CONDUIT MOUNT - COMPOSITION SHINGLE
End Caps add a completed look and keep debris and
pests from collecting inside rail.
Firmly press End Cap onto rail end.
➢ End Caps come in sets of left and right. Check that the proper
amount of each has been provided.
WIRE CLIPS