
Contour Install instructions
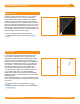
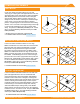

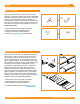
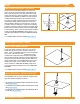
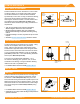
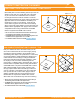
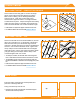
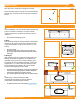
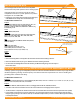
Table Of Contents

END CAPS (OPTIONAL)
©
2022 IRONRIDGE, INC. VERSION 3.5 FLUSH MOUNT INSTALLATION MANUAL - 16
CONDUIT PENETRATION FLASHINGS
QM CONDUIT PENETRATION FLASHING - COMP SHINGLE
Mark a drill point so that the ashing reaches up to the 3rd
shingle course. Drill your conduit hole next to the rafter
so you can secure the conduit below the roof surface.
Cut shingle and remove nails as needed to center the
drilled hole and ashing hole. Apply roong manufacturer's
approved sealant on the underside of the ashing in a
Upside down U and to top of ashing. Under the 3rd
course and through the second course secure ashing
with 2 roong nails, apply sealant over the nail heads. Cut
EPDM collar to appropriate size. Apply a bead of sealant
compatible with the roong manufacturer and EPDM
rubber to anywhere the EPDM collar contacts.
➢ Be sure to secure conduit to rafters below the roof surface per
local building codes and NEC code requirements.
➢ Cut EPDM collar to appropriate size using the sizing chart in the
installation manual, approved for 1/2" to 1" EMT.
➢ For additional details refer to the full QM Installation Manual.
Nails under the third
course
Rafter
Drill your conduit hole next to the rafter so that you can
secure the conduit below the roof surface. Apply roong
manufacturer approve sealant to the underside of the
sub-ashing in the shape of an upside down U. Clear away
any dust and debris to install sub-ashing. Waterproof at
under laminate level according to roong manufacturer
instructions and Tile Roong Institute Guidelines. Under
the top layer of felt, secure the sub-ashing with two
roong nails. Cut EPDM collar to appropriate size. Apply a
bead of sealant compatible with the roong manufacturer
and EPDM rubber to anywhere the EPDM collar contacts.
With a diamond blade cut tile to allow conduit to pass
through, replace all tiles. Bend the ashing to follow the
contour of the tiles. Place ashing over the conduit and
tuck up under the next course of tiles. Apply a bead of
sealant compatible with the roong manufacturer and
EPDM rubber to anywhere the EPDM collar contacts.
Slide collar onto conduit all the way down to the ashing.
➢ Be sure to secure conduit to rafters below the roof surface per
local building codes and NEC code requirements.
➢ Cut EPDM collar to appropriate size using the sizing chart in the
installation manual, approved for 1/2" to 1" EMT.
➢ For additional details refer to the full QM Installation Manual.
Rafter
QM CONDUIT PENETRATION FLASHING - TILE