
Contour Install instructions
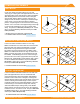

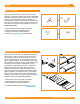
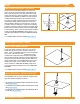
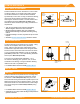
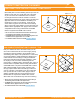
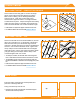
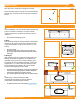
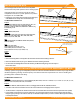
Table Of Contents

©
2022 IRONRIDGE, INC. VERSION 3.5 FLUSH MOUNT INSTALLATION MANUAL - 11
COMPOSITION SHINGLE
QM QBASE COMPOSITION MOUNT
Locate roof rafters and mark locations on roof. Align
QBase vertical holes over center rafter and mark. Drill two
pilot holes with 7/32" drill bit, perpendicular to roof and
back ll with roong manufacturers' approved sealant.
Set grade 8 cap screw through bottom of QBase, place
QBase over drilled holes and secure lags. Screw Post to
QBase. Proceed with roong up until the ashing should
be installed. Install ashing over mount. Allow roong to
proceed to the next course. Apply sealant where post and
ashing meet, install EPDM counter ashing collar. Attach
L-Foot on Stando with hardware. Torque to 174 in-lbs
(14.5 ft-lbs). Attach rail to L-Foot with Bonding Hardware
and torque to 250 in-lbs (21 ft-lbs).
➢ For additional details refer to the full QM Installation Manual.
Locate roof rafters and mark locations on roof. Drill 7/32"
pilot holes perpendicular to the roof and back ll with
roong manufacturers' approved sealant. Slide ashing
between 1st and 2nd course of shingles, ensuring both
that the ashing reaches under the 3rd shingle course and
doesn't overhang the downhill shingle course. Prepare
Hanger Bolt with Hex Nut and Sealing Washer, insert into
hole and using 1/2" socket drive hanger bolt until fully
seated and QBlock stops rotating easily. Insert EPDM
rubber washer over hanger bolt into block, using Rack Kit
hardware secure L-Foot to the mount. Torque to 156 in-lbs
(13 ft-lbs). Attach rail to L-Foot with Bonding Hardware
and torque to 250 in-lbs (21 ft-lbs).
➢ For additional details refer to the full QM Installation Manual.
CLASSIC COMP MOUNT
QM L-MOUNT
Locate roof rafters and mark locations on roof. Drill
7/32”(Lag) or 1/8"(ST) pilot holes perpendicular to the roof
and back ll with roong manufacturers' approved sealant.
Slide ashing between 1st and 2nd course of shingles,
ensuring both that the ashing reaches under the 3rd
shingle course and doesn't overhang the downhill shingle
course. Place L-foot on ute and rotate into desired
position. Prepare lag bolt or structural screw with sealing
washer. Use 1/2" socket to drive prepared lag bolt through
L-foot until fully seated and L-foot can no longer rotate
easily.
Torque Nut to 156 in-lbs (13 ft-lbs) for ST.
Attach
rail to L-Foot with Bonding Hardware and torque to 250
in-lbs (21 ft-lbs).
➢ Structural screw can be driven with T-30 hex head bit.
➢ For additional details refer to the full QM Installation Manual.
Torque to
174 in-lbs