
Contour Install instructions
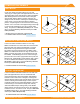

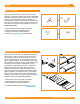
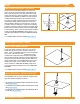
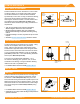
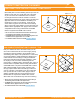
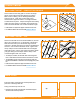
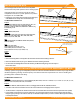
Table Of Contents

©
2022 IRONRIDGE, INC. VERSION 3.5 FLUSH MOUNT INSTALLATION MANUAL - 10
COMPOSITION SHINGLE
Locate roof rafters and mark locations on roof. Drill 1/4"
pilot holes perpendicular to the roof and back ll with
roong manufacturers' approved sealant. Slide ashing
between 1st and 2nd course of shingles, ensuring both
that the ashing reaches under the 3rd shingle course and
doesn't overhang the downhill shingle course. Line up with
pilot hole and insert supplied lag bolt with washer through
ashing. With a 7/16" Socket fully seat lag bolt. Place Cap
onto ashing in desired orientation for E/W or N/S rails and
rotate 180 degrees until it locks into place.
➢ Rail can be installed on either side of FlashFoot2 Cap.
➢ For additional details refer to the full FlashFoot2 Installation
Manual.
FLASHFOOT2
FLASHVUE
Locate rafters and snap vertical and horizontal lines to
mark locations of ashings. Drill 1/4” pilot holes, then
backll with an approved sealant. Slide ashing between
1st and 2nd course of shingles, ensuring both that the
ashing reaches under the 3rd shingle course and doesn't
overhang the downhill shingle course. Line up pilot hole
with View Port. Press Grip Cap onto ashing in desired
orientation for E/W or N/S rails. Insert Lag Bolt with
mechanically bonded washer through ashing. With a
7/16" Socket drive Lag Bolt until fully seated. FlashVue
is now installed and ready for IronRidge XR Rails.
Attach rails to either side of the open slot using bonding
hardware. Level rail at desired height, then torque to 250
in-lbs (21 ft-lbs).
When installing Gripcap+ on roofs with undulations greater
than 1 inch, install GripCap+ in low points across the array
as required.
➢ For additional details refer to the full FlashVue Installation
Manual.
➢ For additional details on the GripCap+ refer to the full GripCap+
Installation Manual.
Torque to
250 in-lbs