
Installation Guide

© 2019 IronRidge, Inc. All rights reserved. Visit www.ironridge.com or call 1-800-227-9523 for more information. ATH-MAN REV 1.10
All Tile Hook Installation
Tools Required: tape measure, chalk, caulking gun, driver, 7/16’’ hex socket, and 1/4’’ drill bit (optional: stud
nder and tile grinder)
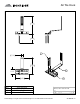
1
Remove tile and locate rafter.
2
Position base over rafter, adjust arm if necessary
and torque hardware to 132 in-lbs (11 ft-lbs).
Position arm near center of valley for curved tiles,
and away from joining seam for at tiles.
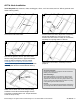
3
4
Replace tiles and notch if necessary to ensure
proper t.
5
Attach rails to either side of slot using bonding
hardware. Level rails at desired height. Ensure
hook does not extend above rail. Torque hardware
to 250 in-lbs (21 ft-lbs).
Rafter
Use base as guide to drill 1/4” pilot holes, then
ll with roong manufacturer’s approved sealant.
Insert lag bolts and tighten until fully seated.
IronRidge offers an optional aluminum deck
ashing
. Other approved ashing methods include
user supplied adhesive backed exible ashing.
Structural Certication
Designed and Certied for Compliance with the International
Building Code & ASCE/SEI-7.
Water Seal Ratings
Water Sealing Tested to UL 441 Section 27 “Rain Test” and
TAS 100(A)-95 “Wind Driven Rain Test” by Intertek. Ratings
applicable for concrete tile roofs having slopes between 2:12
and 12:12. Tested and evaluated without sealant. Any roong
manufacturer approved sealant is allowed.
UL 2703
Conforms to UL 2703 Mechanical and Bonding Requirements.
See IronRidge Flush Mount Installation Manual for full ratings.
Torque to
250 in-lbs
Torque to
132 in-lbs