
Installation Sheet

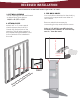

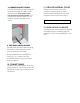

Locate side ironing board brackets
that are secured to cabinet with
three screws. Then remove the
top screw from each bracket. This
is where the bottom part of your
cabinet will be secured to the
studs.
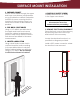
Pre-drill holes into the cabinet using
the holes in side brackets where
screws were just removed.
Finish installation by inserting the
two #14 x 2
1/2
” screws into the
pre-drilled holes to secure bottom
part of cabinet.
8. REMOVE BRACKET SCREW
9. PRE-DRILL HOLES IN SIDES
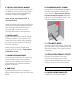
10. CONNECT WIRES
Connect all power supply wires and
ground wires in accordance with all
electrical codes. Trim supply wire as
necessary.
11. REPLACE RACEWAY COVER
Place the raceway cover into
position, ensuring that no wires
are pinched. Reinstall the top and
bottom screw to secure in place.
Reconnect power supply.
12. INSTALLATION COMPLETE!
Cabinet is now fully installed! If desired,
decorative trim or molding may be
added to cover an irregularities in the
wall.