
Installation Sheet
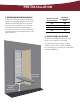
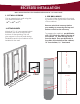

RECESSED INSTALLATION
Cut an opening into wall using the
unit dimensions below:
14
3/8
” x 59
7/8
” x 3
7/8
”
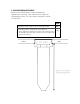
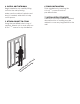
Attach a 2” x 4” cross support cleat
between the studs, level with the
bottom of the opening. This will
give support to the dry wall during
installation and to the cabinet once
installed in the wall.
Your unit will be attached to the studs
by screws in the upper and lower sides
of the cabinet.
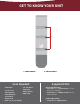
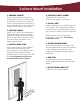
Remove electrical raceway before
proceeding by removing the top and
bottom screws on the raceway.
To prepare the cabinet, pre-drill holes
with 1/8” bit into the sides of the top of
the cabinet, 14” from the top and 2
1/2
”
from the back. Then pre-drill holes in
the sides of the bottom of the cabinet,
14” from bottom, 2
1/2
” from back.
1. CUT WALL OPENING
2. ATTACH CLEATS
3. PRE-DRILL HOLES
Example shown with exposed
studs & unit to illustrate mounting.
14” from bottom of cabinet
2
1/2
” from back
of cabinet
14” from top of cabinet
CLEAT
Note: Instructions based on installation between 16” on-center studs.