
Installation Sheet


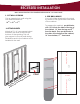

4. INSTALL UNIT INTO WALL
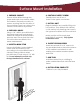
Begin installation by carefully lifting
unit into the wall opening.
Make sure the cabinet is plumb and
level. If needed, add shims to help
unit t space.
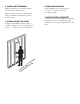
5. ATTACH CABINET TO STUDS
Using the pre-drilled holes in top of
cabinet, attach unit to studs with two
#10 x 1
1/2
” screws for top installation.
Finish installation by inserting the
#14 x 2
1/2
” screws in bottom
pre-drilled holes.
6. FINISH INSTALLATION
7. INSTALLATION COMPLETE!
Cabinet is now fully installed! If desired,
decorative trim or molding may be
added to cover any irregularities in the
wall.
Example shown with studs
to illustrate mounting.