
2020 Installation Instructions


PREINSTALLATION
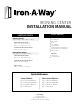
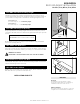
STEP ONE: Ironing Board Clearance
Begin by ensuring your desired installation location has adequate space for your selected model. Choose Recessed
Mount or Surface Mount.
1
2
2
Distance
from wall to
tip of board
Clearance on both
sides of cabinet for
board to fully swivel
AE-46
ANE-46
AE-42
ANE-42
UD-42
51”
16”
47”
15”
47”
15”
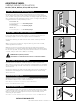
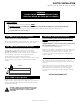
Ater identifying your installation location, use a stud finder to locate necessary studs. Locate existing wiring or
utilities to prevent drilling into or severing wires.
STEP THREE: Prepare Location
1
2
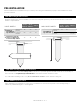
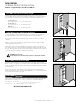
STEP TWO: Standing Room & Door Clearances
It is recommended to have 16” on hinge side for the door to open flush against the wall and move out of the way of
the board. This is a requirement for swivel models so that the board has clearance to turn.
For comfortable standing room to iron, we recommend 24“ clearance on the desired ironing side.
55” 52” 52”
Recessed
Mount
Surface
Mount
PRE-INSTALLATION | PG. 2
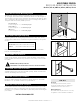
Distance
from wall to
tip of board
E-46
NE-46
E-42
NE-42
IAW-42
46” 42”
43 1/4”
51” 46”
Recessed
Mount
Surface
Mount
Please follow these Pre-Installation steps to ensure your ironing board will work properly in the installation location
you have selected.
SWIVEL MODELS
NON-SWIVEL MODELS