Readiris 16 ™ No retyping. No paper. Just smart documents.
Table of Contents Readiris 16 ..................................................................................................................................... 1 Introduction ................................................................................................................................ 1 What's new in Readiris 16 ............................................................................................................. 2 Legal Notices ..................................................
Readiris 16 - User Guide Introduction ........................................................................................................................... 41 Viewing the Recognition Zones ................................................................................................. 41 Modifying the automatic Page Analysis ...................................................................................... 42 Using zoning templates ................................................................
Readiris 16 RI_16_dgi_11102016-03 Welcome to the Readiris documentation. The aim of this documentation is to help you get up to speed with using Readiris. It covers Readiris' installation and setup, the basic processing steps and the application's commands and working areas. At the end of the documentation you find an How to section in which particular questions are addressed. The procedures described in this documentation are based on the Mac OS X El Capitan operating system.
What's new in Readiris 16 Improved User Interface Improved Recognition Text Corrector Conversion from Finder Recognition Accuracy Indicator Improved Image Adjustment features Improved Deskew of Digital Camera Images Improved Activation Procedure Improved User Interface The ergonomics of the Readiris interface have been improved. The procedures to edit and create new recognition zones have been made more user-friendly.
Legal Notices Copyrights Copyrights © 1987-2016 I.R.I.S. All Rights Reserved. I.R.I.S. owns the copyrights to the Readiris software, to the online help system and to this publication. The information contained in this document is the property of I.R.I.S. Its content is subject to change without notice and does not represent a commitment on the part of I.R.I.S. The software described in this document is furnished under a license agreement which states the terms of use of this product.
Readiris 16 - User Guide Redistributions of source code must retain the above copyright notice, this list of conditions and the following disclaimer. Redistributions in binary form must reproduce the above copyright notice, this list of conditions and the following disclaimer in the documentation and/or other materials provided with the distribution.
Section 1: Installation and Activation System requirements This is the minimal system configuration required to use Readiris: A Mac computer with a 64 bits Intel processor. The operating system Mac OS X 10.9 or higher. Earlier versions of the Mac OS operating system are not supported. 400 MB of free hard disk space. Installation and Activation Installation Download the Readiris package from www.irislink.com/softwaredownload.
Readiris 16 - User Guide Manual Activation If you don't have internet access or when an error occurs during the activation process, an error message is displayed allowing you to do a manual activation. 6 To do so, click Manual Activation in the error message. Click Save as text file to save all the info I.R.I.S. needs to continue with the Manual Activation. It is recommended to keep the default file name and default storage location.
Section 1: Installation and Activation Click Submit to submit the ticket. You will receive the license file by email within 24 hours. Return to Readiris and click Import a license file in the Activation dialog box. When the installation is finished, click Close. The Readiris folder is added to the Applications folder by the installation program. Software Registration Registering is required to get Technical Support.
Readiris 16 - User Guide Uninstalling Readiris To remove Readiris from your computer: Click Finder and open the Applications folder. Drag Readiris to the Trash. Readiris will be removed from your machine. Note: the Readiris preferences are not removed by dragging Readiris to the trash can, in case you should want to re-install the software later on. To remove the preferences: In the Finder's Go menu, press and hold Alt. Click Library > Library > Application Support.
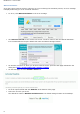
Section 2: Getting Started Exploring the interface The new Readiris interface looks as follows: The interface consists of the following components and panels: 1. The Readiris menu bar The Readiris menu bar regroups all the commands and options available in Readiris, including advanced settings. 2. The top toolbar The top toolbar is by far the most important tool in Readiris. It contains all the basic commands you need to scan and export your documents.
Readiris 16 - User Guide If the default Export buttons don't suit your needs and you want to select a different output format, click Export Options. Then drag the required output format to the Favorites list and configure its options. For more information see Select the Output Format. Note that you can also customize the top toolbar by adding or removing commands. To do so: Ctrl-click the toolbar and click Customize Toolbar. Drag-and-drop the commands you want to move from or to the toolbar. 3.
Changing the user interface language Readiris opens in the user interface language that is currently activated in your Mac System Preferences. To change the user interface language in Readiris: Click the System Preferences icon. Click the Language & Region icon. Drag the language of your choice to the top of the list.
Readiris 16 - User Guide To check if the scanner driver has been installed successfully: In the Readiris menu, click Preferences. Click the Scanner tab. You should see your scanner listed*. *This is not the case for the IRISCard Anywhere, IRIScan Anywhere and IRIScan Book scanners. If your scanner is not listed, its driver has not been installed successfully. 12 Once the scanner has been configured you can start scanning, using the default scanner settings.
Section 3: Basic Document Processing Processing documents with Readiris is fairly straightforward when using a basic configuration. In this section we discuss which steps to take when doing such a basic configuration. For detailed information about all the configuration steps, see sections 4 to 10. Step 1: Scan, Open or Drag-and-Drop your images In order to scan paper documents your scanner must be correctly configured. See the section Configuring your scanner if necessary.
Readiris 16 - User Guide Or drag and drop PDF and image files to Readiris. You can do so in several ways: You can drag and drop files to the Readiris icon in the Dock. The files will be added after the images that are already loaded into Readiris. You can drag and drop files into the Readiris interface that is already opened. Tip: when you drag files to the Pages panel, you can choose where they will be inserted.
Step 2: Modifying the images The images you scan and load into Readiris can be modified easily: To change the order of the pages, drag the thumbnails to a different position in the Pages panel. To delete a page, select a page and click the delete icon. To delete a zone, select it and press the Backspace button on your keyboard. If OCR errors need to be corrected, use the Text Corrector. See the section Editing the Recognized Documents for detailed information.
Readiris 16 - User Guide To select a different output format than the 3 default ones: Click Export Options. Select the format of your choice and drag it to the Favorites list. Configure its formatting options. For detailed information about the different output formats and the different formatting options, see the sections Select the Output Format. Configure its destination.
Section 3: Basic Document Processing Automatic Processing If you want to speed up the processing in Readiris or need to process batches of scanned documents, you can use the Automatic Processing feature. This feature automatically processes the documents you scan and open in Readiris, converts them into the output format you defined, and exports them either to a specific folder you defined or to the configured online Storage System.
Saving and loading settings Note that Readiris saves the processing settings automatically when closing the application. Next time you start Readiris it applies the same settings. In case you want to save a specific settings profile: First, select the required settings. On the Settings menu, click Save Settings. Name the settings, select an location and click Save.
Section 4: Scanning and Opening Documents Preprocessing Options When scanning and opening documents, Readiris applies several Preprocessing options. To access these options: On the Readiris menu, click Preferences. Click the Preprocessing tab. The options you set here are applied as default to all the documents you'll open or scan. Note that changing these options does not affect the images that are already open in Readiris. Note that you can also access these options via the Settings menu.
Remove horizontal lines To remove horizontal lines: Select Remove horizontal lines. The same parameters are available. Note that lines are only removed to improve the recognition. They are not removed from the output files. Automatic despeckling Sometimes documents contain a lot of "noise" - little black spots that occur when scanning low-quality documents or using bad scanner settings. To remove these little black spots, use the Despeckle slider.
Section 4: Scanning and Opening Documents Page Deskewing This option staightens - or deskews - pages that were scanned at an angle. Ignore Border Zones When your scanner generates black borders around your documents, or when your documents contain information that is partially cut from the page, Readiris tends to create recognition zones on the borders of the document, even though they do not contain any useful content. In such cases it is recommended to use the option Ignore Border Zones.
Scanning Documents Readiris is Image Capture and Twain compliant. It supports almost any flatbed and sheet-fed scanner, allin-one device, digital camera and scanner currently available. Before you begin: make sure your scanner is connected to your computer and configured correctly. To do so, go to the Readiris menu and click Preferences. If you see your scanner listed on the Scanner tab it is correctly installed. If you don't see it, refer to the topic Configuring your scanner.
Tips: Sometimes Twain scanners display white text on a black background when scanning in black-andwhite. To avoid this, click Preferences on the Readiris menu. Then click the Scanner tab and select Invert Black & White images from TWAIN scanners. To scan batches of documents, see the sections Automatic Processing and Watched Folder. Readiris can be set as target application of your scanner, if your scanner supports that feature.
Opening Image Files Besides scanning documents, you can also open image files and PDF files with Readiris. Readiris supports the following image file formats: GIF images, JPEG images, JPEG2000 images, Photoshop images, PNG images, (uncompressed, packbits and Group 3 compressed) TIFF images, multipage TIFF images, Windows bitmaps (BMP) and PDF documents. To open existing image files: Click the File button. Then select the images files you want to process, and click Open.
Section 4: Scanning and Opening Documents Other ways of opening image files You can drag and drop files to the Readiris icon in the Dock. The files will be added after the images that are already loaded into Readiris. You can drag and drop files into the Readiris interface that is already opened. Tip: when you drag files to the Pages panel, you can choose where they will be inserted. Note: when you have split documents, you cannot insert pages before the first page of Document 1.
Opening Digital Camera Images Readiris automatically detects when images have been made by a digital camera and uses special recognition algorithms to process them. To open digital camera images: Click File on the top toolbar. Select your digital camera images and click Open. In the page thumbnail, you see a little camera icon, which indicates Readiris recognizes the image as digital camera image. If Readiris does not detect your image is a digital camera image: Ctrl-click the page thumbnail.
Converting Image Files from Finder In Readiris you can now convert Image files and PDF files directly from Finder. You may select a mix of Image and PDF files. When you select multiple files for conversion, a multipage document will be created, each page corresponding to a file. The output file takes the name of the first input file you selected. The order of the files in Finder will also be the order in the multipage document. So the order in which you select the files in Finder does not matter.
Readiris 16 - User Guide The file is converted into the format you selected, keeping the same file name and storage location. If a file with the same name already exists you are prompted whether to overwrite it or not.
Section 5: Selecting the Document Language Readiris converts scanned images, image files and PDF files into editable text documents and textsearchable PDF documents. In order for Readiris to recognize the text in your images, you need to select the correct recognition options. By far the most important recognition option is the document language. To select the document language: Click the language list, and select your document language.
Readiris 16 - User Guide Recognizing Western words in non-Latin alphabets When you are processing Cyrillic, Slavic, Greek or Asian documents that also contain "Western" words written in the Latin alphabet - such as proper nouns, then it is recommended to select one of the available Language pairs. Language pairs are always combined with the English language and are available for Russian, Byelorussian, Ukrainian, Serbian, Macedonian, Bulgarian and Greek.
Selecting the Document Language Recognizing Secondary Languages inside a single document (Readiris Corporate only) When your documents contain text in multiple languages, it is recommended to select a main recognition language, combined with several Secondary languages. You may select up to 4 secondary languages: Click the language list and select Other Languages. Select the Primary language. Cmd-click to select the Secondary languages.
Section 6: Using Training Mode (This feature is not available for Asian languages) If you are processing documents with a non standard font and you notice that Readiris is systematically having trouble recognizing characters, use the Training Mode to train the recognition system on the fonts and character shapes you are using.
Training Mode Using Training Mode Go to Settings > Training Mode. Select Training mode. The option Start to create a new training results set is now selected. Click OK to close the Training Mode settings for now. The other options are explained in Combining Training Mode with Training Results sets below. Scan or Open your document. At the end of the recognition, Readiris enters the Training Mode. The characters the recognition system isn't sure of are displayed.
Readiris 16 - User Guide or Click Don't learn to save the result as unsure. Use this command for damaged characters which could be confused with other characters if trained. E.g. the number 1 and the letter I, which have an identical form in many fonts. Click Delete to delete characters from the output. Use this button to prevent document noise from appearing in the output file. Click Undo to correct mistakes. Readiris keeps track of the last 32 operations.
You can also choose to deactivate Training Mode and: Don't use any training results. Use the current training results set. In this case only the temporary training results are used and you don't have to go through Training Mode again. Click Select, browse for the Results set you saved and select Use training results from . In this case you use the results from the stored Results set without going through Training Mode.
Section 7: Optimizing the Scanned Documents The documents you scan and open in Readiris can be optimized in several ways with the Image and Layout Edting toolbar on the right side of the interface. Deskewing pages When a page has been scanned crookedly it can be deskewed - or straightened. To deskew a page: Select the page in the Pages panel: Click the Deskew icon. Deskewing digital camera images Readiris automatically detects if an image was made by a digital camera.
Automatic detection Readiris tries to detect the borders of the image automatically. If it succeeds, a frame showing the detected borders is displayed and the option Automatic detection is selected in the Borders list. This means the borders cannot be moved manually. Select the appropriate Content type. Important: Readiris computes the image resolution based on the Content type you select. A correct resolution is required to obtain satisfactory OCR results.
Readiris 16 - User Guide Adjusting the Image Quality The recognition results depend a great deal on the image quality of your documents. If you're scanning very low-quality documents, Readiris will not be able to recognize them properly. The reason for this is that Readiris works by converting pictures of text characters into actual text characters. If your documents are too dark, the characters fade into one another and create black spots.
Section 7: Optimizing the Scanned Documents General Smoothen (color or grayscale) image This option is selected by default. It smoothens out differences in intensity, creating a greater contrast between the text and the background. Sometimes smoothening is the only way to separate text from a colored background. Remove dither (black-and-white image) This option removes unwanted dither (noise) from black-and-white images. Brightness Move the slider to increase or decrease the brightness of your documents.
Readiris 16 - User Guide Despeckle Sometimes documents contain a lot of "noise" - little black spots that occur when scanning low-quality documents or using bad scanner settings. To remove these little black spots, use the Despeckle slider. The more you move it to the right, the larger the spots that will be removed. The results on the binarized image are shown immediately. If the results are not satisfactory, use the Undo button to restore the settings.
Section 8: Editing the Recognized Documents Introduction When you scan a document or open an image file in Readiris, each page is divided automatically into recognition zones. Readiris uses these zones to determine how each part of your documents must be converted. If your document does not contain any zones, no recognition will be done. In Readiris there are 4 kinds of recognition zones. You have text zones, image zones, table zones and barcode zones. Notice that each zone type has its own color.
You can also use the keyboard to zoom in on images: Shift-click on an image to zoom in. Then Alt-click on the image to grab it and move to another section of the image. To zoom back out, Shift-click on the image again. Shift-Alt-click on an image to display the Magnifying glass. Hold down the mouse button and move the Magnifying glass over the image.
Section 8: Editing the Recognized Documents Manually drawing zones Click the Layout icon to display the Layout toolbar. Click the zone type you want to create. E.g. Text. Click and hold the mouse button and draw a frame around the section to want to recognize as text. Note that barcode zones must always be drawn manually. They are not created automatically by the Page Analysis feature. Changing the zone type Ctrl-click a zone, and then select the required zone type from the Context menu.
Connecting zones Suppose you have two text zones that belong together, and you want to turn them into one single text zone. In that case: Click the Layout icon to display the Layout toolbar. Click the Text icon. Then draw a text zone that overlaps the two zones to connect them. The two zones are merged into one. Note that only zones of the same zone type can be connected. OR Close the Layout toolbar. Click a zone to select it.
Section 8: Editing the Recognized Documents Re-doing the Page Analysis If you are not satisfied with the changes you made, note that you can always redo the automatic page analysis. Click the Analyze icon to do so. Using zoning templates When you want to scan many similar looking documents, it might be useful to apply zoning templates, instead of editing the recognition zones each time.
Readiris 16 - User Guide Open the layout file you have saved. Choose whether to use the Layout for the current page and new pages or for the current page only. Then, scan or open your documents in Readiris. To stop using the template, re-activate Page Analysis again. Manually copying the zoning layout. It is also possible to manually copy the zoning layout from one page to another: Cmd-click the zones you want to copy to another page. Tip: make sure the Layout toolbar is closed.
Using the Text Corrector The Text Corrector allows you to correct the recognition results. Note that the Text Corrector is meant for text corrections. It is not a Text Editor in which you can change the layout of the document, delete entire paragraphs, merge content, etc. To access the Text Corrector: Click the Text icon in Image and Layout Editing toolbar. Note: the Text icon is only available if you have at least one document open in Readiris.
Correcting Text Click inside the recognized text. An orange frame in the original image shows where you have placed the cursor. The word in which the cursor is located or the text selection is highlighted in the original image Type in the corrections inside the recognition results. When a correction has been done the yellow highlighting is removed from the word. Tip: Ctrl-click a word to display spelling suggestions in the Context menu.
Notes Any changes you do will be taken into account in the exported document. The changes will not be displayed in the original image, but the text behind the original images does contain the changes. It is not necessary to close the Text Corrector before you Export your documents. When the Text Corrector is open it is not possible to modify the Zone Types on the original image. Changing the Zoom To zoom in or out on the original image use the corresponding zoom commands.
Section 9: Configure the Export Three default Export buttons are available to export your documents as PDF, DOCX and XLSX. To export documents directly: Click one of the Export buttons. Enter a name for the documents and choose the location where to save it. When you select Export as PDF you have the possibility to add the current document to an existing PDF file. To do so, select Append to an existing PDF file. Then select the PDF file to which you want to add the current document.
Section 9: Configure the Export Starting a new project When you are done exporting your documents and you want to start a new project, click New on the top toolbar. This command erases your documents from Readiris. Select the Output Format The documents you process with Readiris can be saved in a large number of output formats, ranging from plain text files to fully formatted Word processing and Spreadsheet files, and PDF files.
PDF Options Type With Readiris you can generate 4 types of PDF files: PDF Image-Text. This file type is most commonly used. It contains two layers: the recognized text, and the original image on top of the text. This way, you have both access to the recognized text and you still see the original image. Note: since the image covers the text, any recognition mistakes will not be visible. PDF Text-Image. This file type is the opposite of PDF Image-Text.
Select the compression type: Good quality - best compatibility: no use of wavelet compression (JPEG2000) and no use of symbols compression (JBIG2). Good compression - best compatibility: does the same as the previous option but with more aggressive compression factors for the background and foreground images. Better compression - good compatibility: use of symbols compression (JBIG2) but no use of wavelet compression (JPEG2000).
Readiris 16 - User Guide DOCX, ODT, RTF DOCX DOCX is the standard text processor format used since Microsoft Word 2008. It is a standard format in several applications on the Microsoft Windows operating systems. DOCX is also supported by Pages for Mac and DOCX with simplified layout is supported in TextEdit. ODT ODT stands for "Open DocumentText". It is an open-source file format. ODT files can be opened with any OpenOffice-compatible text processor. RTF RTF stands for "Rich Text Formatting".
Section 9: Configure the Export The option Recreate source document tries to stay as close to the original layout as possible. The text blocks, tables and pictures are re-created in the same place as the original. The word and paragraph formatting are maintained. Hyperlinks are re-created too. Example of a re-created source document The option Use columns instead of frames creates columns instead of text frames to position the information on the page.
Readiris 16 - User Guide Graphics Options The Graphics Options determine how the images will be presented in the output documents, e.g. in blackand-white or in color. They also define their resolution. Note: when you select an output format or application that does not support images, then the Graphics Options will be unavailable in Readiris. Below you find a description of what each option does. Color type Readiris saves graphics in their original depth by default.
Section 9: Configure the Export ePub ePub is a free and open e-book standard by the International Digital Publishing Forum (IDPF). EPUB is designed for reflowable content, meaning that the presentation of the content automatically adapts itself to the device on which it is opened. EPUB also supports fixed-layout content. Note that Readiris only creates body text in ePub files. Images are not included. Text Options The option Merge lines into paragraphs is selected by default.
Readiris 16 - User Guide The option Ignore all text outside the tables saves the tables and ignores all other recognition results. All data inside the tables is recaptured; any data outside the tables is not. Example image The option Convert figures into numbers encodes recognized figures as numbers. As a result, you can execute arithmetical operations on those cells. The text cells (in any table) remain text. Note that only figures inside tables are encoded as numbers.
Text to Speech Options Click the Voice list and select which voice should read out the text. Voices marked with (*) must be downloaded before use. Move the Speaking rate slider to adjust the speed. Tip: to have the output read out to you directly, click the Destination tab, select Open in application and select a supported application. Image Although Readiris is a text recognition application, it can also save documents as image files.
Select the Destination The documents you process with Readiris can be send to different destinations. You can save them locally as files, open them in supported applications and send them to the online Storage Systems Evernote, Dropbox, Google Drive, Microsoft OneDrive and Box. Readiris Corporate also exports documents to Microsoft SharePoint. To access the Destination Options: Click and hold one of the Export buttons for a few seconds until the Options menu appears.
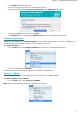
Configure an online Storage System Important: before you can configure an online Storage System in Readiris your first need to have a valid account for that Storage System. Configuring an online Storage System can either be done via Export Options > Destination tab > Store online > Accounts. Or via the Readiris menu > Preferences > Accounts. To configure an account: Click the plus sign at the bottom of the window. Select an account from the Account type list.
Readiris 16 - User Guide Google Drive, Dropbox, OneDrive, Evernote and Box Enter your Email and Password, then click Sign in. Select the option that allows Readiris to access your account. Select the folder to which you want to export documents, and then click Finish. Note that you can add multiple accounts of each type. Once an account has been configured, the option Ask upload name and location is selected by default.
Section 10: Processing Batches of Documents Batch Processing (This section applies to Readiris Corporate only) When you are processing entire batches of image files you can use Readiris' Batch Processing folder. Batch Processing executes the recognition on all scanned images in a specific folder. Indicate to Readiris in which folder your documents are located, start the processing and all your documents will be converted to the required output format.
Readiris 16 - User Guide Watched Folder (This section applies to Readiris Corporate only) If you need to scan entire batches of documents, on a scanner equipped with a document feeder, for instance, you can use Readiris' Watched Folder feature. This way, you can scan all your documents to a specific folder that is being monitored by Readiris. Whenever Readiris spots a new document inside the Watched Folder, it processes it and sends it to an output folder.
Section 10: Processing Batches of Documents The monitoring continues even if you quit Readiris. To add documents to the Watched Folder while it is being monitored by Readiris: Scan documents to the Watched Folder, or Move existing image files to the Watched Folder.
How to How to configure your scanner in Readiris Readiris supports all Twain 1.9 compliant scanners, all Image Capture compliant scanners, and IRIScan 3 and higher scanners. Most Image Capture scanners are plug and play. Before you can use a Twain scanner, however, its drivers need to be installed on your Mac. Twain scanners Connect your scanner to your Mac and power it on. Install your scanner's Twain driver.
How to recognize barcodes Readiris supports most widespread 2D barcodes, both laser printed and inkjet printed. In Readiris Corporate, barcodes can also be used to separate documents in a batch. Note that in this case the content of the barcodes is not converted into text, the barcodes are only used to do the separation. Recognizing barcodes manually Scan or Open your document. Click the Layout icon in the Image and Layout Editing toolbar.
How to obtain good recognition results When an image has been analyzed in Readiris and its recognition accuracy is not sufficient, a warning sign is displayed both in the Page thumbnail and below the top toolbar. There might be various causes for unsatisfactory recognition results, since the recognition depends on a number of factors. In this topic we list the factors that influence the recognition. The document language Make sure you select the right language in the Language list.
How to save the contents of a particular zone Besides saving entire documents, you can also save the contents of particular zones: Ctrl-click the zone you want to recognize. Then click Copy as ... The results are copied to the clipboard. You can now paste them into other applications. Note that you can also send content directly to Evernote, if the connection is configured correctly.
Readiris 16 - User Guide separate documents. You can also add a variable part to the data, for instance the scanning date. This variable part will indicate the specific indexing data of each individual document. In case you want Readiris to generate an XML index file containing detailed information on the processed documents, select the option Generate an XML index. An XML index file will be created per document.
How to Note: in Thumbnail view ( overview. ), each new document is put on a different line, to facilitate the Both in the Pages panel and in Thumbnail view you can drag pages to different locations, and add new pages by drag-and-dropping them into Readiris. Note however that you cannot move a page or insert a new page before the first page of Document 2 and following. It is possible on the other hand to move a page or insert a new pages before the first page of Document 1.
How to recognize forms Note that Readiris is not designed to recognize complex forms. Readiris recognizes documents by converting pictures of text characters and numbers into actual text and numbers. Forms, on the other hand, contain many graphic elements such as lines, boxes, check boxes and the like, which complicate Readiris' tasks.
How to process low-resolution images A resolution of 300 to 400 dpi is required to obtain optimal results in Readiris. When you try to scan or open images of a resolution lower than 200 dpi or higher than 600 dpi, Readiris will display a warning. When you are faced with these kind of images, the best thing you can do is re-can the images in an appropriate resolution.