Table of Contents Copyrights .................................................................................................................. 1 Chapter 1 Introducing the IRISPen............................................................... 3 What is the IRISPen? ............................................................................................3 How does it work? ................................................................................................7 The steps to follow...............
IRISPen Express 6 - User's guide Reading options ..................................................................................................31 Scan type .................................................................................................................. 31 Language .................................................................................................................. 32 Other.....................................................................................................
Copyrights Copyrights ©1993-2007 I.R.I.S. All Rights Reserved. The IRISPen Mini, the IRISPen Express, the IRISPen Executive, the IRISPen Translator software were designed and developed by I.R.I.S. OCR ("Optical Character Recognition") and Linguistic technology by I.R.I.S. I.R.I.S.
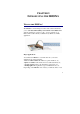
CHAPTER 1 INTRODUCING THE IRISPEN WHAT IS THE IRISPEN? The IRISPen is a hand-held pen scanner and software that allows you to scan data and instantly convert it into real editable text with the OCR (Optical Character Recognition) technology of I.R.I.S. The result is directly available in any Windows or Mac application. Major applications You will use the IRISPen to scan and enter into your active application any of the following: - notes and short entries like addresses, phone numbers, etc.
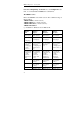
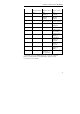
IRISPen Express 6 - User's guide barcodes, handprinting, dot matrix text, scan multiple lines at a time, or even read out or translate the scanned lines. The IRISPen series Here is the IRISPen series. Each version offers a different range of functionalities. - IRISPen Mini (+ Asian version) - IRISPen Express (+ Asian version)* - IRISPen Executive (+ Asian version)* - IRISPen Translator (*) Available for Windows and for Mac OS X.
CHAPTER 1- INTRODUCING THE IRISPEN Replace vertical lines Replace vertical lines Replace vertical lines Delimiters Delimiters Multiline scanning Multiline scanning Speech synthesis Speech synthesis Image adjustment Replace character string Customizable character subset Reading of handprinting Reading of dotmatrix Reading of barcodes Reading of CMC7 Translation of recognized data (*) The Asian version of the IRISPen allows you to recognize 4 additional languages: Traditional Chinese, Simplified Chi
IRISPen Express 6 - User's guide The pen scanner The IRISPen is a pen scanner that has the size and shape of a highlighter. It connects to your computer's USB port and does not require any external power supply. The IRISPen is equipped with a scanning head and a line guide, a roller, and two programmable buttons. The line guide is used to properly position the pen on the line to be captured. The roller enables to easily roll the pen onto the paper and acts as a start switch.
CHAPTER 1- INTRODUCING THE IRISPEN HOW DOES IT WORK? The IRISPen functions as a camera that sends an image to the computer. The image is recognized by the recognition routines. The "read" data is inserted in the target application. To scan the data with the IRISPen, you must simply slide the pen scanner over the line of text or area. Operate as follows: • Hold the IRISPen like a pencil and place it a few millimeters before the first characters or data to be recognized.
IRISPen Express 6 - User's guide • Press the pen onto the paper and roll it over the text line at a steady rate. Once pressed, the start switch is activated and the data is illuminated by a green light. Warning: Make sure you hold the pen at the correct angle, otherwise the data may not be scanned properly. Correct position Incorrect positions • Once you have reached the end of the line, lift the IRISPen. Make sure you lift it after the last character of the line.
CHAPTER 1- INTRODUCING THE IRISPEN improve your scanning skills. Tip: Train yourself with the testsheets We recommend you use the testsheets provided with your IRISPen to experiment and get acquainted with the pen scanner. The testsheets are available as printed matter as well as in PDF format for possible reprint (the testsheet.pdf file is automatically installed in the installation folder). THE STEPS TO FOLLOW... Here are the main guidelines to follow for using your IRISPen.
IRISPen Express 6 - User's guide 3. Take the original document and scan the data to be picked up Get back to the document, magazine, etc. containing the data to be transferred and scan the data with the pen scanner: simply slide your pen over the text lines, images, etc. Scrupulously follow the instructions given under: Introducing the IRISPen, How does it work?. After each scan, the data instantly appears in the target application.
CHAPTER 2 INSTALLATION SYSTEM REQUIREMENTS Here is the minimal system configuration required to use the IRISPen: • A Pentium-based Intel PC or compatible. A Pentium III-based PC is recommended. • 64 MB RAM. • 100 MB of free hard disk space. • The Windows Vista, XP or 2000 operating system. • A free USB port to connect the IRISPen scanner. INSTALLING THE IRISPEN SOFTWARE The IRISPen package contains the pen scanner itself and a selfrunning CD-ROM containing the IRISPen software.
IRISPen Express 6 - User's guide To install the software: • First start your computer and log onto Windows. Caution: You must log on as administrator or make sure you have the necessary administration rights to install the software. • Insert the CD-ROM in your CD-ROM drive. Users of Windows Vista: Click on Run menu.exe to install the program, then follow the on-screen instructions. Users of Windows XP and Windows 2000: Simply wait for the installation program to start running.
CHAPTER 2 - INSTALLATION Caution: Users of Windows XP must ignore the following message and click on Continue Anyway to continue the installation procedure: • Users of Windows Vista must confirm the installation of the device software by clicking on Install. • When the installation is complete, click on Finish, then remove the CD-ROM from the CD-ROM drive. The submenu I.R.I.S. Applications - IRISPen under the Windows Programs menu is created automatically by the installation program.
IRISPen Express 6 - User's guide INSTALLING THE PEN SCANNER Once the IRISPen software installation is complete, you can install the pen scanner. To install the pen scanner: • Plug the pen scanner USB cable into a free USB port of your computer. A message confirms that the device has been installed. Caution: Users of Windows XP, Service Pack 2: the wizard offers to search for more recent drivers on the Internet. Select "No, not this time".
CHAPTER 2 - INSTALLATION • Select Install the software automatically (recommended). Caution: Users of Windows XP must ignore the following message and click on Continue Anyway to continue the installation procedure: • When the installation is complete, click on Finish. Tip: Once the pen scanner has been installed (see above), it can be disconnected then reconnected without having to reconfigure or reboot the PC.
IRISPen Express 6 - User's guide • From the Windows Start menu, select Control Panel and click Add/Remove/Uninstall programs. • Select the IRISPen from the list and click the Uninstall/Change/Remove button to remove the software. • Follow the on-screen instructions. HOW TO GET PRODUCT SUPPORT? If you have registered your product, you are entitled to free product support. Contact I.R.I.S.: Europe - Hotline: 32-10-45 13 64 (working hours) - Fax: 32-10-45 34 43 - support@irislink.
CHAPTER 2 - INSTALLATION - be entitled to free product support - be entitled to special offers on I.R.I.S. products How to register? Registration wizard You can use the Registration Wizard available from the Register menu (main toolbar). Simply follow the on-screen instructions. Registration form You may also directly access the registration form on the I.R.I.S. Web site: http://www.irislink.com/register.
CHAPTER 3 STARTING UP RUNNING THE IRISPEN To start the IRISPen: • From the Windows Start menu, select All Programs, I.R.I.S. Applications, then IRISPen, or click the application shortcut on your desktop. The IRISPen startup screen appears for a few seconds. It displays the version and copyrights of the IRISPen software. Next, the IRISPen Application window and two additional windows are displayed: the Image Quality Check window and the Status window.
IRISPen Express 6 - User's guide automatically appears on top of the others, prompting the user to calibrate the pen scanner. • If you are running the software for the first time, calibrate the pen scanner. See: Starting up, Calibrating the pen scanner. USER INTERFACE The user interface is composed of 3 windows: the Application window, the Image Quality Check window, and the Status window. The IRISPen icon appears in the Windows task bar and confirms that the application is running.
CHAPTER 3 - STARTING UP The Application window The Application window is the IRISPen's main window. It contains a menu bar that gives access to all software commands, a toolbar for quick access to all frequent commands, and the a window pane containing the basic settings. The window can be minimized with a click on the Minimize button or on the OK button. To reopen it, simply double-click or rightclick on the Status window, or use the IRISPen icon on the Windows task bar (see below).
IRISPen Express 6 - User's guide The Image Quality Check window appears by default as a semitransparent window, below the Application window. When scanning, it displays the "raw" grayscale image of the scanned area. Its purpose is to enable the user to view and check the quality of his scans. You can easily drag the window to another position on your screen. The chosen position will be maintained if you save your settings. You can remove the transparency of the window with a right-click of the mouse.
CHAPTER 3 - STARTING UP CALIBRATING THE PEN SCANNER Before you start using the IRISPen, you must calibrate the pen scanner. If you don't calibrate the scanner, the image quality will be low and the recognition results may be mediocre. You are automatically prompted to calibrate the pen scanner when running the software for the first time. All you need to do is push your pen on a white piece of paper for a few seconds. The software indicates when the calibration is complete.
IRISPen Express 6 - User's guide To re-execute the calibration: • Select Calibrate from the Options menu in the Application window or, from the Scan Test window, press the Calibrate button, then push again your pen on a white piece of paper for a few seconds. The software indicates when the calibration is complete. CHANGING THE USER INTERFACE LANGUAGE The user interface of the IRISPen is available in a wide range of languages. The language can be easily changed according to your needs.
CHAPTER 3 - STARTING UP THE SCAN TEST WINDOW The Scan Test window displays the black-and-white version of the image you generate with the pen scanner. The recognized data appears just below the scanned image. Thanks to the Scan Test window, you can test your first scans and check the results before you start with definitive scanning. You can save your images, load and recognize previously scanned images, access the calibration dialog box, etc.
IRISPen Express 6 - User's guide Bad quality images As you will notice, the IRISPen is able to recognize data on bad quality images, e.g. on low-contrast documents where the background nearly has the same color as the text, on highly distorted images with wavy, skewed or even contracted lines (see above figure). However, if the recognition result is not satisfactory, you should use the Scan Test window to make a few more tests.
CHAPTER 3 - STARTING UP Recognize The Recognize option is activated by default. All images you scan or open are thus automatically recognized. Note that in the text zone, you can get directly to the end or the beginning of the recognized text: place your cursor in the text zone, then press the End or Home key from your keyboard. The Recognize option is not useful when scanning graphics.
IRISPen Express 6 - User's guide (modified) templates can be further assigned to a preset button directly accessible from the Application window (or, alternatively, set to function as current settings). When it comes to actually capture a certain type of data, all you need to do is press the right preset button, then start the scanning! By default, the preset buttons are already assigned to the reading of English Text, Text from columns, Text tables.
CHAPTER 3 - STARTING UP Alternatively, select an already existing preset from the Presets tab. It will serve as basis for your custom preset. Select either the current settings or one of the existing presets. Click Next to get to the next step. • Step 2 If needed, change any of the basic settings: Reading options, Target. Click Next to get to the next step. • Step 3 If needed, change any of the settings related to the recognition process in the various tabs proposed. Click Next to get to the next step.
CHAPTER 4 BASIC SETTINGS READING OPTIONS Scan type The Scan type determines the nature of the data to be scanned and read with your pen. Select the appropriate Scan type in the dropdown list. Text (default value): To read machine-printed text in a certain language. This includes alphanumeric characters, punctuation marks, numeric data, etc. The set of characters used by the software to read such data directly depends on the language chosen for the reading.
IRISPen Express 6 - User's guide Also refer to: Learn how to... Read numeric data. Black-and-white image to clipboard: To scan small black-and-white graphics such as signatures, mathematical formulae, etc. The image will be sent to the clipboard before it can be pasted into the active application. Grayscale image to clipboard: To scan grayscale or color graphics and send them to your clipboard before they can be pasted in a chosen application.
CHAPTER 4 - BASIC SETTINGS Asian languages (optional) When choosing an Asian language, also indicate the text flow which is vertical rather than horizontal. See: Learn how to... Scan vertical text. ! Warning: If you use the XP operating system, check that the appropriate Regional and Language Options have been set to read Asian languages. From the Windows Start menu, select Control Panel, then Date, Time, Language, and Regional Options, then Regional and Language Options, Languages tab).
IRISPen Express 6 - User's guide TARGET You may choose the way the read data is being inserted in the target application: either via the clipboard, or directly in the application, without having to operate manually (see below).
CHAPTER 4 - BASIC SETTINGS You should not normally use this option. However, if you notice that the characters inserted in the target application do not correspond to the ones actually recognized by the software (see: Starting up, The Scan Test window), enable it.
CHAPTER 5 FREQUENT COMMANDS PEN BUTTONS Your pen scanner is equipped with two buttons. The simple click of each pen button can be programmed so as to execute an operation in the target application. By simply pressing the pen buttons, you will thus be able to execute keyboard commands, add characters, etc. without having to touch your keyboard.
IRISPen Express 6 - User's guide • Modify the default programming by selecting the required radio buttons on the left- and on the right-hand side. The left radio buttons refer to the left button, the right radio buttons refer to the right button. Possible operations Null: This corresponds to a "null" operation. In other words, a single click will not trigger off any action. This option is usually used to deactivate a programmed operation.
CHAPTER 5 - FREQUENT COMMANDS If the Sound option is enabled, you will also hear a beep sound whenever an error occurs or if you try to operate wrongly with the IRISPen. To activate the beep sound: • Click the Sound button on the toolbar or select Sound from the Options menu. The beep is activated. You can hear it during scanning.
CHAPTER 6 LEARN HOW TO... CUSTOMIZE/SAVE/REOPEN SETTINGS Customize the default settings When you launch the IRISPen, options are selected by default. Some default presets are also available from the IRISPen Wizard (see: Starting up, The IRISPen Wizard). These selected options form the "default settings", also referred to as the "factory settings". You will of course change these default settings to make the IRISPen perfectly fit your particular needs. The changed settings become your own settings.
IRISPen Express 6 - User's guide Save Settings You can save your settings in a file with the Save Settings option from the File menu. You will be able to reopen those settings whenever needed. With the Save Settings option, you can save as many sets of settings as you wish. All you need to do is give them a name and save them with the *.IPC extension. Open Settings At any moment in time, you can reopen any saved settings.
CHAPTER 6 - LEARN HOW TO... READ SMALL PRINT The IRISPen scanning band is 0.41" (10.5mm.) high. It can thus read characters having point sizes of 8 to 20. If you have to read data printed in a font size smaller than 10 point, you must activate the Small print option. This will help you get optimized results with the IRISPen. To read small text: • Select the option Small print in the Application window. See: Basic settings, Reading options, Other.
IRISPen Express 6 - User's guide Warning: Do not use the Small print option to read text above 10 points. This would decrease the recognition accuracy and would slow down the operation substantially. READ NUMERIC DATA The IRISPen is able to read all machine-printed figures. The recognition includes special characters, mathematical symbols, punctuation marks, currencies, etc. You can thus read all types of data such as: digits, codes, amounts, dates, account numbers, numeric tables, etc.
CHAPTER 6 - LEARN HOW TO... SCAN FROM RIGHT TO LEFT By default, the pen scanner is set to operate from left to right, but you can adapt the scanning direction and scan from right to left. You will follow this scanning direction if you are left-handed. You will also operate this way if you intend to read right-to-left text like e.g. in Hebrew. To operate with the pen if you are left-handed: • In the Application window, select the option Left-handed Scanning under the Options menu.
IRISPen Express 6 - User's guide SCAN VERTICAL TEXT (OPTIONAL) If you intend to read some Asian vertical text, you must tell the software that the text flow is vertical rather than horizontal. The new text flow will be indicated in the Status window. To scan vertical text: • In the Application window, select the required Asian language in the Language field, then select Scan Vertical Text from the Options menu.
CHAPTER 6 - LEARN HOW TO... DEFINE THE SYMBOL FOR UNKNOWN CHARACTERS If characters are not properly recognized by the IRISPen, they are by default represented by a tilde, i.e. a "~" symbol, in the recognition result. If you wish to, you can choose another symbol. To define a custom symbol for unknown characters: • In the Application window, select the option Unknown Symbol from the Settings menu. • Replace the symbol in the required field, then click OK to confirm.
IRISPen Express 6 - User's guide REPLACE VERTICAL LINES The IRISPen is able to detect and replace vertical lines separating data as e.g. table columns. By default, the software replaces vertical lines by the command. This means that each time it encounters a vertical line during scanning, it executes a tabulation in your target application. If your target application is a spreadsheet, the moves your cursor to the next cell and the various bits of data are inserted in separate cells.
CHAPTER 6 - LEARN HOW TO... Select Custom to introduce your own set of conversion, then click OK to confirm. You can execute any keyboard command, add characters, or execute any combination of all. Tip: If your table does not contain vertical bars, the easiest procedure is to quickly add them on the original document with a pen and a ruler.
IRISPen Express 6 - User's guide Basic settings, Reading options, Scan type) This will make your work quicker and easier. To program hotkeys for the proposed commands: • In the Application window, select Hotkeys from the Settings menu on the toolbar. • Define a hotkey for one or several available commands. Operate as follows: - tick either the ALT or CTRL key - introduce the clipboard key to be used in the key box E.g.: ALT+X to restore the application.
INDEX A D active application ........................34 data type ..................................... 31 application window.....................21 deinstallation .............................. 15 asian languages ...........................46 dot matrix ................................... 33 B barcodes................................31, 33 beep sound ..................................38 black-and-white image................25 C F factory settings ........................... 41 G grayscale image ..
IRISPen Express 6 - User's guide invisible color ...............................7 rejected characters ...................... 47 IRISPen ........................................3 replacing vertical lines................ 48 IRISPen Wizard ..........................27 restore settings............................ 41 L language......................................32 left-handed users.........................45 N numeric .................................31, 44 P restore to factory settings............
INDEX T use the IRISPen ........................ 7, 9 tables...........................................48 user interface .............................. 20 target...........................................34 user interface language ............... 24 target application ..........................9 V technical support.........................16 vertical lines ............................... 48 templates.....................................27 vertical text................................. 46 text .
54