IRISPen Air 7 Quick User Guide (Windows & Mac OS X)
This Quick User Guide helps you get started with the IRISPen Air 7. Please read this guide before operating this scanner and its software. All information is subject to change without prior notice. TM Table of Contents 1. Introduction 2. Installation 3. Getting Started with the IRISPen TM 4. Scanning 5. Activation 6. Configuration 7. Troubleshooting 8. Specifications 9. Compliance 1.
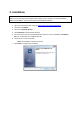
2. Installation Important: Make sure you have the required administration rights on your computer to do the installation. Make sure the IRISPen is disconnected before you install the software. TM The IRISPen application must be downloaded from the I.R.I.S. website. TM 1. Open your Internet browser and go to www.irislink.com/softwaredownload. 2. Scroll down to IRISPen . TM 3. Select your Operating System. 4. Click Download to download the software. 5.
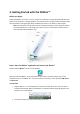
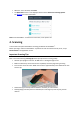
3. Getting Started with the IRISPenTM Before you begin: Charge the IRISPen for 5 hours. To do so, plug it into a computer using the provided USB cable and power on the computer, or plug the IRISPen into a power outlet. The green battery led blinks slowly when the battery is being charged. When the battery led stays on, the battery is fully charged. TM TM Note: the battery life in usage is about 4 hours. When the battery is almost dead, the battery led starts blinking fast. The recharge time is about 2.
When you connect the IRISPen for the first time, the IRISPen Tour is started automatically TM TM Via Bluetooth On Windows PC: insert the provided dongle into a free USB (2.0) port. On Mac OS the dongle is not compatible. Note that the IRISPen Air 7 supports Bluetooth 4.0 and higher. It is not compatible with older versions of Bluetooth. Press the scanning tip for 3 seconds to power on the pen. The blue Bluetooth led blinks slowly while the pen is being paired to your computer.
When the Tour is finished, click Done. The Quick Start screen is now displayed and shows the three main scanning options. See Scanning for more information. Note: when the IRISPen is inactive for 12 minutes, it auto powers off. TM 4. Scanning In this section we explain the different scanning possibilities of the IRISPen . TM Before you begin, make sure the IRISPen is powered on and connected correctly. If not, it says Disconnected in the application screen.
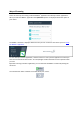
Ways of Scanning There are two ways of scanning: inside the IRISPen application and directly to other applications. TM When you start the IRISPen application the Quick Start options are displayed. Select the option of your choice. TM The IRISPen interface is displayed. Notice that the pen icon is selected. This means you scan inside the IRISPen application. TM TM To scan directly to another application, click the sheet icon. Then open the application to which you want to scan and mouse click inside it.
Scan Settings A number of scan settings are available. Click the Settings icon to access them . Scan Type Select the Scan Type. IRISPen is able to scan the following types: TM Text When scanning Text to an application, IRISPen by default adds a space after each scan and adds new scans on the same line in your application until the line is full. To start a scan on a new line, click and slide the IRISPen over a line of text. At the end of the line, click again with the IRISPen .
Language Select the Language of the documents you will be scanning. IRISPen Air 7 recognizes 130* languages. TM IRISPen also supports vertical text in Simplified and Traditional Chinese, Japanese and Korean. The vertically written languages are marked with a "V". TM With IRISPen you can also scan the so-called MICR lines you find at the bottom of cheques. To do so, select CMC7 from the language list.
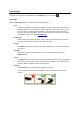
4.1 Scanning inside the IRISPenTM Application In this section we provide more information on how to scan inside the IRISPen application. TM Before you begin, make sure the IRISPen is powered on and connected correctly. If not, it says Disconnected in the application screen. TM Click the pen icon. Click and slide the IRISPen over a line of text. The recognized text is entered in the text field. Repeat the previous step to scan additional lines. Note that one line of text equals one scan.
5. Activation The IRISPen application must be activated in order to use it. Unactivated copies can only be used for 30 days. TM Online Activation 1. Click the Settings icon . 2. Click Settings. 3. Click the Activation tab. 4. Enter the Activation code. The Activation Code can be found in the product box or was sent to you by email. The code consists of 18 digits. 5. Enter your personal data and click Activate. Note that an internet connection is required to do the activation. 6.
Scanner Click Change if you want to connect another pen scanner. Software tab Interface IRISPen is available in 20 interface languages. Select the required language from the list. Widget Side: the application is by default displayed on the Left side of your computer screen. It can also be displayed on the Right side. To start IRISPen automatically when you start your computer, keep the option Start IRISPen Air 7 on startup selected.
Tip: for a list of compatible devices, click the links to go to the IRISPen Air 7 section of the I.R.I.S. Technical Support website and scroll down to Compatibility. TM 8. Specifications Product Specifications Scanner sensor CMOS Scanner Size ( H x L x D) 3,5 x 15 x 2,5 cm ( 1.37 x 5.51 x 0.98) Scanner weight 28gr Max scanning size 8 mm Grey Depth 1 bit DPI resolution 300 Scanning speed 3 sec USB 2.0 Bluetooth Specifications Standard Frequency Range Bluetooth Low Energy Core 4.
Battery Specifications Type Single cell lithium-polymer (LiPo) Model GSP051050 Rated capacity 200mAh Rated voltage 3.7 V Maximum voltage 4.2 V Max discharge current 200 mA Dimensions of battery (H x L x D) 5,0 x 10 x 50 mm Weight 6 g max All software and drivers are available for download at www.irislink.com/softwaredownload. 9.