
Quick Start Guide


English English
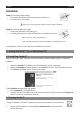
Scanningcards:
Step 1:Pressthepowerbuon
• Thegreenlightblinksafewsecondsthenremainson.
• Thescannerisnowready.
Refrainfromscanningphotoswhilethegreenlightisblinking!
Step 2:Scanyourbusinesscards
• Insertyourbusinesscardsfacingup.
• Usethepaperguidetoalignthebusinesscardwiththescanner.
Whenscanning,thegreenlightblinks.
Waitunlthegreenlightstopsblinkingbeforeinsernganewcard.
YourbusinesscardsarenowreadytobeloadedintoCardiris™.
2. Using Cardiris™ on a Windows PC
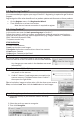
2.1 Installing Cardiris™
Beforeyoubegin,makesureyouhavethenecessaryadministraonrightstoinstallthe
soware.
• InserttheCardiris™CD-ROMintheCD-ROMdriveofyourcomputer.
• WhentheAutoRunwindowappears,clickCardiris™tostarttheInstallaonWizard.
• ClickNextandfollowtheon-screeninstrucons.
If the AutoRunwindowdoesnotappear:
• GotoComputer>CD-ROMDrive.
• Double-clicktheCD-ROMDrive,andthentheCardiris™folder.Double-clickSetup.exe
withintostarttheInstallaonWizard.
2.2 Starng Cardiris™
Duringinstallaon,aCardiris™programshortcutwascreatedonyourDesktop.
• Right-clicktheshortcutandclickRun as administratortostartCardiris™
fortherstme.