Quick User Guide – IRIScanTM Mouse Wifi IRIScanTM Mouse Wifi
Quick User Guide – IRIScanTM Mouse Wifi This Quick User Guide helps you get started with IRIScan Mouse Wifi. TM The descriptions in this documentation are based on the Windows® 7 and Mac® OS X Mavericks Operating Systems. Please read this guide before operating this scanner and its software. All information is subject to change without prior notice. Should you experience issues when using the IRIScan Mouse Wifi, consult the Frequently Asked questions or contact Technical Support at www.irislink.
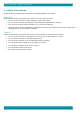
Quick User Guide – IRIScanTM Mouse Wifi 3. Safety Precautions Please heed the following safety precautions regarding IRIScan Mouse Wifi: TM Warnings Failure to heed these instructions may result in serious injuries or death. Do not use the scanner in direct sunlight or near a hot object. Do not use the scanner near liquids or when liquids are spilled on the scanner. Do not point the scan surface towards your eyes during scanning.
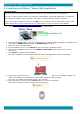
Quick User Guide – IRIScanTM Mouse Wifi 4. Hardware Overview 1. Left-click button 2. Mouse wheel / Click button 3. Right-click button 4. Battery and Wifi indicator led 5. Scan button 6. On/Off button 7. Scan surface Remove plastic before first use. 8. Mouse label 9. Micro USB port 10. Scan sensors Before you get started: Charge the IRIScan Mouse Wifi for 30 minutes.
Quick User Guide – IRIScanTM Mouse Wifi 5. Installing the IRIScanTM Mouse Wifi application Important Notes: Make sure you have the required administration rights on your computer to do the installation. Make sure to install Cardiris before you install the actual IRIScan Mouse Wifi application, as explained below. Otherwise IRIScan Mouse Wifi will not be able to send scanned documents to Cardiris . TM TM TM TM Before you start the installation, switch on the Wifi on your computer.
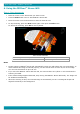
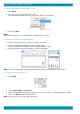
Quick User Guide – IRIScanTM Mouse Wifi 6. Using the IRIScanTM Mouse Wifi Step 1: Scan documents Place the mouse on the documents you want to scan. Press the Scan button once to start IRIScan Mouse Wifi. Move the mouse over the documents to scan the desired area. To stop scanning, press the Scan button again. This opens the Edit screen. To cancel the scanning, press Esc on the keyboard. TM 1. Remaining scan memory Scan screen functions 2. Function description 3.
Quick User Guide – IRIScanTM Mouse Wifi Step 2: Edit the scanned documents In the Edit screen you can edit the scanned documents. 1. Rotate the scan result Edit screen functions 3. Adjust the colors, brightness and contrast 2. Resize the scan area using the handles 4. Adjust the background When you are done, click OK to accept the settings. To return to the Edit screen afterwards, click Edit in the main screen. Note: when you click Cancel the scan result will not be saved to memory.
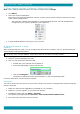
Quick User Guide – IRIScanTM Mouse Wifi 2. Save documents as output files. 1. Click Save. 2. Enter the file name and select a file type. The supported file types are: png, jpeg, bmp, pdf, xls, txt and doc. 3. Then click Save. Notes: When scanning tables, it is recommended to save them as .xls files. 3. Drag-and-drop to applications. 1. Choose in which format you want to save the document. 2. Open an application that supports the selected format. E.g.
Quick User Guide – IRIScanTM Mouse Wifi 5. Share images via Mail, Facebook, Twitter and Flickr Note: when using the Share functions, the scans are always sent as images. 1. Click Share. 2. Select the required application. Note that you need a valid Facebook, Twitter or Flickr account and an internet connection to share scans via these applications. Also note that a default mail application, such as Microsoft Outlook, must be installed and configured on your system. Web mail is not supported. 3.
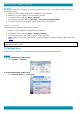
Quick User Guide – IRIScanTM Mouse Wifi Dropbox Your scans can be sent to Dropbox. They are saved both as text files (.doc) and as image files (.jpg) to your Dropbox folder. 1. Make sure the Dropbox application is installed on your computer. 2. Make sure you are logged in to your Dropbox account. 3. In IRIScan Mouse Wifi click Apps > Dropbox. The following message appears: Dropbox - Files synchronized Dropbox. TM 4. The scans are sent to the Scanner Mouse folder within your Dropbox.
Quick User Guide – IRIScanTM Mouse Wifi General Select the required user interface language. The interface is available in 22 languages. The default language is English. Select the required scan resolution: Low = 100 dpi. Medium = 200 dpi. High = 300 dpi. Full = 400 dpi. Important: to obtain satisfactory text recognition results, choose High. When scanning Arabic or Asian languages, select Full. Determine the Window behavior of IRIScan Mouse Wifi. TM Save Determine the file name prefix.
Quick User Guide – IRIScanTM Mouse Wifi Cardiris No settings to be managed. Dropbox: Click Settings and define in which folder the output files must be stored. Evernote No settings to be managed. Google Translate Click Settings, and define the Input and Output language. Facebook, Flickr, Twitter Click Settings, and select Keep me logged in. This way you don't have to log in each time you want to share an image. Mail No settings to be managed.
Quick User Guide – IRIScanTM Mouse Wifi 8. Scanner Specifications Product Specifications Mouse sensor Scanner size (H x L x D) Scanner weight Max. scanning size DPI resolution Scanner window size (H x L) USB type Optical Mouse sensor (1500 DPI) 3,8 x 11,5 x 6 cm (1.18 x 4.3 x 2.36 in) 200g (0.44 lbs) Up to A3 (depending on graphical card configuration) Up to 400 DPI 4.3 x 2 cm 2.0 Wireless Specifications Standard WiFi: IEEE 802.
Quick User Guide – IRIScanTM Mouse Wifi 9. Compliance RoHS and WEEE Compliance This product is compliant with RoHS Regulations of the European Parliament and Council Directive on the Restrictions of the Use of Certain Hazardous Substances in Electrical and Electronic Equipment (2002/95/EC), and with the Waste Electrical and Electronic Equipment (WEEE) Directive (2002/96/EC).