
Product Manual


36
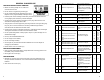
11 1 ECU internal error Check for damaged or corroded
connectors.
Check for damaged wiring
After repairs or if no issues found,
then clear faults.
If faults return, replace the TABS-6
Module.
254 12
11 2 ECU confi guration error Verify correct ABS confi guration
using blink codes, PC-diagnostics or
other off-board diagnostic tools.
If needed, reset to the default ABS
confi guration and power-up to
initiate auto-confi guration.
254 13
12 1 J1587 Check for corroded/damaged wiring
or connectors between the ECU and
J1587 Diagnostic.
Verify the following:
-At the 18-pin ECU harness connector:
(a) Continuity of the J1587 Diagnostic
wiring to the lamp (auxiliary device).
(b) +12V is not measured at J1587
Diagnostic lead.
-At J1587 Diagnostic connector:
(a) No continuity of the J1587
Diagnostic lead to ground.
(b) No continuity from J1587
Diagnostic lead to any other ECU
pin(s).
(c) Replace/repair J1587 Diagnostic
wiring or components as required.
250 3,4,5
or 12
13 1 ABS lamp shorted or open Check for corroded/damaged wiring
or connectors between the ECU and
ABS Indicator Lamp.
Verify the following:
-At the 5-pin or 18-pin ECU harness
connector:
(a) Continuity of the ABS Indicator
Lamp wiring to the lamp auxiliary
device).
(b) +12V is not measured at ABS
Indicator Lamp lead to any other
ECU pin(s).
-At ABS Indicator Lamp connector:
(a) No continuity of the ABS Indicator
Lamp lead to ground
(b) No continuity from ABS Indicator
Lamp lead to any other ECU pin(s).
(c) Replace/repair ABS Indicator
Lamp wiring or components as
required.
81 3,4,5
or 12
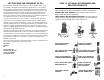
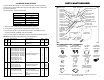
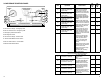
ELECTRONIC CONTROL UNIT (ECU)
J1587 DIAGNOSTIC
TRAILER-MOUNTED ABS INDICATOR LAMP
5
BATTERY GASES, TESTER PREPARATION
AND TESTER/CHARGER LOCATION
RISK OF EXPLOSION
• Gases produced by a battery are highly explosive.
• Wear safety goggles and protective clothing, both
users and bystanders.
• Use in an area having at least four air changes per hour.
• Read, understand and follow all instructions for charger, battery, vehicle and any
equipment used near battery and charger.
• Do not smoke, strike a match, place metal tools on battery or cause a spark in
the vicinity of the battery. When removing battery cables, remove the ground
cable fi rst.
• Clean terminals before charging battery. During cleaning, keep corrosive particles
from eyes, nose and mouth. Use baking soda and water to neutralize acid and
help eliminate airborne corrosion.
• Never allow clamps on charger cables to touch each other.
• Do not expose tester or charger to rain, snow, or wet conditions.
• Do not allow battery gases or acid to contact MUTT
®
cabinet. Do not place
charger directly above or below battery.
• Fill battery to level specifi ed by battery manufacturer using distilled water.
• Do not remove cell caps while charging per manufacturer’s instructions.
• Make sure tester cable clamps make tight connections.
• Battery explosion can cause injury.