
Installation Instructions
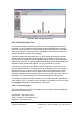
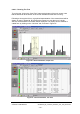
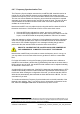
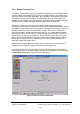
Table Of Contents
- nanoBTS Installation and Test Manual
- 1 Introduction
- 2 Overview
- 3 Customer safety and regulatory information (CENG0133)
- 4 BTS Hardware Installation (CENG0210)
- 5 PSU Installation Guide (CENG0033)
- 6 BTS Installer User Guide (CENG0048)
- Introduction
- 6.2 Capabilities
- 6.3 Concepts
- 6.4 Getting Started
- 6.5 User Interface Reference
- 6.6 The DHCP Server
- 6.7 BTS Attribute Reference
- 6.7.1 The BTS Configuration Dialog box
- 6.7.2 Current Values Display
- 6.7.3 Identifying a nanoBTS
- 6.7.4 How Defaults Work
- 6.7.5 Enabling Configuration Phases
- 6.7.6 The BTS tab
- 6.7.7 The DHCP tab
- 6.7.8 The Unit ID tab
- 6.7.9 The NV Attr (1) tab
- 6.7.10 The NV Attr (2) tab
- 6.7.11 The NV Attr (3) tab
- 6.7.12 The NV Attr (4) tab
- 6.7.13 The Download tab
- 6.8 Using Network Listen
- 6.9 Using BTS Installer via a proxy
- 6.10 Connecting to a nanoBTS via SSL
- 6.11 Configuration File Reference

© ip.access Ltd
COMPANY CONFIDENTIAL CENG0336_XE_nanoBTS_Installation_and_Test_Manual.doc
- 118 -
6.8.7.2 Running The Test
To run the test, click on the Start Test button at the bottom of the main screen.
While the test is running the message pane in the lower part of the window will display
“Test Running – Frequency Synchronisation”. While the nanoBTS is in this mode it is
not possible to do anything else with it until the test is complete except end the test by
selecting the Stop Test button.
Once the test is complete the message pane will display “Test finished”. An example
of the results window is shown in Figure 69.
Figure 69 - Frequency Synchronisation Test Results