
User's Manual
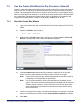


Table Of Contents
- nanoLTE AP Pre-Provisioning and Configuration
- Table of Contents
- 1 Introduction
- 2 Pre-Provisioning Overview
- 3 Capturing Network Policies and AP Modes
- 4 AP-Unique Parameters
- 5 System Preparation for nanoLTE AP Provisioning
- 6 Template Preparation
- 7 AP Provisioning
- 8 How to Implement Policies
- 9 Installation Checks

nanoLTE AP Pre-Provisioning and Configuration AP Provisioning
NANO_INST_43370 v101_0.4 for N4G_1.1 © ip.access Limited 2016 Page 54
7.5 Update the Individual AP Parameters
These are AP object parameters and AP Info object attributes that are either unique per AP
or must be selected on a per AP basis (for example, the Physical Cell ID may not be unique,
but it depends on the AP’s location).
Either update the AP with these settings immediately after completing any other
provisioning activities, or apply them once the AP is installed on site and is able to connect
to the NOS.
Note: Some of the parameters reviewed in this section are configured in the Create Site Wizard or
by applying a template withing the wizard or after completing the wizard. However, it is
useful to review these parameters in case any required changes on a per-AP basis were
missed during the previous configuration phases.
7.5.1 AP Group
The AP Group is part of the AP Info object’s configuration.
Configuring an AP with a Group is optional, depending on whether or not AP Groups are
needed.
If AP Group identities correspond to Product Classes, the recommended method for
configuring the Group is to associate an AP Info object template with the Product Class.
This will set the Group automatically when creating the site.
Alternatively, either set the Group manually with the procedure below or create an AP Info
template apply it to the corresponding AP Info objects after provisioning multiple APs. To
apply a template after provisioning, use the Apply Templates action on the AP search/filter
panel after selecting the required APs - see [OPM_43005] for more details on using this
action.
Note: If AP management by Group is already enabled (the Enable Search Filter By User AP
Groups option is checked in the Manage Users dialogue box) then only NOS Client users
with the Manage Users role will be able to use the search/filter panel to find any APs that
are not already in a Group. Hence, only those users can subsequently assign APs to the
correct Group either manual or with a template. Once APs are in a Group, any users
assigned to manage the AP Group will be able to find and manage the APs in the NOS
Client.
1) If the AP is not currently visible, use AP filtering to make the required AP visible in
the object tree in the Explorer Pane.
Note: For details on using AP filtering, see [OPM_43005].
2) Select the AP Info object for the required AP.
3) Select the AP Group Membership Package.
4) Click the Select button for the Associated Group.
5) Expand the object tree until the Groups are shown.
6) Click the name of the required Group, then click OK.
7) Click Apply to save the changes to the AP Info object.