ST-640 LCD MICROSCOPE Electronic Microscope with Digital LCD Monitor #6820 User Guide
ST-640 Microscope Thank you for purchasing your LCD microscope from iOptron. This high-tech microscope is capable of both digital viewing through a large 3.5” LCD screen and via traditional eyepieces for additional magnification. The camera imbedded in the digital eyepiece can shoot both pictures and videos. By simply connecting the microscope to your computer you can easily browse and organize pictures and videos.
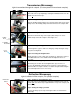
Setting Up Your LCD Monitor Microscope Eyepiece & Attachment Tube LCD Monitor Step 1. Attaching the LCD Monitor Remove the eyepiece cover and attachment tube from the monocular. Then insert the LCD Monitor into the monocular (see yellow arrow). Step 2. Setting the objective. Rotate the revolving nosepiece to select the 4x objective. Step 3. Setting the mechanical stage. Raise the stage with the focusing knob as much as possible. Stop before mechanical stage touches the 40x objective. Step 4.
Using the LCD Monitor Up Key Step 1. Turning on the LCD Monitor. Press the on bottom on the LCD Monitor. Step 2. Zooming. Use “up” and “down” arrows to zooming in or out. Down Key Mode Key Snap Key Step 3. Taking a picture Set the LCD device to picture mode by pressing the “mode” key, until the top right corner of the LCD screen shows “A” (see yellow circle). Press “Snap” Key to take a picture. Mode Step 4. Taking a video.
Setting Up Your Traditional Microscope Eyepiece & attachment tube LCD Monitor Step 1. Attaching the Eyepiece Remove the LCD monitor from the monocular. Then insert the attachment tube and eyepiece into the monocular (see yellow arrow). Step 2. Setting the objective. Rotate the revolving nosepiece to select the 4x objective. Step 3. Setting the mechanical stage. Raise the stage with the focusing knob as much as possible. Stop before mechanical stage touches the 40x objective. Step 4.
Transmission Microscopy Light is transmitted through the sample. (For transparent or translucent samples) Step 1. Turning on the illumination unit. Turn on the microscope lighting by rotating the illumination wheel on the bottom left of the microscope. Step 2. Placing the sample. Open the holding clamp and place the desired sample slide on the stage. Gently release the holding clamp and let it hold fast to the sample slide. Step 3. Centering the sample.
IOPTRON ONE YEAR MICROSCOPE AND ACCESSORIES WARRANTY A. iOptron warrants your microscope and accessories to be free from defects in materials and workmanship for one year. iOptron will repair or replace such product or part which, upon inspection by iOptron, is found to be defective in materials or workmanship. As a condition to the obligation of iOptron to repair or replace such product, the product must be returned to iOptron together with proof-of-purchase satisfactory to iOptron. B.