
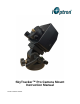
User's Manual


8
STEP 2. Install the polar scope
Before installing the polar scope onto the mount, face the polar scope to a bright source, such
as the sky (but not the SUN) or a lamp from a distance. Adjust the eyepiece to focus the reticle
pattern. Then face the polar scope to a distant object and look through the eyepiece. If you cannot
see the distant object clearly, the polar scope is not focused for your eyesight. Release a few turns of
the Lock ring (or hold the objective lens and turn it counterclockwise). Turn the Objective lens until the
image is focused. Retighten the Lock ring.
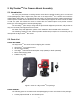
Objective lens
Lock ring
Eyepiece
Reticle illumination inlet
Figure 6. AccuAlign
TM
dark field illuminated polar scope
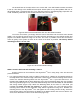
Figure 7. Insert the polar scope
Remove the front cover of the polar telescope. Loosen the Polar Scope Locking Screw until it
does not intrude into the polar scope mounting hole. Gently insert the polar scope all the way into the
polar scope mounting hole from the back of the mount and with the flat platoon on the polar scope
facing left, as shown in Figure 7. Adjust the polar scope to make 12 o’clock at the top of the polar
scope dial and finger tighten (not too tight) the Polar Scope Locking Screw. Turn the mount power on.
Press the Polar Scope Illumination Adjustment Button to adjust the brightness of the dark field reticle.
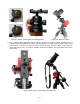
STEP 3. Attach the SkyTracker
TM
Pro to a tripod
The SkyTracker
TM
Pro can be mounted to a stable tripod with or without the alt-azi base, as
shown in Figure 8. When the alt-azi base is not used, a ball head (#3305A, not included) is suggested
for easy adjustment.
Figure 8. Mounting the SkyTracker
TM
Pro to a tripod
Mounting hole