
User's Manual


7
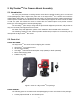
Figure 4. Alt-azi adjusting base
14- Dovetail saddle
15- Latitude lock
16- Azimuth adjusting knob
17- Dovetail locking knob
18- Azimuth locking knob
19- Base
20- Latitude adjustment knob
21- Latitude scale
22- Leveling bubble
2.4. SkyTracker
TM
Pro Camera Mount Assembly
NOTE: The SkyTracker
TM
Pro mount is a precision astronomical instrument. It is highly
recommended that you read the entire manual and become familiar with the nomenclature and
functions of all components before starting the assembly.
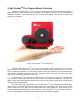
STEP 1. Check/charge the battery
The SkyTracker
TM
Pro is shipped with battery
partially charged. It is suggested to fully charge the battery
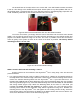
before the first time use. Insert the micro USB plug into the
USB port at the side of the mount (see Figure 5), and
connect the other end of the USB cable into a USB port of
a computer, a smart phone charger or a portable battery
pack (not included). The input power should be 5V, 1A. It
usually takes 5 hours to charge the internal Li-Poly battery
to reach 80% of full power. When the battery is fully
charged the battery status indicator should flash rapidly
(about 5Hz). You may charge the SkyTracker
TM
Pro with
the power switch either on or off. (However, when the
power switch is turned off, the battery status indicator does
not function). When the indicator stays steady on, the
battery power should be sufficient for your session. When
the indicator blinks slowly (about 0.5Hz), it indicates the
power is low and recharging is necessary.
Please don’t charge the battery or use USB power when temperature is at or below 0°C
(32°F), otherwise the rechargeable battery might be permanently damaged.
If the mount is not to be used for an extended period of time, charge the battery in full and
recharge every 6 months.
Figure 5. Micro USB
powering/charging port