® SkyTracker™ Pro Camera Mount Instruction Manual Product #3322 & #3322A
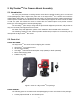
Table of Content Table of Content ...................................................................................................................... 2 1. SkyTrackerTM Pro Camera Mount Overview ........................................................................ 3 2. SkyTrackerTM Pro Camera Mount Assembly ....................................................................... 5 2.1. Introduction ..........................................................................................................
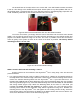
1. SkyTrackerTM Pro Camera Mount Overview Introducing The SkyTrackerTM Pro -- iOptron’s next generation camera tracking device! After 4 years leading the camera tracker market, SkyTrackerTM has been the tool of choice for photographers worldwide, ushering in the astroscape genre of outdoor photography. Now iOptron has been just pushing it to perfection. Figure 1.
Features: All metal structure with ABS covers Attaches to a camera tripod with 3/8” or 1/4” threads Accepts cameras weighing up to 3 kg (6.
2. SkyTrackerTM Pro Camera Mount Assembly 2.1. Introduction You have just purchased a tracking camera mount that is capable of taking you to a new level of astrophotography. When aligned the polar axis of the SkyTrackerTM Pro camera mount with the celestial North Pole (CNP), or celestial South Pole (CSP), the mount will provide rotation matching the celestial sphere rotation around the Earth.
An power source with a USB port for mount charging, such as a smartphone charger, a laptop with a USB port, or car cigarette adapter, or a portable battery pack A ball head A camera YOU MAY NEED IT FOR POLAR ALIGNMENT: iPhone/iPad app for accurate polar alignment (https://itunes.apple.com/us/app/ioptron-polar-scope/id564078961?mt=8) or Android phone polar finder app (https://play.google.com/store/apps/details?id=com.techhead.
Figure 4. Alt-azi adjusting base 14- Dovetail saddle 15- Latitude lock 16- Azimuth adjusting knob 17- Dovetail locking knob 18- Azimuth locking knob 19- Base 20- Latitude adjustment knob 21- Latitude scale 22- Leveling bubble 2.4. SkyTrackerTM Pro Camera Mount Assembly NOTE: The SkyTrackerTM Pro mount is a precision astronomical instrument. It is highly recommended that you read the entire manual and become familiar with the nomenclature and functions of all components before starting the assembly.
STEP 2. Install the polar scope Before installing the polar scope onto the mount, face the polar scope to a bright source, such as the sky (but not the SUN) or a lamp from a distance. Adjust the eyepiece to focus the reticle pattern. Then face the polar scope to a distant object and look through the eyepiece. If you cannot see the distant object clearly, the polar scope is not focused for your eyesight. Release a few turns of the Lock ring (or hold the objective lens and turn it counterclockwise).
The dovetail base of the SkyTrackerTM Pro comes with a 1/4"-3/8” thread converter, as shown in FIG 9, It fits directly to the 3305A ball head quick release plate or any other platform with 1/4” or 3/8” threads screw. The alt-azi base fits to any standard camera or astrophotography tripod with 1/4" or 3/8” threads by insert the 1/4”-3/8” thread converter into it, as needed. Figure 9.
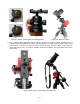
(a) (b) (c) Figure 11. Attach a ball head to the mounting block Figure 12. Attach a camera 2. For a heavy DSLR, especially with a long lens (more than 1.2kg or 2.6lbs, including lens), a counterweight (CW) balance kit (#3324, sold separately) is recommended for better balance and performance, as shown in Figure 13. Please retreat the polar scope by about 10 mm after the polar alignment is done, to avoid a possible interference between the CW balance kit and the polar scope. Figure 13.
STEP 5. Set the SkyTrackerTM Pro mount The SkyTrackerTM Pro head can be attached to the Alt-azi base in two opposite directions depends on your latitude position. Choose the one with the center of gravity of the system as close to the center of the base as possible. Assuming you are in northern hemisphere, facing the SkyTrackerTM Pro to approximately the north. You may use a compass or an electronic compass from your smart phone.
Sigma Octantis. If the dial ticks are numbered, the 12 o’clock mark should be on top (Fig. 14a). Otherwise, any one major tick on top can be assigned as 12 o’clock (Fig. 14b). (a) (b) Figure 15. Polar scope app on an iPhone Figure 14. Polar scope dial To maximize the benefits of the iOptron polar scope for polar alignment, you need to know where the Polaris is in the northern (Sigma Octantis in southern) hemisphere.
3. Maintenance and Servicing 3.1. Maintenance The SkyTrackerTM Pro camera mount is designed to be maintenance free, except the battery. Do not overload the mount. Do not drop the mount. This will damage the mount or degrade the tracking accuracy permanently. Use a damp cloth to clean the mount if necessary. Do not use solvent. 3.2. Trouble Shooting 1. Unit does not power on? Make sure battery is fully charged. 2.
3.3. iOptron Customer Service If you have any question concerning your mount, contact iOptron Customer Service Department. Customer Service hours are 9:00 AM to 5:00 PM, Eastern Time, Monday through Friday. In the unlikely event that the mount requires factory servicing or repairing, write or call iOptron Customer Service Department first to receive a RMA# before returning the mount to the factory.
Appendix A. Technical Specifications Mount Payload (MAX) Mount weight Mount weight with base Body material RA shaft Worm wheel Worm gear Worm period Bearing Motor drive Tracking Tracking speed Fast slew speed Polar sight hole Polar scope Power requirement Battery type Duration of operation Power charge port Body dimension Operation Temperature Mounting ring Body-base connection Alt-Azi adjustable Base Latitude adjustment range AZ adjustment range Base diameter Warranty Ultra compact single axis EQ 6.
IOPTRON ONE YEAR TELESCOPE, MOUNT, AND CONTROLLER WARRANTY A. iOptron warrants your telescope, mount, or controller to be free from defects in materials and workmanship for one year. iOptron will repair or replace such product or part which, upon inspection by iOptron, is found to be defective in materials or workmanship. As a condition to the obligation of iOptron to repair or replace such product, the product must be returned to iOptron together with proof-ofpurchase satisfactory to iOptron. B.