
Users Manual Part 6


IBA | 47-10 |
Clinical User’s Guide
Volume 1 - Treatment Session
|Part XI
- Patient Positioning and Alignment Calculating Corrections Using adaPT
insight
|
2D-3D Image Registration
This step is launched after the 2D stereographic dual source mode acquisition is
performed. The two orthogonal radiographs acquired by rad-A and rad-B are
compared with numerically generated projections of the planning CT in order to
correctly set up the patient for treatment.
This step can be performed in one of the following ways:
Point-based image registration uses a set of given markers or anatomical
landmarks as a list of control points for patient setup. After point-based 2D-3D
registration, alignment can be manually refined, if needed.
Intensity-based image registration finds the best match between images
based on pixel values or intensity information of each image. After Intensity-
based registration, alignment can be manually refined, if needed.
Manual image registration can be performed by the user between DRRs and
acquired DR images by a simple drag and drop of the DR with the mouse and/or
by changing the correction values. Alternatively, the arrows of the keyboard can
be used; to rotate an image, a combination of the arrows and the CTRL key can
be used.
Note: For more detailed information on how to perform 2D-3D Image Registration,
refer to the adaPTinsight documentation listed in chapter “About this Manual”.
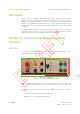
3D-3D Image Registration
Registration between 3D images plays the role of aligning Cone-Beam CT image and
Planning CT image. The application has three views, from left to right and top to
bottom: axial, sagittal and coronal. The corresponding slices of the volumes being
registered are shown superimposed on each view.
There are two available applications for this task:
Intensity-based image registration finds the best match between images
based on pixel values or intensity information of each image. After Intensity-
based registration, alignment can be manually refined if needed.
Manual image registration can be performed by the user between DRRs and
acquired DR images by a simple drag and drop of the DR with the mouse and/or
by changing the correction values.
Note: For more detailed information on how to perform 3D-3D Image Registration,
refer to the adaPTinsight documentation listed in chapter “About this Manual”.
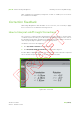
Generating the Correction
At the end of the Image Registration process, the correction appears on the toolbox.
There, you can either manually refine it or validate it to end the registration step. To
validate the Correction, click Validate.