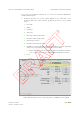
Chapter 36 Monitoring and Controlling the Treatment •••••• Note: Screen representations throughout this chapter and throughout this part may show ‘Control Mode: EMR-Centric’ or ‘Control Mode: DEV-Centric’ at the bottom. When working in Standalone mode, you will notice that the mode indication reads ‘Stand-Alone’. Proceeding to the Treatment Step Click the Next button from the EQUIPMENT PREPARATION SCREEN and the TREATMENT SCREEN appears.
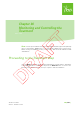
|Part VI - Using adaPTdeliver in Standalone Mode Monitoring and Controlling the Treatment | Monitor panel Figure 36-1. Treatment Screen Panels, tabs and buttons on the TREATMENT SCREEN enable you to monitor and control the treatment process. The screen elements are: Actions panel: contains buttons with which you can control the irradiation. For detailed information, refer to Section “Performing Functions From the Actions Panel” on page 36-3.
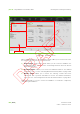
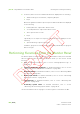
|Part VI - Using adaPTdeliver in Standalone Mode Monitoring and Controlling the Treatment | Performing Functions From the Actions Panel Equipment status Beam functions Figure 36-2. Treatment Screen - Actions Panel From the Actions panel of the TREATMENT SCREEN you can: View the Equipment status: When the treatment room is configured with the Remote Positioning Device option, adaPTdeliver displays an 'Equipment status' button in the navigation bar to provide access to the status panel.
|Part VI - Using adaPTdeliver in Standalone Mode Monitoring and Controlling the Treatment | In the Irradiation phase, the Equipment status button is disabled during actual irradiation. To avoid redundancy of displayed data, access to the status panel during Preparation phase is not provided.
|Part VI - Using adaPTdeliver in Standalone Mode Monitoring and Controlling the Treatment | In the case of Pencil Beam Scanning, an icon next to the status bar displays the multiple repainting type. Treatment progress: the current status appears in the status bar of the Dosimetry panel.
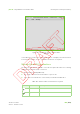
|Part VI - Using adaPTdeliver in Standalone Mode Monitoring and Controlling the Treatment | Dosimetry values: the Preset and Actual values are displayed for the following: Global: meaning the entire beam, comprising all layers.
|Part VI - Using adaPTdeliver in Standalone Mode Monitoring and Controlling the Treatment | Figure 36-5. Treatment Screen - Monitor Panel (Typical) Some tabs may contain more columns than what is on display in the Monitor Panel. To view these columns, use the scroll bar at the bottom of the panel.
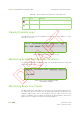
|Part VI - Using adaPTdeliver in Standalone Mode Monitoring and Controlling the Treatment | Table 36-1. Monitor Panel Icons and Colors Legend (Cont’d) Icon Color Meaning red Check active but not OK yellow Check active and not OK, but overridable Viewing Operator Logs This tab lists the reason(s) why irradiation got paused, if any, in addition to some miscellaneous errors. Figure 36-6.
|Part VI - Using adaPTdeliver in Standalone Mode Monitoring and Controlling the Treatment | You can access the BEAM LINE CHECKS TAB also by clicking the beam line icon ( from the Equipment panel of the TREATMENT SCREEN. ) Figure 36-8.
|Part VI - Using adaPTdeliver in Standalone Mode CAUTION Monitoring and Controlling the Treatment | In case the Beam Line Checks tab shows that one of the BAEU or BIREU relay check is failed, request (from the maintenance team) a verification of the structural integrity and the proper functioning of the IC cyclo related equipment (i.e. IC cyclo related electrical wiring).
|Part VI - Using adaPTdeliver in Standalone Mode Monitoring and Controlling the Treatment | Figure 36-9.
|Part VI - Using adaPTdeliver in Standalone Mode Monitoring and Controlling the Treatment | Figure 36-10. TSS Interlocks Tab If the status of any of these interlocks is not OK, proceed as described in Section “Verifying the Room Interlocks”.
|Part VI - Using adaPTdeliver in Standalone Mode Monitoring and Controlling the Treatment | Figure 36-11. Positioning System Status Tab Resuming Irradiation After a Positioning Check Manager Halt Irradiation may get paused in case the Positioning Check Manager has insufficient response from one or more devices. To resume irradiation, click Reset check manager (see Figure 36-11).
|Part VI - Using adaPTdeliver in Standalone Mode Monitoring and Controlling the Treatment | Intentionally left blank IBA | 36-14 | Clinical User’s Guide Volume 1 - Treatment Session
Chapter 37 Starting Irradiation •••••• Note: Screen representations throughout this chapter and throughout this part may show ‘Control Mode: EMR-Centric’ or ‘Control Mode: DEV-Centric’ at the bottom. When working in Standalone mode, you will notice that the mode indication reads ‘Stand-Alone’. Process Before starting the irradiation you must reset the DCEU (refer to Chapter 15, “Resetting a Dose Counter Electronic Unit”).
|Part VI - Using adaPTdeliver in Standalone Mode Starting Irradiation | If you intend to perform treatment with a gated beam, pay attention to the following warning message: WARNING As a Radiation Therapy Technologist (RTT), before allowing irradiation with a triggered treatment beam, you are recommended to check the patient file to see that the selected gating source is the prescribed one.
|Part VI - Using adaPTdeliver in Standalone Mode Starting Irradiation | WARNING The Radiation Therapy Technologist (RTT) must be aware of the progress of the treatment at all times. WARNING As a Radiation Therapy Technologist (RTT) you are recommended to monitor the patient behavior during irradiation. In case of patient movement, pause the beam immediately.
|Part VI - Using adaPTdeliver in Standalone Mode Starting Irradiation | The aforementioned error message appears if the following is encountered: Delivered MU of layer i > prescribed MU of layer i + X% Where X is a configurable tolerance (in the above case 5% of prescribed dose); this value may be different at your treatment center. In case this message appears, verify that the Delivered MU on the DCEU corresponds to both the prescribed and the recorded value.
Chapter 38 Pausing and Stopping an Irradiation •••••• Note: Screen representations throughout this chapter and throughout this part may show ‘Control Mode: EMR-Centric’ or ‘Control Mode: DEV-Centric’ at the bottom. When working in Standalone mode, you will notice that the Control Mode indication reads ‘Stand-Alone’. Figure 38-1.
|Part VI - Using adaPTdeliver in Standalone Mode Pausing and Stopping an Irradiation | Introduction The normal end to an irradiation occurs when all elements of the prescribed irradiation (spots) have been delivered. WARNING Press the hardware emergency stop button if the irradiation fails to halt when the software PAUSE or STOP button is clicked or when the hardware PAUSE button is pressed. WARNING Emergency stop buttons shut off energy to most components in the Proton Therapy System (PTS).
|Part VI - Using adaPTdeliver in Standalone Mode Pausing and Stopping an Irradiation | Whether you are using the Universal Beam Triggering Interface (UBTI) in manual mode or in automatic mode, you are always capable of pausing the irradiation following the procedure described in Section “Pausing Irradiation” on page 38-3. WARNING As a Radiation Therapy Technologist (RTT), when the treatment is interrupted (e.g., the treatment is stopped after a pause, the software crashes, etc.
|Part VI - Using adaPTdeliver in Standalone Mode WARNING Pausing and Stopping an Irradiation | Emergency stop buttons shut off energy to most components in the Proton Therapy System (PTS). However, the electrical power to some components will not be interrupted, so be aware that electrical hazards and faults (faulty parts made live or induced fire) may still be present. When the beam is paused, you may: Re-enter the TR and attend to the patient if necessary. Resume the treatment.
|Part VI - Using adaPTdeliver in Standalone Mode Pausing and Stopping an Irradiation | Stopping Irradiation The normal end of an irradiation occurs when each layer is completed, i.e., when the ICs have read the complete dose for each layer. (The ICs are reset to 0 between each layer and loaded with a new target criteria). The PTS stops the irradiation and archives irradiation parameters (referred to as received parameters).
|Part VI - Using adaPTdeliver in Standalone Mode WARNING Pausing and Stopping an Irradiation | As a Radiation Therapy Technologist (RTT), when the treatment is interrupted (e.g., the treatment is stopped after a pause, the software crashes, etc.), you have to manually record the value reported by the hardware Monitor Unit (MU) counter, which is located on the front panel of the Dose Counter Electronic Unit (DCEU). If applicable, i.e.
Chapter 39 Resuming after a Partial Irradiation •••••• Note: Screen representations throughout this chapter and throughout this part may show ‘Control Mode: EMR-Centric’ or ‘Control Mode: DEV-Centric’ at the bottom. When working in Standalone mode, you will notice that the Control Mode indication reads ‘Stand-Alone’.
|Part VI - Using adaPTdeliver in Standalone Mode WARNING Resuming after a Partial Irradiation | When working in Standalone mode, after a partial irradiation, the user must record the cumulative MU value delivered for that beam according to the center’s best practices (may be on paper or other method). The goal is to be able to use that value for the event of a resumption in a different session. Not doing this entails a serious risk of under or over-irradiation of the patient.
|Part VI - Using adaPTdeliver in Standalone Mode Resuming after a Partial Irradiation | Summary of the steps for Resuming from a Partial treatment 1. Partial Irradiation There are several situations that can lead to partial irradiation: Therapist (user abort) The therapist can choose to do so for many reasons such as patient’s condition, safety, motion etc. 2.
|Part VI - Using adaPTdeliver in Standalone Mode 3. Resuming after a Partial Irradiation | Automatic: adaPTdeliver software is able to retrieve all available irradiation records from the Beam Management System (BMS) software automatically and provides detailed records. In automatic recovery, if the DCEU value entered is higher than the irradiation records, the remaining is simulated. Manual recovery from file: adaPTdeliver software is not able to retrieve irradiation records from the BMS software.
|Part VI - Using adaPTdeliver in Standalone Mode Partial treatment occurs Resuming after a Partial Irradiation | Irradiation termination Data recovery Termination by the Therapist No Recovery needed Resume Irradiation adaPTdeliver session crashes Machine Abort Automatic Manual Resume irradiation Online recovery adaPTdeliver session OK in same session in new session DCEU Treatment is completed Offline recovery Termination by the PT System User Abort Automatic Manual Resume irradiation i
|Part VI - Using adaPTdeliver in Standalone Mode Resuming after a Partial Irradiation | Termination by the Therapist: No Recovery needed When the irradiation is manually terminated by the therapist, a popup message appears informing the user that the irradiation is not complete (Figure 39-2). Figure 39-2. Recovery after Termination by Therapist - Warning message adaPTdeliver builds an irradiation record and stores it in its database. 1. In the TREATMENT SCREEN, click Next. 2.
|Part VI - Using adaPTdeliver in Standalone Mode Resuming after a Partial Irradiation | Figure 39-3. Resuming irradiation - Standalone mode: Warning messages Important In case the User exits a Standalone session before having completed a partial irradiation, adaPTdeliver does not keep track of the partial irradiation and will not inform the User about this partial irradiation in the next session.
|Part VI - Using adaPTdeliver in Standalone Mode Resuming after a Partial Irradiation | Termination by the Proton Therapy System Online recovery - adaPTdeliver session maintained When the irradiation is terminated by the PTS, popup appears indicating the cause of termination (Figure 39-4). Click OK to continue. Figure 39-4. Recovery after termination by PTS - Warning message The recovery of the data can be performed through one of the following methods: 1. Automatic recovery 2.
|Part VI - Using adaPTdeliver in Standalone Mode Resuming after a Partial Irradiation | Figure 39-5. Recovery after termination by PTS - Automatic recovery process (online) 2. In case the process is not successful, proceed to section “Retry and Troubleshoot”. Retry and Troubleshoot The automatic process can fail for various reasons, including software crashes, communication faults, hardware problems, etc.
|Part VI - Using adaPTdeliver in Standalone Mode Resuming after a Partial Irradiation | Figure 39-6. Recovery after termination by PTS - Automatic data recovery information (online) 1. In case the Automatic process fails, a new popup appears giving you the possibility to Retry or to attempt the Manual Recovery (Figure 39-7a). You can click on More Information to know more (Figure 39-6). IBA | 39-10 | 2. Click in Retry. A message Recovery in Progress is displayed (Figure 39-7b). 3.
|Part VI - Using adaPTdeliver in Standalone Mode Resuming after a Partial Irradiation | a b d c Figure 39-7. Recovery after termination by PTS - Retrying automatic recovery process (online) 5. In case the process is not successful, proceed to section Manual recovery from File. Note: It is recommended to retry the automatic process until all reasonable options have been investigated by the Operator Manual recovery from File 1.
|Part VI - Using adaPTdeliver in Standalone Mode Resuming after a Partial Irradiation | Figure 39-8. Recovery after termination by PTS - Manual data recovery information (online) 2. Call an operator to gather the irradiation data inside a .zip file in the local disk. 3. Once the operation is complete, click LOAD FILE (Figure 39-9a). Note: In case the Operator cannot recover files manually, the recovery based on the DCEU values must be performed. See section“Manual Recovery from DCEU values”.
|Part VI - Using adaPTdeliver in Standalone Mode Resuming after a Partial Irradiation | b a c Figure 39-9. Recovery after termination by PTS - Manual recovery process (online) 7. In case the process is not successful, proceed to section “Manual Recovery from DCEU values”. Manual Recovery from DCEU values In case the loading of the file cannot be performed, the last resort is the use of the DCEU values. 1.
|Part VI - Using adaPTdeliver in Standalone Mode Resuming after a Partial Irradiation | Figure 39-10. Recovery after termination by PTS - Recovery from DCEU values Resuming Irradiation Note: In case of resuming from the irradiation records containing simulated values, a signature will be needed to proceed (Figure 39-11). Figure 39-11.
|Part VI - Using adaPTdeliver in Standalone Mode Resuming after a Partial Irradiation | Offline recovery - adaPTdeliver session crashes WARNING When performing the offline recovery procedure, when the system prompts the user to input the MU and counts values, the user must be careful to input the values corresponding to the irradiation they want to recover. The values displayed on the DCEU at that time may not be the ones needed for the procedure (e.g.
|Part VI - Using adaPTdeliver in Standalone Mode Resuming after a Partial Irradiation | Figure 39-12. Recovery after termination by PTS - Offline recovery The recovery of the data can be through one of the following methods: 1. Automatic recovery 2. Manual recovery from file 3. Manual recovery from DCEU values Automatic recovery IBA | 39-16 | 1. Click Offline Recovery in the Session Definition screen (Figure 39-12). 2.
|Part VI - Using adaPTdeliver in Standalone Mode Resuming after a Partial Irradiation | Figure 39-13. Recovery after termination by PTS - Automatic data recovery information (offline) Note: In case the prescribed dose was delivered and the irradiation does not need to be resumed, the corresponding beam can be marked off as complete using the Mark As Complete button. The beam will be recorded in the PTS database. 3. WARNING Select the line that corresponds to the irradiation you want to recover.
|Part VI - Using adaPTdeliver in Standalone Mode Resuming after a Partial Irradiation | 5. In case the automatic recovery process is successful, click OK to continue and proceed to section “Resuming Irradiation”. 6. In case the process is not successful, proceed to section “Manual recovery from File” Manual recovery from File 1. When the automatic recovery procedure fails, click Manual Recovery in the popup message (Figure 39-14). Figure 39-14.
|Part VI - Using adaPTdeliver in Standalone Mode 2. Resuming after a Partial Irradiation | Then, click LOAD FILE (Figure 39-16a). Note: In case the Operator cannot recover files manually, the recovery based on the DCEU values must be performed. See section ”Manual Recovery from DCEU values”. 3. In file explorer popup, browse and select the file as indicated by the Operator. Click Open. 4. In the Manual Recovery popup, the button turns green and now reads File Loaded.
|Part VI - Using adaPTdeliver in Standalone Mode Resuming after a Partial Irradiation | Manual Recovery from DCEU values In case the loading of the file cannot be performed, the last resort is the use of the DCEU values. 1. Enter the delivered cumulative MUd value related to that beam, taking into account all previous partial irradiations of that beam and click search for partial irradiation continuation (Figure 39-17). 2.
|Part VI - Using adaPTdeliver in Standalone Mode Resuming after a Partial Irradiation | Figure 39-18.
|Part VI - Using adaPTdeliver in Standalone Mode Resuming after a Partial Irradiation | Resuming Irradiation in the Same Session The user can resume the irradiation in the same session when there is: Termination by the Therapist, or Termination by the PTS where the adaPTdeliver session is maintained The irradiation can be resumed in the same session only after an online recovery. Note: Resuming the irradiation in a new session is possible in both the Standalone and the OIS mode. 1.
|Part VI - Using adaPTdeliver in Standalone Mode Resuming after a Partial Irradiation | Resuming irradiation Ensure the partial beam is selected as indicated above. Click Next to proceed to the PREPARATION SCREEN and complete the irradiation of the selected beam. Note: In case of resuming from the irradiation records containing simulated values, a signature will be needed to proceed (Figure 39-20). Figure 39-20.
|Part VI - Using adaPTdeliver in Standalone Mode Resuming after a Partial Irradiation | Partial treatment record found 1. In the SESSION DEFINITION SCREEN (Figure 35-2), load the desired patient and plan. 2. Select the beam to be resumed. 3. Search the adaPTdeliver database manually for data about partial treatments. To do so, in the Dose panel, click on Partial (Figure 39-21). Figure 39-21. Resuming irradiation after partial treatment in Standalone mode IBA | 39-24 | 4.
|Part VI - Using adaPTdeliver in Standalone Mode Resuming after a Partial Irradiation | Figure 39-22. Resuming irradiation 6. In the Beam Selection screen (Figure 39-23), the beams marked as partial are indicated by an orange checkmark . Figure 39-23. Resuming irradiation after partial treatment Note: In case of resuming from the irradiation records containing simulated values, a signature will be needed to proceed. The user will receive a message (Figure 3924) to confirm the use of simulated data.
|Part VI - Using adaPTdeliver in Standalone Mode Resuming after a Partial Irradiation | Figure 39-24. Confirmation to the use of simulated data for resuming irradiation 7. 8. In the Dose panel (Figure 39-23), the user can see that: The Delivered MU is non-zero. The MU to be delivered is the difference between prescribed and delivered MU. A banner below the Dose panel gives info about the partial irradiation. Click Next and complete the irradiation of the selected beam.
|Part VI - Using adaPTdeliver in Standalone Mode Resuming after a Partial Irradiation | Figure 39-25. Resuming irradiation - Partial treatment records found The user must choose the correct report based on the date and time of the partial irradiation to be resumed, and click OK to continue to proceed to the Preparation screen. No partial records found In case adaPTdeliver finds no record that matches the irradiation to be resumed, a popup is displayed when the Beam Selection screen appears.
|Part VI - Using adaPTdeliver in Standalone Mode Resuming after a Partial Irradiation | 3. Click on the corresponding line in adaPTdeliver to select it, and then click Next (Figure 40-1). 4. Select the corresponding plan and beam in the OIS. (The data is sent by the OIS to adaPTdeliver.) 5. The Beam Selection screen appears directly with the chosen beam selected. In the Beam Selection screen (Figure 39-26), the beams marked as partial are indicated by an orange checkmark . Figure 39-26.
|Part VI - Using adaPTdeliver in Standalone Mode Resuming after a Partial Irradiation | Figure 39-27. Confirmation to the use of simulated data for resuming irradiation 6. 7. In the Dose panel (Figure 39-26), the user can see that: The Delivered MU is non-zero. The MU to be delivered is the difference between prescribed and delivered MU. A banner below the Dose panel gives info about the partial irradiation. Click Next and complete the irradiation of the selected beam.
|Part VI - Using adaPTdeliver in Standalone Mode Resuming after a Partial Irradiation | Intentionally left blank IBA | 39-30 | Clinical User’s Guide Volume 1 - Treatment Session
Part VII Using adaPTdeliver in Worklist Mode Clinical User’s Guide Volume 1 - Treatment Session
Chapter 40 Operating in Worklist Mode •••••• Selecting an Appointment Using adaPTdeliver in a Treatment session, the first screen to appear is the APPOINTMENT SELECTION SCREEN. Figure 40-1. Appointment Selection Screen From the APPOINTMENT SELECTION SCREEN you can select the desired appointment. Upon selection of an appointment, the list of beams appears. You can process each beam through the subsequent steps of beam selection, preparation, and treatment.
|Part VII - Using adaPTdeliver in Worklist Mode Operating in Worklist Mode | If the plan contains more than one isocenter, the system will trigger a consistency check between the isocenters positions and the PPS positions. If there are inconsistencies (i.e.
|Part VII - Using adaPTdeliver in Worklist Mode Operating in Worklist Mode | Figure 40-3. Couch Positions Check - Pop-Up Message There is a configurable tolerance for the check (default value 2 mm), which can be modified by IBA following a user request. Click OK if you want to proceed with your selection, else click Cancel. There is a user right: ISOCENTER_CHECK_OVERRIDE to authorize users to continue with the workflow despite the consistency check finding an inconsistency.
|Part VII - Using adaPTdeliver in Worklist Mode Operating in Worklist Mode | When no Appointments Appear Note: Condition for an appointment to appear is that the appointment has been checked in in OIS. For patients with no plan defined no appointments appear in the APPOINTMENT SELECTION SCREEN. The APPOINTMENT SELECTION SCREEN is automatically refreshed after a predefined time. If you want to manually refresh the list of appointments, press Refresh.
|Part VII - Using adaPTdeliver in Worklist Mode Operating in Worklist Mode | The header of the BEAM SELECTION SCREEN now displays the type of accessory, if any, and its identifier, as follows: Pencil Beam Scanning: No accessory: no accessory type One accessory: accessory type and identifier The list area is now filled with the beam(s) that you selected from the SESSION DEFINITION SCREEN. If there are multiple beams in the list, click the beam that you want to process first.
|Part VII - Using adaPTdeliver in Worklist Mode Operating in Worklist Mode | How to Proceed From Here? The remainder of the process in Worklist mode is identical to the process in Standalone mode.
Chapter 41 Resuming after a Partial Irradiation •••••• Note: Screen representations throughout this chapter and throughout this part may show ‘Control Mode: EMR-Centric’ or ‘Control Mode: DEV-Centric’ at the bottom. When working in Standalone mode, you will notice that the Control Mode indication reads ‘Stand-Alone’.
|Part VII - Using adaPTdeliver in Worklist Mode Resuming after a Partial Irradiation | Summary of the steps for Resuming from a Partial treatment 1. Partial Irradiation There are several situations that can lead to partial irradiation: Therapist (user abort) The therapist can choose to do so for many reasons such as patient’s condition, safety, motion etc. 2.
|Part VII - Using adaPTdeliver in Worklist Mode 3. Resuming after a Partial Irradiation | Automatic: adaPTdeliver software is able to retrieve all available irradiation records from the Beam Management System (BMS) software automatically and provides detailed records. In automatic recovery, if the DCEU value entered is higher than the irradiation records, the remaining is simulated. Manual recovery from file: adaPTdeliver software is not able to retrieve irradiation records from the BMS software.
|Part VII - Using adaPTdeliver in Worklist Mode Partial treatment occurs Resuming after a Partial Irradiation | Irradiation termination Data recovery Termination by the Therapist No Recovery needed Resume Irradiation adaPTdeliver session crashes Machine Abort Automatic Manual Resume irradiation Online recovery adaPTdeliver session OK in same session in new session DCEU Treatment is completed Offline recovery Termination by the PT System User Abort Automatic Manual Resume irradiation in
|Part VII - Using adaPTdeliver in Worklist Mode Resuming after a Partial Irradiation | Termination by the Therapist: No Recovery needed When the irradiation is manually terminated by the therapist, a popup message appears informing the user that the irradiation is not complete (Figure 41-2). Figure 41-2. Recovery after Termination by Therapist - Warning message adaPTdeliver builds an irradiation record and stores it in its database. 1. adaPTdeliver sends a Dicom record for the irradiation to the OIS.
|Part VII - Using adaPTdeliver in Worklist Mode Resuming after a Partial Irradiation | Termination by the Proton Therapy System Online recovery - adaPTdeliver session maintained When the irradiation is terminated by the PTS, popup appears indicating the cause of termination (Figure 41-3). Click OK to continue. Figure 41-3. Recovery after termination by PTS - Warning message The recovery of the data can be performed through one of the following methods: 1. Automatic recovery 2.
|Part VII - Using adaPTdeliver in Worklist Mode Resuming after a Partial Irradiation | Figure 41-4. Recovery after termination by PTS - Automatic recovery process (online) 2. In case the process is not successful, proceed to section “Retry and Troubleshoot”. Retry and Troubleshoot The automatic process can fail for various reasons, including software crashes, communication faults, hardware problems, etc.
|Part VII - Using adaPTdeliver in Worklist Mode Resuming after a Partial Irradiation | Figure 41-5. Recovery after termination by PTS - Automatic data recovery information (online) 1. In case the Automatic process fails, a new popup appears giving you the possibility to Retry or to attempt the Manual Recovery (Figure 41-6a). You can click on More Information to know more (Figure 41-5). IBA | 41-8 | 2. Click in Retry. A message Recovery in Progress is displayed (Figure 41-6b). 3.
|Part VII - Using adaPTdeliver in Worklist Mode Resuming after a Partial Irradiation | a b d c Figure 41-6. Recovery after termination by PTS - Retrying automatic recovery process (online) 5. In case the process is not successful, proceed to section Manual recovery from File. Note: It is recommended to retry the automatic process until all reasonable options have been investigated by the Operator Manual recovery from File 1.
|Part VII - Using adaPTdeliver in Worklist Mode Resuming after a Partial Irradiation | Figure 41-7. Recovery after termination by PTS - Manual data recovery information (online) 2. Call an operator to gather the irradiation data inside a .zip file in the local disk. 3. Once the operation is complete, click LOAD FILE (Figure 41-8a). Note: In case the Operator cannot recover files manually, the recovery based on the DCEU values must be performed. See section“Manual Recovery from DCEU values”.
|Part VII - Using adaPTdeliver in Worklist Mode Resuming after a Partial Irradiation | b a c Figure 41-8. Recovery after termination by PTS - Manual recovery process (online) 7. In case the process is not successful, proceed to section “Manual Recovery from DCEU values”. Manual Recovery from DCEU values In case the loading of the file cannot be performed, the last resort is the use of the DCEU values. 1.
|Part VII - Using adaPTdeliver in Worklist Mode Resuming after a Partial Irradiation | Figure 41-9. Recovery after termination by PTS - Recovery from DCEU values Resuming Irradiation Note: In case of resuming from the irradiation records containing simulated values, a signature will be needed to proceed (Figure 41-10). Figure 41-10.
|Part VII - Using adaPTdeliver in Worklist Mode Resuming after a Partial Irradiation | Offline recovery - adaPTdeliver session crashes WARNING When performing the offline recovery procedure, when the system prompts the user to input the MU and counts values, the user must be careful to input the values corresponding to the irradiation they want to recover. The values displayed on the DCEU at that time may not be the ones needed for the procedure (e.g.
|Part VII - Using adaPTdeliver in Worklist Mode Resuming after a Partial Irradiation | Figure 41-11. Recovery after termination by PTS - Offline recovery The recovery of the data can be through one of the following methods: 1. Automatic recovery 2. Manual recovery from file 3. Manual recovery from DCEU values Automatic recovery IBA | 41-14 | 1. Click Offline Recovery in the Session Definition screen (Figure 41-11). 2.
|Part VII - Using adaPTdeliver in Worklist Mode Resuming after a Partial Irradiation | Figure 41-12. Recovery after termination by PTS - Automatic data recovery information (offline) Note: In case the prescribed dose was delivered and the irradiation does not need to be resumed, the corresponding beam can be marked off as complete using the Mark As Complete button. The beam will be recorded in the PTS database. 3. WARNING Select the line that corresponds to the irradiation you want to recover.
|Part VII - Using adaPTdeliver in Worklist Mode Resuming after a Partial Irradiation | 5. In case the automatic recovery process is successful, click OK to continue and proceed to section “Resuming Irradiation”. 6. In case the process is not successful, proceed to section “Manual recovery from File” Manual recovery from File 1. When the automatic recovery procedure fails, click Manual Recovery in the popup message (Figure 41-13). Figure 41-13.
|Part VII - Using adaPTdeliver in Worklist Mode 2. Resuming after a Partial Irradiation | Then, click LOAD FILE (Figure 41-15a). Note: In case the Operator cannot recover files manually, the recovery based on the DCEU values must be performed. See section ”Manual Recovery from DCEU values”. 3. In file explorer popup, browse and select the file as indicated by the Operator. Click Open. 4. In the Manual Recovery popup, the button turns green and now reads File Loaded.
|Part VII - Using adaPTdeliver in Worklist Mode Resuming after a Partial Irradiation | Manual Recovery from DCEU values In case the loading of the file cannot be performed, the last resort is the use of the DCEU values. 1. Enter the delivered cumulative MUd value related to that beam, taking into account all previous partial irradiations of that beam and click search for partial irradiation continuation (Figure 41-16). 2.
|Part VII - Using adaPTdeliver in Worklist Mode Resuming after a Partial Irradiation | Figure 41-17.
|Part VII - Using adaPTdeliver in Worklist Mode Resuming after a Partial Irradiation | Resuming Irradiation in the Same Session The user can resume the irradiation in the same session when there is: Termination by the Therapist, or Termination by the PTS where the adaPTdeliver session is maintained The irradiation can be resumed in the same session only after an online recovery. Note: Resuming the irradiation in a new session is possible in both the Standalone and the OIS mode. 1.
|Part VII - Using adaPTdeliver in Worklist Mode Resuming after a Partial Irradiation | Resuming irradiation Ensure the partial beam is selected as indicated above. Click Next to proceed to the PREPARATION SCREEN and complete the irradiation of the selected beam. Note: In case of resuming from the irradiation records containing simulated values, a signature will be needed to proceed (Figure 41-19). Figure 41-19.
|Part VII - Using adaPTdeliver in Worklist Mode Resuming after a Partial Irradiation | 4. Select the corresponding plan and beam in the OIS. (The data is sent by the OIS to adaPTdeliver.) 5. The Beam Selection screen appears directly with the chosen beam selected. In the Beam Selection screen (Figure 41-20), the beams marked as partial are indicated by an orange checkmark . Figure 41-20.
|Part VII - Using adaPTdeliver in Worklist Mode Resuming after a Partial Irradiation | Figure 41-21. Confirmation to the use of simulated data for resuming irradiation 6. 7. In the Dose panel (Figure 41-20), the user can see that: The Delivered MU is non-zero. The MU to be delivered is the difference between prescribed and delivered MU. A banner below the Dose panel gives info about the partial irradiation. Click Next and complete the irradiation of the selected beam.
|Part VII - Using adaPTdeliver in Worklist Mode Resuming after a Partial Irradiation | Intentionally left blank IBA | 41-24 | Clinical User’s Guide Volume 1 - Treatment Session
|Part VII - Using adaPTdeliver in Worklist Mode Resuming after a Partial Irradiation | End of an Irradiation Once the irradiation is complete, the status bar of the IRRADIATION SCREEN becomes green and a pop-up appears mentioning ‘Irradiation Done’. Figure 41-22. Irradiation Screen: Irradiation Complete (typical) It is possible to print or save an irradiation report (in PDF format) containing the delivery information before leaving the irradiation screen.
|Part VII - Using adaPTdeliver in Worklist Mode Resuming after a Partial Irradiation | Intentionally left blank IBA | 41-26 | Clinical User’s Guide Volume 1 - Treatment Session
Part VIII Browsing adaPTdeliver Reports Clinical User’s Guide Volume 1 - Treatment Session
Chapter 42 Browsing Reports •••••• History reports get created at the patient level. The adaPTdeliver application enables you to browse standalone history reports when no treatment is going on in the TR. Using Reports To display the list of reports that exist for a patient: 1. Click the ID or the icon of the patient, study, plan, or a beam of the desired patient. Note: Do not click the green handle to the left of the instance: this only expands or collapses an instance without making any selection. 2.
|Part VIII - Browsing adaPTdeliver Reports Browsing Reports | Figure 42-1. Report List Screen Sessions are listed with a gray background, beams are listed with a white background. The buttons at the bottom of the REPORT LIST SCREEN enable you to perform the following functions: Show a report: for detailed information, refer to Section “Display an Irradiation Report” on page 42-3. Print a report (for beams only) Export to DICOM (for sessions only): to save the record in DICOM format.
|Part VIII - Browsing adaPTdeliver Reports Browsing Reports | Beam Report Entry Characteristics The beam report entry provides the following information: Begin date and time End date and time Beam name Study ID Plan label To be delivered (MU) Delivered (MU) You can sort these reports by any of these column headings: click in the required column heading and the reports get sorted accordingly, in ascending or descending order.
|Part VIII - Browsing adaPTdeliver Reports browsing options Browsing Reports | viewing options output options Figure 42-2. Irradiation Report Screen From the IRRADIATION REPORT SCREEN you can perform the following functions: Return to the REPORT LIST SCREEN: click OK at the bottom of the screen. Print the report: click the printer icon at the top of the screen Save the report: click the save icon at the top of the screen.
|Part VIII - Browsing adaPTdeliver Reports Browsing Reports | Figure 42-3. DICOM Export Screen From the DICOM EXPORT SCREEN you can browse to the location where you want to store the export file. At the selected location, exported DICOM files are identified by their .DCM extension. Figure 42-4. DICOM File List These exported DICOM files contain all relevant irradiation data, which can be imported into the OIS or the Treatment Planning System (TPS).
|Part VIII - Browsing adaPTdeliver Reports Browsing Reports | Intentionally left blank IBA | 42-6 | Clinical User’s Guide Volume 1 - Treatment Session
Part IX adaPTdeliver in Physics Mode Clinical User’s Guide Volume 1 - Treatment Session
Chapter 43 Using adaPTdeliver in Physics Mode •••••• Purpose of Physics mode is to perform Quality Assurance (QA) and calibration activities. WARNING In Physics mode, patient treatment is absolutely forbidden at all times. Note: Make sure that you have obtained the right to use Physics mode. For detailed information on the User Manager, refer to Appendix B, “Managing PTS Users”. The login in adaPTdeliver is as follows: Clinical: to perform clinical operations.
|Part IX - adaPTdeliver in Physics Mode Using adaPTdeliver in Physics Mode | Figure 43-1. adaPTdeliver Login Screen The presence of purple elements on the screen indicates that you are logged in in Physics mode. Be aware that this color is a clear indication that you are working in an environment that is not suited nor intended for patient treatment.
|Part IX - adaPTdeliver in Physics Mode step indication Using adaPTdeliver in Physics Mode | step description ‘non-clinical’ indication Figure 43-2. adaPTdeliver in Physics Mode (Typical) In adaPTdeliver, at sites where Physics mode is deployed, active QA patients no longer appear in the selection area in Clinical mode. QA patients can be accessed in Physics mode only. Table 43-1.
|Part IX - adaPTdeliver in Physics Mode Using adaPTdeliver in Physics Mode | It is important to know that unlike in Clinical mode, in Physics mode error messages and pop-up messages are prevented and treatment records are not stored. For information generic to both Clinical mode and Physics mode, refer to Part V, “Using adaPTdeliver”. Session Definition In Physics mode, the background color of the step indication and the step description of adaPTdeliver screens is violet.
|Part IX - adaPTdeliver in Physics Mode Using adaPTdeliver in Physics Mode | Figure 43-4. Session Definition Screen - Physics Mode A message appears at the bottom of the screen when certain beam related information is missing. At the bottom of the screen, the following buttons are available: Important Display report: displays clinical information. Be aware that in Physics mode no treatment record is stored in the database nor sent to the Oncology Information System (OIS).
|Part IX - adaPTdeliver in Physics Mode Using adaPTdeliver in Physics Mode | Baselining Aspects in Clinical and Physics Mode As beams in Physics mode are to be used exclusively for QA and calibration purposes, there is no need to baseline beams in adaPTprescribe. Baselining is only needed for clinical beams intended to be used for patient irradiation and therefore needs to be done in Clinical mode only. Table 43-2.
|Part IX - adaPTdeliver in Physics Mode Using adaPTdeliver in Physics Mode | Using the Pristine Beam Tool As part of the PTS software package, IBA provides the Pristine Beam Tool. Its functions are as follows: It facilitates the execution by physicists of certain machine QA procedures that require depth dose curve acquisition, such as the regular verification of the machine’s tolerance.
|Part IX - adaPTdeliver in Physics Mode Using adaPTdeliver in Physics Mode | Figure 43-6. Pristine Beam Tool - BEAM SETTINGS SCREEN The beam settings which need to be specified before performing an irradiation with the Pristine beam tool are the following: Nozzle Beam Current (nA): this parameter indicates the proton beam current as measured in the nozzle (note that this is not the same as the cyclotron current).
|Part IX - adaPTdeliver in Physics Mode Using adaPTdeliver in Physics Mode | Figure 43-7. Pristine Beam Tool - Preparation Screen Once the nozzle and the beam are ready, you can proceed to irradiate the central spot from the IRRADIATION SCREEN. The commands on the left side of the irradiation screen enable you to control the irradiation whereas the information on the right side of the screens enables you to closely monitor the irradiation progress.
|Part IX - adaPTdeliver in Physics Mode Using adaPTdeliver in Physics Mode | Figure 43-8. Pristine Beam Tool - Irradiation Screen The data produced by this irradiation is gathered and processed using the dosimetry tools available at your center.
|Part IX - adaPTdeliver in Physics Mode Using adaPTdeliver in Physics Mode | Beam Selection As mentioned in Table 43-1 and Table 43-2, both baselined and unbaselined plans and beams of both clinical and QA patients appear in the list. To enable you to modify certain beam characteristics in Physics mode, the following fields are editable: Gantry angle Delivered MU: any partially delivered MU appear here.