
Users Manual Part 2


IBA | 14-22 |
Clinical User’s Guide
Volume 1 - Treatment Session
|Part II
- Using Treatment Room Equipment Installing and Removing Accessories into/from the Accessory Drawer or PBS
Installing Accessories onto a DN_XL Type Snout
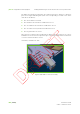
The procedure to install a block and accessory onto a DN_XL type snout is as follows:
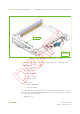
1. Insert the first block slice; the safety lock falls into place and the LED on the
snout’s tray indicating ‘Snout Slot 1.1’ turns green.
2. Repeat Step 1 with each block slice. Check to see that the corresponding LED
turns green.
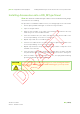
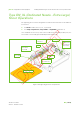
3. Check to see that the snout lock switch is in the Unlocked position (see
Figure 14-10), i.e., pointing in the direction of the drawer movement.
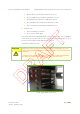
4. Insert the desired accessory (if any) in slot 2. The LED on the tray indicating
‘Snout Slot 2’ turns green.
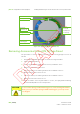
5. Rotate the snout lock switch by 90° to the Locked position. The LED on the tray
indicating ‘Snout Locked’ turns green.
Note: Always rotate the snout lock switch to the Locked position, even if no
accessory is installed in slot 2.
Removing Accessories from a DN_XL Type Snout
The procedure to remove a block and accessory from a DN_XL type snout is as
follows:
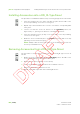
1. Rotate the snout lock switch by 90° to the Unlocked position. The LED on the
snout’s tray indicating ‘Snout Unlocked’ turns green.
2. Remove the accessory installed on slot 2 (if any).
3. Unlock the safety lock retaining the block slice installed on slot 1.4.
4. Remove the block slice installed on slot 1.4.
5. Repeat Step 3 and Step 4 with each remaining block slice.