
Users Manual Part 2


Clinical User’s Guide
IBA | 13-13|
Volume 1 - Treatment Session
|Part II
- Using Treatment Room Equipment Attaching/Removing a Patient Support Device to/from the PPS
|
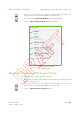
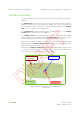
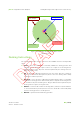
Figure 13-9. Automatic Docking Areas and Positions
(Top down view)
Docking Instructions
The following automatic docking instructions are available from the hand pendant
menu:
Fetch: to move the vacant PPS horizontally towards the docking position and
vertically up until the PPS coupler touches the coupler of the docking device
supported by the trolley. Any fetch movement passes by the docking reference
point (see Figure 13-9).
Lift: to raise the loaded docking device from the trolley, after the lock/unlock
button on the wrist has been pressed, and to move the docking device away
towards the treatment position.
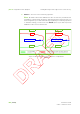
Put back: to move the PPS, loaded with a loaded docking device, horizontally
towards the docking position and vertically down to deposit the docking device
on a vacant trolley that is waiting there. Any put back movement passes by the
docking reference point (see Figure 13-9).
Release: to lower the PPS under the docking device, after the lock/unlock button
on the wrist has been pressed, and to move the vacant PPS horizontally away
from the docking position to a safe position.
Manual: to perform a manual docking operation.
docking area
docking reference
point, sample
docking position
coupling area