
Users Manual Part 2


Clinical User’s Guide
IBA | 11-33|
Volume 1 - Treatment Session
|Part II
- Using Treatment Room Equipment Using the Remote Positioning Controls
|
Moving the Snout
To insert the snout, proceed as follows:
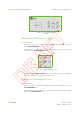
1. Click on the Insert Snout icon.
Figure 11-32. Insert Snout Icon
2. Press and hold the MEB and Move buttons on the remote positioning hardware
console until the device reaches the required position.
To retract the snout, proceed as follows:
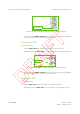
1. Click on the Retract Snout icon.
Figure 11-33. Retract Snout Icon
2. Press and hold the MEB and Move buttons on the remote positioning hardware
console until the device reaches the required position.
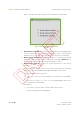
Note: This command enables you to perform a continuous snout motion,
without a precise target position. As such, it differs from the snout ‘Retract’
option available in Auto mode, which moves the snout to the ‘retracted’ target
position (i.e., it completely retracts the snout).
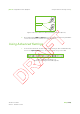
To move the snout to a particular extension, proceed as follows:
Note: This command may entail an insertion or a retraction of the snout,
depending on the location of the target position relative to the current snout
position.
1. Click on the field next to the Insert or Retract Snout icon, enter a target snout
extension and press the Enter key on your keyboard.