
Users Manual Part 1


Clinical User’s Guide
IBA | 9-27|
Volume 1 - Treatment Session
|Part II
- Using Treatment Room Equipment Using the Wireless Hand-Pendant
|
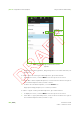
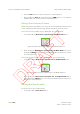
Figure 9-17. Insert Snout Icon
2. While holding the Insert Snout button, press and hold the MEB buttons on the
wireless hand-pendant until the device reaches the position that you consider
appropriate or motion is stopped by the software motion limits.
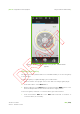
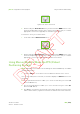
To retract the snout, proceed as follows:
1. Touch and hold the Retract Snout button.
Figure 9-18. Retract Snout Icon
2. While holding the Retract Snout button, press and hold the MEB buttons on the
wireless hand-pendant until the device reaches the position that you consider
appropriate or motion is stopped by the software motion limits.
Using Manual Mode to Move the PPS (Patient
Positioning System)
Note: Manual PPS motions are executed along the Horizontal Table Top Coordinate
System (HTTCS) axes.
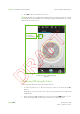
1. Touch the PPS icon on the device selection bar at the bottom of the screen.
Once the PPS subsystem is selected, the interface displays four Move buttons in the
central dial:
The top and bottom buttons enable you to move the PPS along the Y axis (Y+
button and Y- button).
The left and right buttons enable you to move the PPS along the X axis (X+
button and X- button).
The Z slider controls PPS movement along the Z axis (positive movement if the
slider is slid clockwise, negative movement if the slider is slid counterclockwise).