
Quick Start Guide

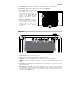
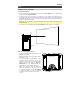
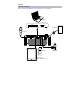

Table Of Contents
- Quickstart Guide (English)
- Introduction
- Features
- Setup
- Operation
- Selecting the Projector Source
- Projecting Image Files from a USB Drive
- Playing Music Files from a USB Drive
- Projecting Movie Files from a USB Drive
- Projecting Text Files from a USB Drive
- Projecting Video from a Device Connected to the HDMI Port
- Listening to Music from a Bluetooth Device
- Listening to Music from an Auxiliary Device
- Troubleshooting
- Guía de inicio rápido (Español)
- Introducción
- Características
- Instalación
- Funcionamiento
- Selección de la fuente del proyector
- Proyección de archivos de imágenes desde una unidad de USB
- Reproducción de música desde una unidad USB
- Proyección de archivos de película desde una unidad de USB
- Proyección de archivos de texto desde una unidad de USB
- Proyección de un video desde un dispositivo conectado al puerto HDMI
- Cómo escuchar música desde un dispositivo Bluetooth
- Cómo escuchar música desde un dispositivo auxiliar
- Solución de problemas
- Guide d’utilisation rapide (Français)
- Présentation
- Caractéristiques
- Démarrage
- Fonctionnement
- Sélection de la source du projecteur
- Projection de fichiers image depuis une clé USB
- Faire la lecture de fichiers audio depuis une clé USB
- Projection de fichiers vidéo depuis une clé USB
- Projection de fichiers texte depuis une clé USB
- Projection de fichiers vidéo depuis un appareil branché au port HDMI
- Faire la lecture de musique depuis un appareil Bluetooth
- Faire la lecture de musique depuis un appareil auxiliaire
- Dépannage
- Appendix (English)

7
Setup
Getting the Projector Ready
To set up the projector:
1. Power up the projector by flipping Projector Plus’s Power Switch to the on position and
then pressing the Projector button.
2. Position Projector Plus in front of your projection screen, making sure that the lens is
facing the screen. The closer that Projector Plus is to the projection screen, the smaller the
projected video will be. You’ll get a clear picture when the size of the projected video is
between 2.5 feet and 12.5 feet.
Note: The lens should be at the same height as the center of the projected video (as
pictured below).
3. Focus the lens as needed by turning the Focus Ring until you achieve a clear picture.
Some tips on using the projector:
• The projector will work best when used in a
dimly lit environment.
• White is the ideal color for the surface of the
projection screen.
• The lens should be perpendicular to the
projection screen. If Projector Plus is not
sitting on a level surface, you can correct the
angle of the lens by using the Keystone
Adjustment or by raising/lowering the
adjustable foot on the bottom of the unit.
• When you are done using the projector,
fasten the included lens cap to the lens. If
you are having trouble, use the Focus Ring
to make sure that the lens is extended
enough in order for the lens cap to latch
onto it.
Projector
Plus
Lens
Projection Screen
Projector Plus
Bottom Panel
Adjustable Foot