ion8i Access Point QUICK START GUIDE
ANYWHERE EVERYWHERE
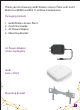
Thank you for choosing ion8i Wireless Access Point with 4x4:4 Multi-User MIMO and 802.11ac Wave 2 compliance. Packaging Content 1. 2. 3. 4.
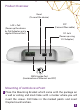
Product Overview Reset (To reset the device) LAN + PoE (Power up the device by PoE Adaptor and a regular Ethernet Port) SFP (Connect fiber cable) DC Jack (Power up using 12 V Adaptor) WAN Combo Port (Combination of Ethernet and SFP) Mounting of ion8i Access Point 1. Place the Mounting Bracket which came with the package on a wall or ceiling and mark holes with a marker where you will insert the screws. Drill holes in the marked points and insert the plastic wall anchors.
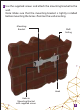
2. Use the supplied screws and attach the mounting bracket to the wall. Note: Make sure that the mounting bracket is tightly installed before mounting the Access Point on the wall or ceiling.
3.
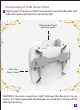
Unmounting of ion8i Access Point 1. Slightly push the Access Point towards the mounting bracket and slide the hooks out from the mounting slots. Slide Access Point out from hooks Push the Access Point WARNING: Insecure mounting might damage the device or cause injury. IO is not responsible for damages incurred by insecure wall or ceiling mounting.
Getting the ion8i Online Step 1: Power up The Access Point can be powered up using PoE Adaptor or AC Adaptor (12V) as shown below: AC Power Adaptor Power up using AC Power Adaptor Cat-5 PoE Adaptor Power up using PoE Adaptor Note: The Reset button serves two functions: Restart: Press and release the Reset button quickly. Restore to Factory Default Settings: Press and hold the Reset button for more than five seconds.
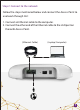
Step 2: Connect to the network Follow the steps mentioned below and connect the Access Point to a network through GUI: 1. Connect an Ethernet cable to the computer. 2. Connect the other end of the Ethernet cable to the LAN port on the ion8i Access Point.
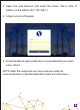
3. Open the web browser and enter the Access Point static IP address in the address bar: 192.168.1.1 4. A login screen will appear. 5. Enter the default login credentials as provided with your ion8i Access Point. NOTE: Refer the respective user manual on our website www.ionetworks.in for detailed information on GUI features.
Step 3: Check the LED status 5 GHz LED (Blinks in blue color when the wireless network interface comes up) VENT (Transfers the heat in ambient) 2.4 GHz LED (Blinks in blue color when the wireless network interface comes up) POWER LED (Blinks in blue color to notify the user that the device is powered ON) Observe the following safety precautions to avoid damage to the ion8i Access Point: 1. 2. 3. 4. 5. 6. Do not subject the device to high temperatures. Keep away from high voltage cables.
Contact us: Email: iosupport@hfcl.com Website: www.hfcl.com www.io.hfcl.com 8, Commercial Complex, Masjid Moth Greater Kailash-II, New Delhi-110048 ©HFCL Limited. All rights reserved. IO logo is registered trademarks of HFCL Limited Specifications are subject to change without notice.