
User Guide


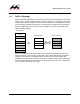
Table Of Contents
- Contents
- 1 Getting Started
- 2 Using the Software
- 3 Configuring RAID Using the Basic Input/Output System (BIOS)
- 4 Selecting a RAID Level

F
o
r
S
a
m
s
u
n
g
Us
e
On
l
y
3-32 Configuring RAID Using the Basic Input/Output System (BIOS)
Marvell RAID Utility User Guide
6. Enter values for the following logical drive properties:
RAID Level (RAID 0, RAID 1, RAID 10)
Array Name
Capacity
Stripe Size (16K, 32K, 64K, 128K)
Init Mode (Initialization: None or Quick)
Cache Mode (Write Through or Write Back)
7. Select NEXT, and then press ENTER.
The BIOS main screen appears and displays the new logical drive.
Figure 3-5 Logical Drive Display
Adapter 1
Arrays Information:
Disks Information:
ID Port
Disk Name Size Speed
1
5
9
13
17
18
2
1
3
4
5
5
SATA:
SATA:
SATA:
SATA:
PATA:
PATA:
Maxtor 6L200P0
HDT722516DLA380
HDT722516DLA380
HDT722516DLA380
HDT722516DLA380
ST3400832A
SATA 1
SATA 1
SATA 1
SATA 1
164.6GB
164.6GB
164.6GB
164.6GB
400GB
203.9GB
UDMA-5
UDMA-6
[Delete][Create][Adapter]
:Navigate, ENTER/SPACE:Select, ESC:Back/Exit
ID
1
Array Name Size Level Status Stripe Members
New array 293.8GB RAID10 Online 64KB 1.5.9.13.17.18