
User Guide

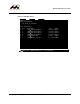


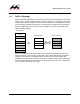
Table Of Contents
- Contents
- 1 Getting Started
- 2 Using the Software
- 3 Configuring RAID Using the Basic Input/Output System (BIOS)
- 4 Selecting a RAID Level

F
o
r
S
a
m
s
u
n
g
Us
e
On
l
y
3-30 Configuring RAID Using the Basic Input/Output System (BIOS)
Marvell RAID Utility User Guide
3.2 Using the BIOS
This section describes the menus and related screens for configuring the MRU through the
BIOS.
3.2.1 Adapter
Figure 3-1 shows the main BIOS menu screen, which displays the physical drives and
related information installed on your computer.
From the Adapter screen, you can navigate to the Create and Delete screens.
3.2.2 Create
Follow these steps to create a logical drive:
1. Start the BIOS.
See Accessing the BIOS on page 3-28.
2. At the top of the screen, select the Create tab, and then press ENTER.
The Create screen appears. This screen lets you select the disk drives for the logical drive.
Figure 3-2 Select Disks to Create, Screen 1
Select from disks to create
ID Port
Disk Name Size Speed
1
5
9
13
17
18
2
1
3
4
5
5
SATA:
SATA:
SATA:
SATA:
PATA:
PATA:
Maxtor 6L200P0
HDT722516DLA380
HDT722516DLA380
HDT722516DLA380
HDT722516DLA380
ST3400832A
SATA 1
SATA 1
SATA 1
SATA 1
164.6GB
164.6GB
164.6GB
164.6GB
400GB
203.9GB
UDMA-5
UDMA-6
NEXT