BUILT-IN OVEN inbouw oven IOV6011RVS • gebruiksaanwijzing • instruction manual IOV6011-instructions.
• IOV6011-instructions.
Nederlands 1. 2. 3. 4. 5. 6. 7. 8. 9. veiligheidsvoorschriften product omschrijving voor het eerste gebruik klok instellen kookwekker instellen bereidingstijd instellen einde van de bereidingstijd instellen uitgestelde begin van de bereidingstijd instellen instelling van de sterkte van het geluidssignaal pagina 4 pagina 8 pagina 9 pagina 9 pagina 9 pagina 9 pagina 10 pagina 10 pagina 10 10. bediening van de oven 11. reiniging & onderhoud 12. storingen & oplossingen 13.
Nederlands 1 veiligheidsvoorschriften • Lees eerst de gebruiksaanwijzing aandachtig en geheel door voordat u het apparaat gaat gebruiken en bewaar deze zorgvuldig voor latere raadpleging. • Gebruik dit apparaat uitsluitend voor de in de gebruiksaanwijzing beschreven doeleinden. Gebruik geen agressieve reinigingsmiddelen in dit apparaat. De oven is alleen geschikt voor het bereiden van voedsel. Het apparaat is niet geschikt voor industrieel of laboratorium gebruik.
• • • • • • • • • • • • • • • • • • • • verstikken. Controleer of het apparaat is uitgeschakeld voordat u de lamp vervangt om het risico op een elektrische schok te vermijden. Zet geen toebehoren van de oven op de open ovendeur. De ovenbodem nooit afdekken met aluminiumfolie. Aluminiumfolie houdt warmte tegen en geeft daardoor slechte bakresultaten. Bovendien kan het emaille van de ovenbodem beschadigd raken. De oven heeft een ventilator die de ovenmantel koelt.
• • • • • • • • aparte afstandsbediening. Sluit het apparaat alleen aan op wisselstroom, op een randgeaarde wandcontactdoos, met een netspanning overeenkomstig met de informatie aangegeven op het typeplaatje van het apparaat. Laat het apparaat niet onbeheerd achter indien het apparaat in werking is. Niet aan het snoer c.q. het apparaat trekken om de stekker uit de wandcontactdoos te halen. Het apparaat nooit met natte of vochtige handen aanraken.
Nederlands • 7 IOV6011-instructions.
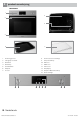
2 product omschrijving IOV6011RVS 1 4 2 5 3 6 1. 2. 3. 4. 5. 6. 7. 7 8. 9. 10. 11. 12. 13. 14. 15. Bedieningspaneel Handgreep ovendeur Ovendeur Ovenlamp Geleiderekken Bakplaat Rooster 8 9 10 11 12 Thermostaatcontrolelampje Temperatuurknop MIN toets KLOK toets PLUS toets + Klok/display Aan/uit en Ovenfunctieknop Controlelampje 13 14 15 8 • Nederlands IOV6011-instructions.
3 voor het eerste gebruik Voordat u het apparaat voor de eerste maal in gebruik neemt, dient u als volgt te werk te gaan: pak de oven voorzichtig uit en verwijder al het verpakkingsmateriaal. De verpakking (plastic zakken en karton) buiten het bereik van kinderen houden. Controleer na het uitpakken het apparaat zorgvuldig op uiterlijke schade, mogelijk ontstaan tijdens transport. Controleer of de spanning overeenkomt met die vermeld is op het typeplaatje.
7 einde van de bereidingstijd instellen De tijd waarop het functioneren van de oven beëindigd wordt. De oven zal tot de ingestelde eindtijd op de vooringestelde temperatuur en ovenfunctie functioneren. • Druk ongeveer 3 seconden op de middelste toets KLOK tot het symbool knipperend in het display verschijnt en druk nogmaals twee keer op de middelste toets KLOK waarna End in het display verschijnt. Als u de klok goed heeft ingesteld, geeft het display de huidige tijd aan.
10 bediening van de oven Om de oven te bedienen, beschikt deze over twee draaiknoppen. Een knop voor het instellen van de temperatuur en een knop om de oven in te schakelen en een ovenfunctie te selecteren. Temperatuurknop Ovenfunctie-knop INSCHAKELEN Om de oven in te schakelen, draait u de ovenfunctie-knop op de gewenste stand en de temperatuurknop op de gewenste temperatuur. Zodra de oven de juiste temperatuur heeft bereikt, gaat het thermostaatcontrolelampje uit.
Onderstaande tabellen zijn ter indicatie voor het bereiden van verschillende gerechten. Gebak Cupcakes & koekjes Pizza Vis Worst Functie °C Tijd (min.) 160-200 160-200 160-180 200-230 210-220 200 2-3 2 2 1-3 2 4-5 30-60 30-60 20-40 10-20 45-60 14-18 Groenten Rundvlees Varkensvlees Gevogelte 225-250 210-230 160-180 190-210 170-190 2 2 2 2 3 120-150 90-120 45-60 40-50 40-50 Functie °C Tijd (min.
11 reiniging & onderhoud Zet het apparaat uit als u deze wilt reinigen en laat het apparaat volledig afkoelen. Het apparaat mag niet gereinigd worden met een stoomreiniger of hogedruk reiniger. Binnenzijde Maak de binnenzijde van het apparaat na elk gebruik schoon. Gebruik een vochtige doek. Voor een grondige reiniging mag een ovenspray gebruikt worden. Spoel de resten van de schoonmaakmiddelen goed af. De binnenzijde goed drogen met een doek.
12 storingen & oplossingen Storing Oplossing De tiptoetsen reageren niet. Verwijder de stekker uit het stopcontact of draai de zekering in de groepenkast los. Wacht enkele minuten alvorens de stekker in het stopcontact te steken en schakel de oven in. De ovenverlichting brandt niet. Vervang de ovenlamp volgens de instructies. De oven wordt niet warm. - Is de juiste temperatuur en ovenfunctie ingesteld? - Is de deur van de oven goed gesloten? Het display van de klok knippert.
INBOUWMATEN In onderstaande afbeeldingen zijn de afmetingen van de uitsparingen aangegeven in mm. Let op dat u de juiste tekening gebruikt voor het model wat u heeft. ELEKTRISCHE AANSLUITING De netspanning moet overeenstemmen met de spanning weergegeven op het typeplaatje in de oven. De groep in de meterkast moeten gezekerd zijn met minimaal 16 Ampère elk. De aansluitkabel moet een aderdoorsnede hebben van minimaal 2,5 mm² en een lengte van 1,5 m.
English 1 safety instructions • Please read these instructions before operating the appliance and retain for future use. • The appliance is intended solely for domestic use within the home. Do not use corrosive chemicals or vapors in this appliance. This oven is especially designed to prepare food. It is not designed for industrial or laboratory use. • Do not place any object between the door of the oven. Don’t allow soil or cleaner residue to accumulate on the sealing surfaces.
• • • • • • • • • • • • • • • • • • • • • blocks the heat flow, which may result in inferior cooking results. This can also damage the enamel of the bottom of the oven. The oven has a fan that cools the oven casing. The fan may run for some time after the oven is switched off. The appliance should only be connected by a registered installer. Faulty parts may only be replaced by original parts. The manufacturer can only guarantee that original parts meet safety requirements.
the socket. We also recommend making all potentially dangerous parts of the appliance harmless, particularly for children who might be tempted to play with it. • Never immerse any part of the main body, lid, power cord and plug in water or any other liquid to protect against electrical hazards. • If the appliance is used for other purposes than intended, or is it not handled in accordance with the instruction manual, the full responsibility for any consequences will rest with the user.
2 appliance description IOV6011RVS 1 4 2 5 3 6 1. 2. 3. 4. 5. 6. 7. 7 Control panel Handle Oven door Oven lamp Guide rails Baking tray Rack 8. 9. 10. 11. 12. 13. 14. 15. 8 9 10 11 12 Thermostat control light Temperature knob MINUS key CLOCK key PLUS key + Clock/display On/ off and ovenfunction knob Control light 13 14 15 English • 19 IOV6011-instructions.
3 before first use Before you use the appliance for the first time, please do as follows: Carefully unpack the appliance and remove all the packaging material. Keep the material (plastic bags and cardboard) out of reach of children. Check the appliance after unpacking for any damage, possible from transportation. Check that the voltage in your home corresponds with the voltage printed on the appliance and plug it in a socket. Follow the installation instructions in chapter 13 for installing the oven.
7 setting the end of the cooking time The time which ends the functioning of the oven. The oven will function till the set end time on the preset temperature and oven function. • Press the central key CLOCK for about 3 seconds until the appears flashing in the display and press the central key CLOCK twice again after which End appears in the display. If the clock is set correctly, the display shows the current time. • Set the end of the cooking time with the [+] and [-] keys.
10 using the oven To set the oven, use the two knobs. One knob is for setting the temperature and one knob for switching the oven on and off and for selecting an oven function. Temperature knob Ovenfunction knob SWITCHING ON To switch the oven on, turn the oven function knob to the desired setting and the temperature knob to the right temperature. As soon as the oven has reached the set temperature, the thermostat light goes out.
The tables below are indicative for preparing different dishes. Pastry/flan Cupcakes & cookies Pizza Fish Sausage Function °C Time (min.) 160-200 160-200 160-180 200-230 210-220 200 2-3 2 2 1-3 2 4-5 30-60 30-60 20-40 10-20 45-60 14-18 Vegetables Beef Pork Poultry 225-250 210-230 160-180 190-210 170-190 2 2 2 2 3 120-150 90-120 45-60 40-50 40-50 Function °C Time (min.
11 cleaining & maintenance Switch the appliance off before cleaning and let it cool down. Do not clean the appliance with a pressure cleaner or steam cleaner. Interior Clean the inside of the appliance after every use. Use a damp cloth. To clean the oven thoroughly, an ovenspray may be used. Rinse well. Dry the inside will a dry cloth. Accessories Clean the accessories, such as the baking tray and the grid and the guide rails with warm water and a mild detergent. Dry thoroughly before reusing.
12 problems & solutions Problem Solution The touch keys don’t respond. Unplug the appliance or remove the fuse in the fusebox. Wait a few minutes before plugging the appliance back in. The oven lamp is not lit. Replace the oven lamp according to the instructions. The oven is not heating up. - Has the correct temperature and oven function been set? - Is the door of the oven closed properly? The display of the clock is flashing. - There has been a power failure. Reset the clock.
INSTALLATION DIMENSIONS In the drawing below, all the dimensions are displayed in mm. Make sure you use the right drawing for the model you have. ELECTRICAL CONNECTION Check that the voltage in your home corresponds with the voltage printed on the appliance. These groups in the meter must be secured with at least 16 amps each. The connection cable must have a cross-section of at least 2.5mm² and must have a length of at least 1.5 m.
garantie & service • Op alle apparaten van INVENTUM krijgt u standaard 2 jaar volledige fabrieksgarantie geldend vanaf de aankoopdatum. De garantie dekt aantoonbare defecten in materiaal, fabricage en functioneren van onderdelen en is inclusief materiaalkosten, voorrijkosten (indien van toepassing) en arbeidsloon. • INVENTUM geeft naast de 2 jaar volledige garantie 3 jaar verlengde garantie op arbeidsloon en onderdelen. Het enige dat we u berekenen zijn de voorrij- of verzendkosten.
guarantee & after sales service • INVENTUM guarantees this product for a period of 2 years starting from the date of purchase. The warranty covers proven defects in material, manufacturing and functioning of components and includes material costs, travel- or shipping costs and labor. • INVENTUM provides not only the 2 years standard warranty, but also gives 3 years extended warranty on spare parts and labor costs. We only bill the travel- or shipping costs.
IOV6011-instructions.
klein huishoudelijk witgoed vrijstaand witgoed inbouw persoonlijke verzorging Inventum Huishoudelijke Apparaten B.V. Generatorstraat 17 3903 LH Veenendaal T +31 (0)900 -468 36 88 info@inventum.eu www.inventum.eu twitter.com/inventum1908 facebook.com/inventum1908 youtube.com/inventum1908 IOV6011/01.1214 Wijzigingen en drukfouten voorbehouden/ Änderungen und Druckfehler vorbehalten/ Sous réserve de modification / Modifications and printing errors reserved IOV6011-instructions.