INDUCTION HOB inductie kookplaat IKI6020 IKI6021 IKI6022 IKI6023 IKI7821 IKI9021 • gebruiksaanwijzing • instruction manual
•
Nederlands 1. veiligheidsvoorschriften 2. product omschrijving 3. voor het eerste gebruik 4. bediening van de kookplaat 5. pannen voor inductie 6. reiniging & onderhoud 7. installatie voorschrift 8. storingen & oplossingen 9. product kaart Garantie & service pagina 4 pagina 8 pagina 10 pagina 10 pagina 13 pagina 13 pagina 14 pagina 18 pagina 19 pagina 37 1. safety instructions 2. appliance description 3. before first use 4. operation of the appliance 5. cookware for induction 6. cleaning & maintenance 7.
Nederlands 1 veiligheidsvoorschriften • Lees eerst de gebruiksaanwijzing aandachtig en geheel door voordat u het apparaat gaat gebruiken en bewaar deze zorgvuldig voor latere raadpleging. • Gebruik dit apparaat uitsluitend voor de in de gebruiksaanwijzing beschreven doeleinden. Gebruik de kookplaat alleen voor het bereiden van gerechten. Het toestel is niet geschikt om ruimtes te verwarmen. • WAARSCHUWING: het apparaat en de toegankelijke delen worden heet tijdens het gebruik. Raak hete delen niet aan.
• • • • • • • • • • • • • • bijvoorbeeld een deksel of een blusdeken. Het apparaat mag niet buiten gebruikt worden. Gebruik het apparaat niet als werkblad. Het apparaat kan per ongeluk worden ingeschakeld of nog heet zijn, waardoor voorwerpen kunnen smelten, heet worden of vlam vatten. Dek het apparaat nooit af met een doek of iets dergelijks. Als het apparaat nog heet is of wordt ingeschakeld, bestaat er brandgevaar. Gebruik nooit een hogedruk- of stoomreiniger voor het reinigen van de kookplaat.
• Houd tijdens het gebruik van de inductiekookplaat magnetiseerbare voorwerpen (creditcards, bankpasjes, diskettes, horloges e.d.) uit de buurt van het apparaat. Wij adviseren dragers van pacemakers om eerst uw arts te raadplegen. • Dit apparaat mag alleen door een erkend installateur worden aangesloten. • Defecte onderdelen mogen alleen vervangen worden door originele onderdelen. Alleen van die onderdelen kan de fabrikant garanderen dat zij aan de veiligheidseisen voldoen.
Nederlands • 7
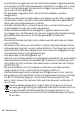
2 product omschrijving IKI6020 - IKI6021 - IKI6022 - IKI6023 1 2 3 IKI7821 4 1 2 3 4 Kookplaat 1. Kookzone linksachter (Ø 200 mm) 2. Kookzone linksvoor (Ø 160 mm) 3. Kookzone rechtsvoor (Ø 200 mm) 4. Kookzone rechtsachter (Ø 160 mm) IKI6020 IKI6021 IKI6022 IKI7821 11 14 14 6 7 8 9 9 12 13 Bedieningspaneel 6. Pauzetoets 7. Vermogenstoetsen + en - / slider control - geldt alleen voor model IKI6023 8. Vermogen/restwarmte indicatie 9. Kookzonetoets 10. Timertoets 11. Display timer 12.
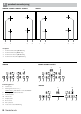
IKI9021 1 2 5 3 4 Kookplaat 1. Kookzone linksachter (Ø 200 mm) 2. Kookzone linksvoor (Ø 160 mm) 3. Kookzone rechtsvoor (Ø 200 mm) 4. Kookzone rechtsachter (Ø 160 mm) 5. Kookzone midden (Ø 250 mm) IKI9021 13 6 7 8 9 14 10 13 9 8 11 12 6 7 14 13 10 9 8 11 12 6 7 8 13 14 13 9 10 9 8 11 12 Bedieningspaneel 6. Pauzetoets 7. Toets voor toetsenblokkering 8. Vermogen/restwarmte indicatie 9. Kookzonetoets 10. Timertoets 11. Boost-toets 12. Aan-/ uittoets 13.
3 voor het eerste gebruik Voordat u het apparaat voor de eerste maal in gebruik neemt, dient u als volgt te werk te gaan: pak de kookplaat voorzichtig uit en verwijder al het verpakkingsmateriaal. De verpakking (plastic zakken en karton) buiten het bereik van kinderen houden. Controleer na het uitpakken het apparaat zorgvuldig op uiterlijke schade, mogelijk ontstaan tijdens transport. Reinig de glasplaat met een licht vochtige doek.
De tijdsduur van de Boost functie is afhankelijk van het ingestelde vermogen van de betreffende kookzone.
TIMER FUNCTIE INSTELLEN (niet beschikbaar op model IKI6020) De timer functie kan op twee manieren gebruikt worden: kookwekker en kooktimer. Kookwekker De kookwekker kan gebruikt worden zonder dat er kookzones in gebruik zijn. Schakel de kookplaat in en druk op de TIMER toets en het display toont . Stel de gewenste tijd in met de + en - toets. De kookwekker kan ingesteld worden van 0 tot 99 minuten.
5 pannen voor inductie Pannen die al eerder op een andere kookplaat zijn gebruikt, bijvoorbeeld een gaskookplaat, zijjn niet meer geschikt voor een inductie kookplaat. Schaf daarom voor het eerste gebruik nieuwe pannen aan als u geen geschikte pannen heeft. • • • • Gebruik pannen met een dikke, vlakke bodem die dezelfde diameter heeft als een kookzone. Dit vermindert de kooktijd. Pannen gemaakt van metaal, geëmailleerd metaal, gietijzer en roestvrijstaal geven het beste resultaat.
7 installatievoorschrift • De veiligheid tijdens het gebruik is alleen gegarandeerd als de montage technisch correct en in overeenstemming met dit installatievoorschrift is uitgevoerd. De installateur is aansprakelijk voor schade veroorzaakt door een foutieve montage. • De elektrische aansluiting mag alleen worden uitgevoerd door een bevoegde electriciën. Deze is op de hoogte van de landelijke en regionale veiligheidsvoorschriften waaraan de aansluiting moet voldoen.
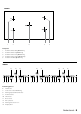
INBOUWMATEN In onderstaande afbeeldingen zijn de afmetingen van de uitsparingen aangegeven in mm. Let op dat u de juiste tekening gebruikt voor het model wat u heeft. 520 590 53 min. 25* 560 min. 25* 490 * 40mm bij gebruik van een houten achter- of zijwand. IKI6020 - IKI6021 - IKI6022 - IKI6023 520 780 53 min. 40** 750 min. 25* 490 * 60mm bij gebruik van een houten achterwand. ** 150mm bij gebruik van een houten zijwand. IKI7821 520 890 53 min. 40** 860 min.
BELUCHTING De elektronica in de kookplaat heeft koeling nodig. De kookplaat schakelt na korte tijd uit wanneer er onvoldoende lucht circuleert en oververhitting optreedt. Aan de onderzijde van de kookplaat bevinden zich de ventilatie-openingen. Door deze openingen moet koele lucht aangezogen kunnen worden. Aan de voorzijde is de kookplaat voorzien van uitblaasopeningen om de warme lucht af te voeren. Beluchting vindt plaats via de plint en de achterzijde van de kast. Zaag de beluchtingsopeningen (min.
ELEKTRISCHE AANSLUITING - 60 EN 78 CM BREED Sluit de kookplaat volgens het aansluitschema aan. Dit apparaat is standaard ingesteld voor 2x 1 fase (230V DC) en maakt gebruik van een zogenaamde 5-polige Perilex stekker. Deze groepen in de meterkast moeten gezekerd zijn met minimaal 16 Ampère elk. De aansluitkabel moet een aderdoorsnede hebben van minimaal 2,5 mm². ELEKTRISCHE AANSLUITING - 90 CM BREED Sluit de kookplaat volgens het aansluitschema aan.
8 storingen & oplossingen Indien er zich een probleem voordoet dan zal dit getoond worden op de displays. Storingscode Oorzaak Oplossing Ventilatie functioneert niet. Neem contact op met de servicedienst van Inventum. E3 Het voltage is te hoog. Laat uw aansluiting door een electriciën controleren. E4 Netfrequentie verschilt van de aangegeven waardes (50Hz). Laat uw aansluiting door een electriciën controleren. E5 De kookplaat is oververhit.
Ø 16 Ø 20 Ø 20 Diameter per kookzone [cm] (rechtsachter) Diameter per kookzone [cm] (linksachter) Diameter per kookzone [cm] (rechtsvoor) � Spanning aan-indicator Displays 220-230V 7400 10,6 590 x 520 x 53 LED tiptoetsen glas � � � per kookzone 220-230V 7400 10,6 590 x 520 x 53 LED tiptoetsen glas � � � per kookzone 193 220-230V 7400 10,6 590 x 520 x 53 LED tiptoetsen + slider glas � � � per kookzone 193 192 192 Opmerking: Op het typeplaatje - welke aan de onderzi
•
English 1 safety instructions • Please read these instructions before operating the appliance and retain for future use. • The appliance is intended solely for domestic use within the home. The hob is only to be used for the preparation of food. The appliance is not designed for heating rooms. • WARNING: this appliance and the accessible parts will become hot during use. Do not touch hot parts. Keep children younger than 8 away from the appliance unless they are under continuous supervision.
• • • • • • • • • • • • • • • • appliance is still hot or is switched on, there is a risk of fire. Never use a pressure cleaner or steam cleaner to clean the hob. Do not use the appliance in temperatures below 5°C. When you use the hob for the first time you will notice a “new smell”. Don’t worry, this is normal. If the kitchen is well ventilated, the smell will soon disappear.
• • • • • • • manufacturer, the manufacturer’s service organisation or equivalently qualified persons, in order to avoid dangerous situations. The electrical connection must comply with national and local regulations. The wall plug socket and plug should always be accessible. For connecting, use an approved cable with the correct cable diameters appropriate for the connection. The cable casing should be made of rubber (preferably a cable that meets the directive 60227 IEC 53).
2 appliance description IKI6020 - IKI6021 - IKI6022 - IKI6023 1 2 3 IKI7821 4 1 2 3 4 Hob 1. Cooking zone rear left (Ø 200 mm) 2. Cooking zone front left (Ø 160 mm) 3. Cooking zone front right (Ø 200 mm) 4. Cooking zone rear right (Ø 160 mm) IKI6020 IKI6021 IKI6022 IKI7821 11 14 14 6 7 8 9 9 12 13 Control panel 6. Pause key 7. Heat setting keys+ and - / slider control - only available on model IKI6023 8. Heat setting/ residual heat display 9. Cooking zone key 10. Timer key 11.
IKI9021 1 2 5 3 4 Hob 1. Cooking zone rear left (Ø 200 mm) 2. Cooking zone front left (Ø 160 mm) 3. Cooking zone front right (Ø 200 mm) 4. Cooking zone rear right (Ø 160 mm) 5. Cooking zone middle (Ø 250 mm) IKI9021 13 6 7 8 9 14 10 13 9 8 11 12 6 7 14 13 10 9 8 11 12 6 7 8 13 14 13 9 10 9 8 11 12 Bedieningspaneel 6. Pause key 7. Key lock 8. Heat setting/ residual heat display 9. Cooking zone key 10. Timer key 11. Boost key 12. On/ off key 13. Heat setting keys + and 14.
3 before first use Before you use the appliance for the first time, please do as follows: Carefully unpack the appliance and remove all the packaging material. Keep the material (plastic bags and cardboard) out of reach of children. Check the appliance after unpacking for any damage, possible from transportation. Clean the glass with a damp cloth. Check that the voltage in your home corresponds with the voltage printed on the bottom of the appliance and plug it in a socket.
SWITCHING A COOKING ZONE OFF Select the cooking zone you want to switch off by pressing the corresponding key. Touch the - key to decrease the heat setting to [0]. By pressing the keys + and - simultaneously, the setting turns directly to [0]. If the cooking zone is hot, the displays shows an [H] instead of [0]. SWITCHING OFF ALL COOKING ZONES AT ONCE To switch off all cooking zones at once, press the ON/OFF key. The displays which are still hot an [H] appears.
Cooking zone timer The cooking zone timer is connected to a cooking zone and can be set separately for each cooking zone. In contrast to the minute minder timer the cooking zone timer switches off the cooking zone when the set time runs out. • • • • Switch on the hob and activate a cooking zone. Set the heat setting with the + and - key. Press on the TIMER key . The display shows . The timer will now function as a minute minder timer.
5 cookware for induction Cookware which has been used on other hobs, such as a gas hob, are no longer suitable for use on an induction hob. Therefore purchase before the first use new cookware if you do not have suitable pans. • • • • Use thick, flat smooth bottomed cookware that are the same diameter as the cooking zone. This will help reduce cooking times. Cookware made of steel, enamelled steel, cast iron and stainless steel will give the best results.
7 installation instructions • The safety during use can only be guaranteed when the hob is installed correctly and according to the regulations. The installer is responsible for any damage caused by a faulty installation. • The electrical connection must be made by a qualified electricien. This person is aware of the national and local regulations the installation must comply with. • The appliance falls under protection class I and can only be used in combination with a grounding conductor connection.
INSTALLATION DIMENSIONS In the drawings below, all the dimenions are displayed in mm. Make sure you use the right drawing for the model you have. 520 590 53 min. 25* 560 min. 25* 490 * 40mm when the neighbouring walls are wood. IKI6020 - IKI6021 - IKI6022 - IKI6023 520 780 53 min. 40** 750 min. 25* 490 * 60mm when using a back of wood. ** 150mm when using a sidewall of wood. IKI7821 520 890 53 min. 40** 860 min. 25* 490 * 60mm when using a back of wood.
VENTILATION The electronics in the hob need to cool. The hob will automatically switch off if there is insufficient air circulation and the hob will overheat. There are ventilation openings on the underside of the appliance. It must be possible for cool air to be drawn in through these openings. There are outlet openings to the front of the appliance. Ventilation occurs through the plinth and the back of the cupboard. Saw out the ventilation openings (min. 100cm2).
ELECTRICAL CONNECTION FOR 60 AND 78 CM WIDE HOBS Connect the hob according to the wiring diagram. This device is set for 2 x 1 phase (230V DC) and uses a so-called 5-pin Perilex plug. These groups in the meter must be secured with at least 16 amps each. The connection cable must have a cross-section of at least 2.5 mm ². ELECTRICAL CONNECTION FOR A 90 CM WIDE HOB Connect the hob according to the wiring diagram. This device is set for three phase, three phase (400V DC) and uses a special 5-pin plug.
8 problems & solutions If there is an error, an error code will be shown at the displays. Error code Cause Solution E1 Cooling fan is disabled. Contact the service department of Inventum. E3 Supply voltage is too high. Have the installation checked by a qualified electricien. E4 Supply frequency is different from the rated values (50Hz). Have the installation checked by a qualified electricien. E5 The hob is overheated. Switch the appliance off and let the cooking zones cool down.
Manufacturer Timer Displays 220-230V 7400 10,6 590 x 520 x 53 LED touch keys glass 220-230V 7400 10,6 590 x 520 x 53 LED touch keys glass � � 220-230V 7400 10,6 590 x 520 x 53 LED touch keys + slider glass � � � per cooking zone Remark: on the rating label - which can be found at the bottom of the appliance - you will find the technical specifications of the appliance.
•
garantie & service • Op alle apparaten van INVENTUM krijgt u standaard 2 jaar volledige fabrieksgarantie geldend vanaf de aankoopdatum. De garantie dekt aantoonbare defecten in materiaal, fabricage en functioneren van onderdelen en is inclusief materiaalkosten, voorrijkosten (indien van toepassing) en arbeidsloon. • INVENTUM geeft naast de 2 jaar volledige garantie 3 jaar verlengde garantie op arbeidsloon en onderdelen. Het enige dat we u berekenen zijn de voorrij- of verzendkosten.
guarantee & after sales service • INVENTUM guarantees this product for a period of 2 years starting from the date of purchase. The warranty covers proven defects in material, manufacturing and functioning of components and includes material costs, travel- or shipping costs and labor. • INVENTUM provides not only the 2 years standard warranty, but also gives 3 years extended warranty on spare parts and labor costs. We only bill the travel- or shipping costs.
klein huishoudelijk witgoed vrijstaand witgoed inbouw persoonlijke verzorging Inventum Huishoudelijke Apparaten B.V. Generatorstraat 17 3903 LH Veenendaal T +31 (0)900 -468 36 88 info@inventum.eu www.inventum.eu twitter.com/inventum1908 facebook.com/inventum1908 youtube.com/inventum1908 IKI-serie/01.