
User Manual


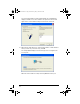
Table Of Contents
- Important Information
- Regulatory Information
- USA FCC Information Concerning Radio Frequency Interference
- Europe - EU Declaration of Conformity
- Overview
- System requirements
- Unpacking the boxes
- Assembling and charging the network hubs
- Before you begin
- Setting up your TI-Navigator™ network the first time
- Before you begin
- Hardware type and Ethernet adapter type
- Connecting the cables to the access point
- Starting the wizard
- Identifying your hardware and selecting a channel
- Identifying the network connection
- Configuring an Ethernet port
- Configuring a USB port
- Setting up your classroom network
- Activating the access point
- Activating Type 2 network hubs
- Activating Type 1 network hubs
- Registering your TI-Navigator™ system
- Installing the calculator operating system
- Connecting the calculators to the hubs
- Installing software Apps on the calculators
- Technical information
- Troubleshooting
- Resetting the Type 2 access point
- Resetting the Type 1 access point
- Texas Instruments Support and Service
- Battery Precautions for Calculators
- Battery Precautions for Rechargeable Battery Packs
- Texas Instruments (TI) Warranty Information
- TI LearningCheck 3.x License Agreement

33
6. With the network connector already attached to the end of the
network hub, insert the end of a paper clip though the small hole on
the bottom of the hub and gently press and hold the reset button
inside the unit.
7. Hold the reset button until the power status LED shows solid red.This
may take up to 10 seconds.
8. When you see the solid red light, remove the paper clip.
9. Repeat steps 6 through 8 for all network hubs, and wait.
Reset hole
Network hub, bottom view
InstallationGuide.book Page 33 Wednesday, May 3, 2006 10:19 AM