
User Manual
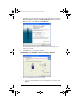
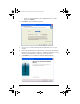


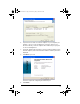


Table Of Contents
- Important Information
- Regulatory Information
- USA FCC Information Concerning Radio Frequency Interference
- Europe - EU Declaration of Conformity
- Overview
- System requirements
- Unpacking the boxes
- Assembling and charging the network hubs
- Before you begin
- Setting up your TI-Navigator™ network the first time
- Before you begin
- Hardware type and Ethernet adapter type
- Connecting the cables to the access point
- Starting the wizard
- Identifying your hardware and selecting a channel
- Identifying the network connection
- Configuring an Ethernet port
- Configuring a USB port
- Setting up your classroom network
- Activating the access point
- Activating Type 2 network hubs
- Activating Type 1 network hubs
- Registering your TI-Navigator™ system
- Installing the calculator operating system
- Connecting the calculators to the hubs
- Installing software Apps on the calculators
- Technical information
- Troubleshooting
- Resetting the Type 2 access point
- Resetting the Type 1 access point
- Texas Instruments Support and Service
- Battery Precautions for Calculators
- Battery Precautions for Rechargeable Battery Packs
- Texas Instruments (TI) Warranty Information
- TI LearningCheck 3.x License Agreement

21
4. Confirm that the AC9926 power adapter is connected to the access
point.
5. Now plug the AC adapter into a power outlet.
6. Insert the black Ethernet crossover cable into the Ethernet jack on
the USB-to-Ethernet adapter. Don’t connect the adapter to the
computer yet.
7. Confirm that the crossover cable connects the access point and the
USB-to-Ethernet adapter.
8. Select the options to confirm that you have completed all
connections except that the USB adapter is not connected to the
computer, and then click
Next.
InstallationGuide.book Page 21 Wednesday, May 3, 2006 10:19 AM