
User Manual
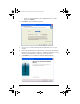


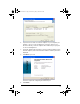


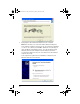

Table Of Contents
- Important Information
- Regulatory Information
- USA FCC Information Concerning Radio Frequency Interference
- Europe - EU Declaration of Conformity
- Overview
- System requirements
- Unpacking the boxes
- Assembling and charging the network hubs
- Before you begin
- Setting up your TI-Navigator™ network the first time
- Before you begin
- Hardware type and Ethernet adapter type
- Connecting the cables to the access point
- Starting the wizard
- Identifying your hardware and selecting a channel
- Identifying the network connection
- Configuring an Ethernet port
- Configuring a USB port
- Setting up your classroom network
- Activating the access point
- Activating Type 2 network hubs
- Activating Type 1 network hubs
- Registering your TI-Navigator™ system
- Installing the calculator operating system
- Connecting the calculators to the hubs
- Installing software Apps on the calculators
- Technical information
- Troubleshooting
- Resetting the Type 2 access point
- Resetting the Type 1 access point
- Texas Instruments Support and Service
- Battery Precautions for Calculators
- Battery Precautions for Rechargeable Battery Packs
- Texas Instruments (TI) Warranty Information
- TI LearningCheck 3.x License Agreement

15
1. Click OK to start the wizard. (You can run the wizard later by clicking
Start > Programs > TI Tools > TI Network Manager. When Network
Manager opens, click
Actions > Setup Wizard.)
The wizard lists the three major steps involved in setting up your
classroom network.
2. Click Next to proceed with the wizard.
Identifying your hardware and selecting a channel
1. Choose the hardware type you are using:
• If you are using hardware from a TI-Navigator™ 1.x system, click
Type 1.
InstallationGuide.book Page 15 Wednesday, May 3, 2006 10:19 AM