
User's Manual

MOUNTING
8/6/02 PRELIMINARY DOCUMENT 3
Mounting
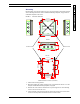
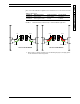
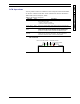
Mounting holes are provided at each corner to secure the LCM to a flat surface. Figure 4
shows mounting dimensions. Refer to FIGURE 9. Mounting Template, on page 8 for an
installation template at actual size.
FIGURE 2. Enclosure dimensions
1. Select a flat mounting location.
2. Mark and prepare the surface mounting holes, using dimensions above or use the
template in FIGURE 9. Mounting Template, on page 8.
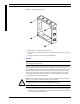
3. Remove the cover from the LCM enclosure by removing the four cover attaching
screws in the corners of the cover.
4. Insert mounting screws down through the same holes that the cover screws came
out of and securely fasten the LCM enclosure to the flat surface.
6.90 [175.36]
7.00 [177.83]
5.43 [138.03]
5.50 [139.58]
3.94 [100.00]
6.18 [157.01]
1.42 [36.09]
1.00 [25.40]
3.94 [100.00]
1.99 [50.50]
6.18 [157.03]
5.51 [140.00]
5.00 [127.00]
END VIEW
REAR VIEW
0.39 [10.00]
5.51 [140.00]
5.43 [138.03]
7.00 [177.83]
1.97 [50.00]
3.02 [76.62]
MOUNTING HOLES
MOUNTING HOLES
NOTE:
DIMENSIONS ARE IN INCHES (MILLIMETERS)