
Installation Manual
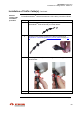
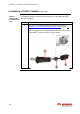
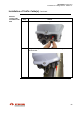
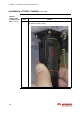
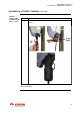
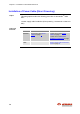


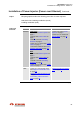
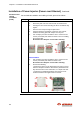
Table Of Contents
- Revisions
- Reasons of change
- Introduction
- Regulations
- General installation guidelines
- (RF exposure)
- Compliance boundary definition
- Table of Contents
- 1. Introduction
- Scope of document
- Target Audience
- Reference manuals
- Conventions
- 2. Prior to Installation
- Topics
- Packing list materials
- Powering materials
- Power injectors
- Power cables
- Power modules & connectors
- Grounding materials
- Data traffic materials
- S-FTP cables
- Fiber optic cables
- SFP
- Pole fastening materials
- Mounting bracket
- Steel hose clamps
- Cable ties
- StreetNodeTM 6250 PTP(1)
- Outdoor DC PonE
- Outdoor AC PonE
- Indoor AC PoE
- Anchor point
- / /
- Introduction
- Site survey
- Preparation of the installation premises
- Network port distributors
- Cables routing (lamp post)
- Power cable routing
- Cable conduits
- Wall installation
- Installation location
- Lamp post or pole
- Grounding
- Outdoor grounding system
- Power supply source
- Circuit breakers
- Line Of Sight (LOS) verification
- Lightning & Surge protection
- Internal ovp(2)
- Safety
- Introduction
- Cable length restrictions
- Instruction
- Topics
- Equipment installation tools
- Ethernet cable termination tools
- Power supply cable termination tools
- Grounding cable termination tools
- 3. Installation of StreetNode 6250 PTP
- Mechanical Installation & Grounding
- Installation of Traffic Cable(s)
- Installation of Power Cable (Direct Powering)
- Installation of Power Injector (Power over Ethernet)
- Appendix A: Terminating Ethernet (S-FTP) Cable
- Appendix B: Terminating Power Supply Cable
- Appendix C: Terminating Grounding cable
- Appendix D: Removing StreetNode 6250 PTP
- Appendix E: Standards of Compliance
- Precautions
- Topics
- Tools and materials
- Lamp post (or pole) installation procedure
- Grounding cable installation procedure
- Topics
- Tools and materials
- Ethernet (S-FTP) cable installation procedure
- Ethernet (S-FTP) cable installation with SFP
- Ethernet (S-FTP) cable installation with SFP
- Topics
- Tools and materials
- Procedure
- Introduction
- Topics
- Tools and materials
- Mechanical and cabling installation (PonE)
- Cabling installation (PoE)
- Introduction
- Parts of RG-45 jack
- Termination procedure
- Procedure
- Topics
- Procedure

Chapter 3. Installation of StreetNode 6250 PTP
62
Installation of Power Injector (Power over Ethernet), Continued
Mechanical and
cabling
installation
(PonE)
For mechanical installation and cabling of PonE, proceed as follows:
Step
Action
1
Pole installation:
a.
Attach the plate onto rear side of PonE, as shown below:
b.
Install grover and screw and using the PH-2 screwdriver fully
tighten:
c. Pass the hose clamp through the plate holes.
d.
Using the electrical screwdriver, extension and 7 mm bit,
install the mounting plate with clamps onto the pole.
e.
Use a tamper-proof torx screwdriver T10 to remove the six
screws (see below) and detach the PonE cover for installing
the ground cable.
Be careful not to drop the screws while removing.
Wall Installation:
a.
Use a tamper-proof torx screwdriver T10 to remove the six
screws (see below) and detach the PonE cover.
Be careful not to drop the screws while removing.
b. Perform the following:
• Position the device on the wall surface and using a pencil
mark the drill points. With the drill machine (fitted with 5 mm
bit), drill four holes on the wall surface, at a depth of 45 mm.
• Install the four supplied wall plugs and using the cross
headed screwdriver and tighten the four screws.
Continued on next page