
Operation Manual

119
PO
SAVE THESE INSTRUCTIONS
(119PO) RECTANGULAR ULTRA FRAME POOL ENGLISH 7.5” X 10.3” PANTONE 295U 07/22/2015
English
Page 11
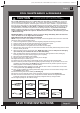
POOL SETUP (continued)
YoumayhavepurchasedthispoolwiththeIntexKrystalClear™filterpump.Thepumphasits
ownseparatesetofinstallationinstructions.Firstassembleyourpoolunitandthensetupthe
filterpump.
Estimatedassemblytime60~90minutes.(Notetheassemblytimeisonlyapproximateand
individualassemblyexperiencemayvary.)
• Findaflat,levellocationthatisfreeandclearofstones,branchesorothersharpobjectsthatmay
puncturethepoollinerorcauseinjury.
• Openthecartoncontainingtheliner,joints,legs,etc.,verycarefullyasthiscartoncanbeusedtostore
thepoolduringthewintermonthsorwhennotinuse.
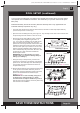
• Removethegroundcloth
(14)
fromcarton.Spreadit
outcompletelywithitsedgesbeingatleast5-6’
(1.5-2.0m)fromanyobstaclesuchaswalls,fences,
trees,etc.Removetheliner
(15)
fromcartonand
spreaditoutoverthegroundclothwiththedrainvalve
towardsthedrainingarea.Placethedrainvalveaway
fromthehouse.Openituptowarmitinthesun.This
warmingwillmakeinstallationeasier.Makesurethe
lineriscenteredatopthegroundcloth.Besuretoface
theendwiththe2hoseconnectorstowardsthe
electricalpowersource.
IMPORTANT: Do not drag the liner across the
ground as this can cause liner damage and pool
leakage (see drawing 1).
• Duringtheset-upofthispoolliner,pointthehose
connectionsoropeningsinthedirectionoftheelectric
powersource.Theouteredgeoftheassembledpool
istobewithinreachoftheelectricalconnectionfor
theoptionalfilterpump.
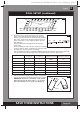
2.
Removeallthepartsfromthecarton(s)andplacethem
onthegroundinthelocationwheretheyaretobe
assembled.Checkthepartslistingandbesureallthe
piecestobeassembledareaccountedfor(see
drawings 2.1-2.4).
IMPORTANT: Do not start assembly if any pieces
are missing. For replacement pieces call the
Consumer Service telephone number in your area.
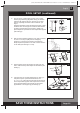
Afterallpiecesareaccountedformovethepiecesaway
fromthelinerforofinstallation.
1
ELECTRICAL SOURCE
5 - 6' (1.5 - 2.0 m)
5 - 6'
(1.5 - 2.0 m)
5 - 6'
(1.5 - 2.0 m)
LINER
2.1
157-1/2”x78-3/4”x39-3/8” /15’ X 9’ /16’ X 8’/ 18’ X 9’
(A)
CORNER JOINT
CORNER JOINT
CORNER JOINT
CORNER JOINT
(F)
(D)
(F)
(D)
(C)
(A)
(C)
LINER
(B)
(B)
(B)
(B)
2.2
118-1/8”x68-3/4”
(A)
CORNER JOINT
CORNER JOINT
CORNER JOINT
CORNER JOINT
(F)
(D)
(F)
(D)
(C)
LINER
(E)
(B)
2.3
(A)
CORNER
JOINT
CORNER
JOINT
CORNER
JOINT
CORNER
JOINT
(F)
(D)
(E)
(D)
(F)
(E)
(C)
LINER
(B)
(B)
(B)
(B)
(C)
(A)
(B)
(B)
(B)
(B)
24’ X 12’
(E)
(A)(B)(C)