
User guide


(118PO) ULTRA FRAME POOL ENGLISH 7.5” X 10.3” PANTONE 295U 07/20/2012
118
PO
SAVE THESE INSTRUCTIONS
Page 8
English
SETUP INSTRUCTIONS
POOL SETUP (continued)
IMPORTANT
Before allowing anyone to use the pool, hold a family meeting. Establish a set of
rules that include, at a minimum, the important safety rules and general aquatic
safety information in this manual. Review these rules on a regular basis and with
all users of the pool including guests.
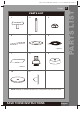
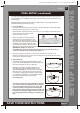
• Nextslidetheverticallegsintothebeltlooplocatedin
the middle of the pool liner. The bottom of the leg
should be inside the white restraining rope (6)
(optional)locatedneartheliner’sbottomedge.
Carefully slide the leg into the belt loop and place the
leg’sbottominsidetheropeandtheninsertthetopof
thelegintothebottomofthejoint.Snaptheleginto
joint’sholesbyaligningtheholeandthespring-loaded
pin.Attachtheleg’sendcap(3) to the bottom of the
leg (see drawing 3).
• Grabtheframepool’stopbeamsin2–3locationsand"shake"thepooltobesureall
thejoints,legsandbeams"fitintoeachother".
• Pullgently,inanoutwarddirection,thebottomofthelegmakingsurethelegisinside
the restraining rope.
• If pool was purchased with a filter pump, read the Krystal Clear™ Filter Pump
Manual first and then proceed to next installation step.
3. Filling of the pool
• Beforefillingthepoolwithwater,ensurethatthedrainpluginsidethepoolisclosedand
that the drain cap on the outside is screwed on tightly. Fill the pool with no more than 1
inch(2.5cm)ofwater.Checktoseewhetherthewaterislevel.
IMPORTANT: If the water in the pool flows to one side, the pool is not completely
level. Setting up the pool on unlevel ground will cause the pool to tilt resulting in
the sidewall material bulging and a potential collapse of the pool. If the pool is not
completely level, you must drain the pool, level the area or move the pool to a
different area that is level, and re-fill the pool, following the above directions.
• Smoothoutthebottomlinerwrinkles(frominsidethepool)bypushingoutwherethepool
floorandpoolsidesmeet.Or(fromoutsidepool)reachunderthesideofthepool,
grasp the pool floor and pull in an outward direction. If the ground cloth is causing the
wrinkles, have 2 adults pull from opposite sides to remove all wrinkles. Use the properly
assembled pool ladder when entering or exiting the pool during this process.
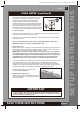
• Fillthepoolwithwateruptojustbelowthe
sleeve line (see drawing 4).
4. Posting aquatic safety signs
Selectahighlyvisibleareanearthepooltopost
theDangerNoDivingorJumpingsignincluded
later in this manual.
3
3
4
WATERLEVEL