
Instruction Manual


(87PO) ROUND METAL FRAME POOL ENGLISH 7.5” X 10.3” PANTONE 295U 07/20/2012
87PO
SAVE THESE INSTRUCTIONS
Page 12
English
SETUP INSTRUCTIONS
POOL SETUP (continued)
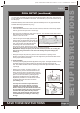
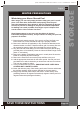
• Nextslidetheverticallegsintothebeltloop
locatedinthemiddleofthepoolliner.Thebottomof
thelegshouldbeinsidethewhiterestrainingrope(9)
(optional)locatedneartheliner’sbottomedge.
Exceptionsarethe10’(305cm)and12’(366cm)size
pools.Carefullyslidethelegintothebeltloopand
placetheleg’sbottominsidetheropeandtheninsert
thetopofthelegintothebottomofthejoint.Snapthis
legintojoint’sholesbyaligningtheholesandthe
spring-loadedpin.Attachtheleg’sendcap(5) to the
bottomoftheleg(see drawings 3.1 & 3.2).
• Uponconnectingthelastleg,grabholdoftheframe
pool’stopbeamsin2–3locations.Shakethepoolto
besurethatallthejoints,legsandbeamsfitintoeach
other.Ensurethatallpinsareinpositionbypushing
themdownwardsthroughtheholes(see drawing 4.1).
• Pullgently,inanoutwarddirection,thebottomofeach
leg;makingsurethelegisinsidetherestrainingrope.Thelegistoendupinanupright
verticalposition.
3. Filling of the pool
• Thefollowingappliestopoollinerswithhoseconnectors(16’(488cm)&belowpools).If
thepoolwaspurchasedwithoutafilterpump,inserttwoofthethreeplugs(11) into the
blackfilterpumpoutlets.Dothisfromtheinsideofthepoolsothatwaterwillnotrunout
when filling it.
Ifthepoolwaspurchasedwithafilterpump,readtheKrystalClear™FilterPump
Manual first and thenproceedtonextinstallationstep.
• Beforefillingthepoolwithwater,ensurethatthedrainpluginsidethepoolisclosedand
thatthedraincapontheoutsideisscrewedontightly.Fillthepoolwithnomorethan1
inch(2.5cm)ofwater.Checktoseewhetherthewaterislevel.
IMPORTANT: If the water in the pool flows to one side, the pool is not completely
level. Setting up the pool on unlevel ground will cause the pool to tilt resulting in
the sidewall material bulging and a potential collapse of the pool. If the pool is not
completely level, you must drain the pool, level the area or move the pool to a
different area that is level, and re-fill the pool, following the above directions.
• Smoothoutthebottomlinerwrinkles(frominsidethepool)bypushingoutwherethepool
floorandpoolsidesmeet.Or,(fromoutsidepool)reachunderthesideofthepool,
graspthepoolfloorandpullinanoutwarddirection.Ifthegroundclothiscausingthe
wrinkles,have2adultspullfromoppositesidestoremoveallwrinkles.Usetheproperly
assembledpoolladderwhenenteringorexitingthepoolduringthisprocess.
• Fillthepoolwithwateruptojustbelowthe
sleeveline.(see drawing 4.2).
4. Posting aquatic safety signs
Selectahighlyvisibleareanearthepoolto
posttheDangerNoDivingorJumpingsign
includedlaterinthismanual.
IMPORTANT
Before allowing anyone to use the pool, hold a family meeting. Establish a set of rules that include, at
a minimum, the important safety rules and general aquatic safety information in this manual. Review
these rules on a regular basis and with all users of the pool, including guests.
4.2
FILLLINE
3.1
8
9
5
3
3.2
4
4.1