
Instruction Manual


(87PO) ROUND METAL FRAME POOL ENGLISH 7.5” X 10.3” PANTONE 295U 07/20/2012
87PO
SAVE THESE INSTRUCTIONS
Page 11
English
SETUP INSTRUCTIONS
POOL SETUP (continued)
YoumayhavepurchasedthispoolwiththeIntexKrystalClear™filterpump.Thepumphas
itsownseparatesetofinstallationinstructions.Firstassembleyourpoolunitandthensetup
thefilterpump.
Estimatedassemblytime30-60minutes.(Notetheassemblytimeisonlyapproximateand
individualassemblyexperiencemayvary.)
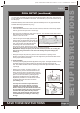
1. Liner preparation
• Findaflat,levellocationthatisfreeandclearofstones,branchesorothersharpobjects
thatmaypuncturethepoollinerorcauseinjury.
• Openthecartoncontainingtheliner,joints,legs,etc.,verycarefullyasthiscartoncanbe
usedtostorethepoolduringthewinter
monthsorwhennotinuse.
• Takeoutthegroundcloth(10)(optional)and
spreaditovertheclearedarea.Thentakeout
the liner (7)andspreaditoutovertheground
cloth,withthedrainvalvedirectedtowards
thedrainingarea.Placethedrainvalve
awayfromthehouse.Allowthesuntowarm
upthelinerbeforeinsertingthebeams(6)intothesleeveopenings.
IMPORTANT: Always set up the pool unit with at least 2 persons. Do not drag the
liner across the ground as this can cause liner damage and pool leakage (see
drawing 1).
• Duringthesetupofthispoolliner,pointthehoseconnectionsoropeningsinthe
directionoftheelectricpowersource.Theouteredgeofthepoolshouldbewithinreach
ofthepump’selectricalconnection.
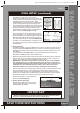
2. Frame assembly
• Theframepool’slegs(8)andbeams(6)fallintotwogroups.Thelargerdiametersarethe
horizontalbeamsthatareslid(pushed)intothesleeveopeningsatthetopofthe
liner.Thesmallerdiametersaretheverticallegs.Boththeselegsandbeamsfitintothe
T-joints(3).
• Startingatanylocation,butalwaysworkinginthe
samedirection,pushthehorizontalbeamintothe
sleeve.Oncethebeamiscenteredtakeoneofthe
T-jointsandusingtheconnectionpin(1), attach the
jointtooneendofthebeambyinsertingthepin
through the seal (2)andinthepre-drilledholes.
Repeatthisprocedureinacircularfashionuntilall
thebeamsandjointshavebeenconnected
(see drawing 2.1).
The last joint connection may be difficult to
complete. You can do it though, if you first
simultaneously raisethe last joint and beam
about 2 inches (5 cm). Now insert the beam into
the joint while lowering the pieces into position.
The beam will easily slide into the joint (see
drawing 2.2). Ensure that the last joint is fully
connected before proceeding to connecting
the legs.
1
7
1
2
6
3
2.1
2.2
3