
Installation Guide

NEWELMOUNT‐INSTVer‐4/1/16
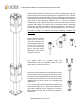
For Installation on a concrete surface (Using Concrete
Mounting Hardware Kit)
1. Lay out the location of the post. Note, concrete must be solid
and at least 3” thick.
2. Using the leveling plate as a template, mark the locations of the
4 mounting holes to be drilled.
3. Drill 4 holes into the concrete using a 3/8" diameter masonry
drill bit. The hole must be drilled to a minimum depth of 3-1/2".
- Remove all dust and debris from the holes
4. Install the 4 leveling screws into the threaded holes in the post
mount’s flange.
5. Place the leveling plate on the concrete surface and align over
the 4 drilled holes.
6. Place the post mount on top of the leveling plate and align the
4 holes.
7. Install the 4 concrete bolts as shown by applying downward
pressure while turning in a clockwise direction. Tighten to about
1/4” from the leveling plate.
8. Adjust the leveling screws as necessary to ensure the post
mount is plumb.
9. Finish tightening the concrete bolts until the heads are firmly
seated and the post mount is secure. (Do not over tighten)
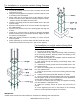
For Installation on a deck surface (Using Deck
Mounting Hardware Kit)
1. Lay out the location of the post.
2. Install at least 3" (two 2x8’s) of blocking under the decking
at the mounting location. Securely attach the blocking to the
joists using 3” or longer screws.
3. Using the leveling plate as a template, mark the locations of
the 4 mounting holes to be drilled.
4. Drill 4 holes through the decking and blocking using a 3/8"
diameter drill bit.
5. Install the 4 leveling screws into the threaded holes in the
post mount’s flange
6. Place the leveling plate on the decking surface and align
over the 4 drilled holes.
7. Place the post mount on top of the leveling plate and align
the 4 holes.
8. Install the 4 mounting bolts with washers as shown,
9. On the underside, place the bottom plate over the exposed
mounting bolts. (Use the centered holes for in-line applications
and the offset holes for corner applications.)
10. Secure the bottom plate by using the supplied mounting
nuts and washers, hand tighten only.
11. Adjust the leveling screws to ensure the post mount is
plumb.
12. Finish tightening the nuts on the bottom of the mounting
bolts. Re-confirm plumb and adjust as necessary.
IMPORTANT:
Installer must consult local code officials for compliance to building code requirements.