
Installation Guide


Page 2 of 3
3. Trim Installation
a. Once adhesive has set on column, install bottom wrap around lower end of
column. Apply adhesive liberally along the mitered edges. Use Velcro strap to
hold in place and secure with stainless steel finish nails.
b. Repeat step a with top wrap.
c. Position and attach pre-mitered WM164 cap and base trim at the lower edge
of the top wrap and at the upper edge of the bottom wrap, securing with
adhesive and stainless steel finish nails.
d. Fill all nail holes with a quality exterior grade vinyl spackle such as White
Lightning brand.
Newel Covers
1. Structural Post Preparation
a. Insure that structural newel post is sound, straight and plumb.
• Note that all Intex Newel Cover sizing is given as outside dimensions. See
the table at the end of these instructions for specific internal sizing
information.
b. Based upon Newel Cover size, pack out the structural newel as appropriate to
support the cover. Insure that adequate blocking is placed at all locations where
railing will be attached.
2. Newel Cover Installation
a. Slide the Newel Cover down over the structural newel and blocking/packing, and
secure with stainless steel finishing nails.
3. Trim Installation
a. Bottom wrap with WM164 cap and base trim ships pre-assembled on the Newel
Cover, but can be slipped off for trimming. Once bottom wrap/trim is in place,
secure with stainless steel finishing nails.
b. Apply Newel Cap (purchased separately) using exterior caulk. Do not secure
Cap until railings are installed.
Builders Series Post Wraps
1. Structural Post Preparation
a. Insure that structural post is sound, straight and plumb.
• Note that all Intex Post Wrap sizing is given as outside dimensions.
See the table at the end of these instructions for specific internal
sizing information.
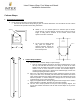
b. Attach 3/4” x 3” x 3” L-shaped spacers to structural post as shown.
Locate spacers 4” up from bottom, 4” down from top and at center of
length. If railing will be attached to the post, locate center spacers at
location of handrail.
c. For 10” and 12” Post Wraps only, place the supplied ‘U’ shaped stand-
offs around the structural post and attach to the internal spacers.
2. Column Wrap Installation
a. Cut both halves of Post Wrap to required height.
b. Place one of the Post Wrap halves in place against the spacers (or stand-offs) on one side of the structural
post and attach with stainless steel finish nails, placing nails where they will be hidden by the top and bottom
trim wrap whenever possible.
c. Apply the supplied adhesive liberally along both aligning mitered edges of the Post Wrap half which is
installed, and place the other half in position. Insure that the aligning miters are male-female on each side.
Typical
3-5/8" x 3-5/8"
4 X 4
6"
Spacers