
User Manual


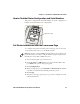
Table Of Contents
- Send Feedback
- Before You Begin
- Chapter 1 - About the Printers
- Chapter 2 - Connect and Configure the Printer
- Chapter 3 - Troubleshoot and Maintain the Printer
- Appendix A - Specifications
- Appendix B - Printer Settings

Chapter 2 — Connect and Configure the Printer
22 PR2 and PR3 Mobile Receipt Printer User Manual
Configure the Printer from the Web Page
To configure the printer from the printer web page, you need to turn
on the printer and connect to your Wi-Fi network.
1 On your desktop PC, open a web browser.
2 In the Location or Address bar, type the printer IP address and
press Enter. The printer web page appears.
3 Click Configuration.
4 When prompted, type your Username and Password. The default
username is admin and the default password is pass.
5 Click Login.
6 Change the necessary settings.
7 When you are done, click Submit.
Configure the Printer Using PrintSet
To configure your printer using PrintSet 5.2 or later, you connect your
printer to a desktop PC through a USB connection.
1 Connect your printer to a desktop PC with a USB cable.
2 Download and install Intermec PrintSet 5.2 or later from the
Intermec website at www.intermec.com.
3 Use PrintSet to add your printer to PrintSet and configure printer
settings.
Note: If you are not using a DHCP network and you do not know your
printer IP address, you must configure Wi-Fi settings using Intermec
PrintSet 5.2 or later with a USB connection.
Note: The first time you create a USB connection to a desktop PC, you
must use Intermec InterDriver to install the appropriate driver
software on your PC.