User's Guide EasyCoder PL4 Printer
Intermec Technologies Corporation 6001 36th Avenue West Everett, WA 98203 U.S. service and technical support: 1-800-755-5505 U.S. media supplies ordering information: 1-800-227-9947 Canadian service and technical support: 1-800-668-7043 Canadian media supplies ordering information: 1-800-268-6936 Outside U.S.A. and Canada: Contact your local Intermec service supplier.
Contents Introducing the EasyCoder PL4 Printer......................................... 5 Unpacking and Inspecting .............................................. 5 Reporting Damage.......................................................... 5 Learning About the Printer............................................................ 6 Installing the Battery ..................................................................... 7 Charging the Battery ..................................................................
Troubleshooting .......................................................................... 52 Understanding the Standard Control Panel LEDs ......... 53 Understanding the LCD Control Panel Icons................ 53 Troubleshooting Printer Problems................................. 54 Using Communications Diagnostics Mode ................... 57 Specifications............................................................................... 58 Printing Specifications................................................
Introducing the EasyCoder PL4 Printer Thank you for choosing the Intermec EasyCoder® PL4 Printer. This rugged printer is sure to become a productive and efficient addition to your workplace thanks to its innovative design. Intermec ensures world-class support for all of your bar code printers, software, and supplies. This user’s guide gives you all the information necessary to operate the PL4 printer. The PL4 uses the CPL programming language.
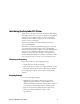
Learning About the Printer The EasyCoder PL4 printer is a rugged, portable label and receipt printer that provides: • Print resolution of 203 dpi • Print speeds up to 7.62 cm (3 inches) per second • Serial or wireless communications options Use the next two illustrations to familiarize yourself with the printer.
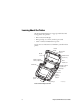
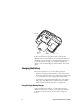
Communications port Belt clip Charger jack Battery PL4U003.eps Back view of the EasyCoder PL4 Installing the Battery Note: Batteries are shipped uncharged. 1 Unwrap the battery. 2 Rotate the belt clip to allow access to the battery compartment. 3 Insert the battery into the printer.
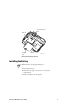
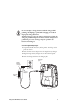
Belt clip Charger jack Battery PL4U006.eps 4 Press the battery into the printer until it locks in place. When the battery is first installed, the Control Panel indicators may briefly turn on and then go off which indicates the battery is not fully charged. For help, see “Using the Single Battery Charger” and “Understanding the Control Panels” later in this guide.
Do not attempt to charge batteries with the charger while printing. Attempting to print while charging can result in improperly charged batteries. Attention: Ne pas essayer de charger des batteries à l’aide du chargeur pendant l’impression. Toute tentative d’impression pendant le processus de charge risque de produire des batteries mal chargées. To use the single battery charger 1 (Optional) Install the battery in the printer. For help, see the previous section.
5 The charger LED will indicate the status of the charger as follows: Charger LED Status Description Steady on light The battery is undergoing a fast charge. Slow blinking light The charger is in trickle mode. The battery is ready for use. Rapidly blinking light There is a problem with the battery. It may have an internal short or its charge monitoring circuitry may be malfunctioning. Do not use the battery.
Power supply Fast Faul t Char ge Full Char ge Read y Fast Faul t Char ge Full Char ge Read y Fast Amber indicator Faul t Char ge Full Char ge Read y Fast Faul Green indicator Char ge Full t Char ge Read Powe y r Charger bay PL4U009.eps Power indicator 2 Plug a battery into any one of the four charger bays, noting the orientation of the battery. 3 Slide the battery into the charging bay until it stops and then rock the battery back until it snaps into place.
Note: A fault condition is caused by a problem with the battery. The charger may indicate a fault because the battery is too hot or cold to charge reliably. Charge batteries between 0°C to 45°C (32°F to 113°F). If the amber indicator starts flashing on the second attempt, the battery should be discarded. 4-Pack Charger Cycle Times for PL4 Batteries Percentage Charged Time Battery 80% Charged 2.5 hrs. Battery Fully Charged 5 hrs. These times are for completely discharged batteries.
Understanding the Control Panels The EasyCoder PL4 comes with one of two possible control panels: • The standard control panel • The LCD control panel Standard Control Panel The next illustration shows the standard control panel with its three buttons and two LEDs. Power button Green LED Yellow Feed LED button Function button PL4U016.eps Standard Control Panel Functions Button or LED Function Power button Turns the printer on and off.
Standard Control Panel Functions (continued) Button or LED Function Yellow LED Steady on light indicates an out of media or media cover not closed error condition. Fast blink indicates RF activity (on RF equipped printers only). Fast blink with a chime indicates that no application is loaded. For more information , see “Understanding the Standard Control Panel LEDs” later in this guide. Feed button Advances the media out one label or a software determined length of media.
Feed button Printer status icons Power button LCD Scroll button Select button PL4U017.eps LCD Control Panel Functions Button or LED Function Feed Advances the media out one label or a software determined length of media. Scroll Scrolls through the options and settings. Select Selects an option or setting. Power Turns the printer on and off. The top of the screen has a row of status icons that indicate the state of various printer functions.
In addition to the status icons, the LCD control panel can display many of the printer’s settings and functions as text. Refer to the next table, “LCD Functions,” for the full set of printer features that are available with the LCD panel. To set these functions, see the EasyCoder PL-Series Printer Programmer’s Reference Manual.
* The highest baud rate with consistent results is 38400. ** Some parameters, such as the WLAN ID number and non-standard noactivity time out values can be set using a PC running Intermec PLUS and a data cable link to the printer. The LCD has a backlight option that allows viewing of the screen in a dark environment or provides better contrast in a very bright environment. Using the backlight decreases the time the printer runs between charges.
PL4U011.eps 3 Pull the media supports apart, insert the roll of media between them, and let the media supports close. Make sure the media pulls off the core in the direction shown in the next illustration. Media supports PL4U013.
The supports adjust themselves to the width of the media. The media should be able to spin freely on the supports. 4 If you want to use the printer in Tear-Off mode, go to the next step. If you want to use the printer in Self-Strip mode, peel a few labels off of the media. 5 Close the media cover. 6 If you want to use the printer in Tear-Off mode, flip the self-strip bar down away from the latch assembly.
7 Rotate the latch assembly until it locks in place. 8 Turn on the printer or press the Feed button if the printer is already on. The printer advances the media. Tear-Off mode Self-Strip mode Media cover Media cover Latch assembly PL4U044.eps Latch assembly The printer advances the media to the next label, if printing labels. If you are printing on continuous media, the printer will advance a short strip of media and will then be ready for printing.
Self-strip bar PL4U046 .eps Latch assembly 4 Rotate the latch assembly until it locks in place. Loading Fanfold Media The PL4 has a loading slot in the rear of the media compartment that allows you to use standard 101.6-mm (4-inch) wide fanfold media from an external supply. It is important to place the external media supply in a location that allows the media to feed easily through the printer. To load fanfold media 1 Press the latch release button on the side of the printer.
Rear media slot Media spacer PL4U015.eps Surface of media to be printed 5 Close the media cover and then rotate the latch assembly until it locks in place. 6 Turn on the printer or press the Feed button if the printer is already on. The printer advances the media to the next label, if printing labels. If you are printing on continuous media, the printer will advance a short strip of media and will then be ready for printing.
To print a configuration label 1 Turn the printer off. Load the media compartment with continuous media (media with no black marks printed on the back). 2 Press and hold the Feed button. 3 Press and release the Power button and keep the Feed button pressed. When printing starts, release the Feed button. The printer prints a line of interlocking “x” characters to make sure all elements of the printhead are working, prints out the version of software loaded in the printer, and then prints two reports.
1 2 3 4 5 6 7 8 9 10 11 12 13 14 15 1234567890 Intermec PL4 V79/00 08/24/01 Serial Number: XXEC00-10-0042 xxQF00-10-0042 Name: xxQF00-10-0042 Unit serial number Program: Firmware:HTQ47940 /18 Chksum:F18A Software:HTK44L Chksum:5C8F Application number Ver:L4.R79.40.U176.B19.T19.A00 Cable Communications: 19200 BPS, N,8,1 Handshake:hardware DSR: 1 Bridge mode: off Report appears only Wireless Communications: on units with wireless options installed.
Cable Communications: 115200 BPS, N,8,1 Handshake:Hardware Wireless Communications: NO LINK ATTEMPTED SRRF Version: Release Date: Src Address: Dest Address: Data Retries: Packet Size: RF Baud: Max RF Baud: Manchester: Sleep Mode: CC Threshold: Extra CCF: Busy Mode: Low Battery: Debug Mode: 5.17.12W 05/08/00 1140850687 0 5 1000 9600 9600 Enabled Enabled 10 Disabled Disabled Shutdown Disabled Bluetooth Software Version Bluetooth settings Bluetooth section of report PCMCIA/CF Adapter 1.
Peripherals: MCR 2.00 LCD: Installed Expansion module: 0x1D 802.11/b PCMCIA 5V Other : 0F Power Management: In-activity Timeout:120 Secs Low-battery Timeout:60 Secs Remote(DTR) pwr-off:Enabled Voltage :6.98(179) Low-bat Warning :6.86(176) Low-bat Shut-down:6.
Establishing Communications With a Terminal The printer must establish communications with a host terminal that sends the data to be printed. The PL4 printer provides three ways to communicate with a terminal: • Serial cable between the printer and the host terminal • Bluetooth™ radio link • Wireless Local Area Network (WLAN) per 802.11b specifications Serial Cable Communications All EasyCoder PL4 printers can communicate by serial cable.
5020 Communications port Communications cable to terminal PL4U019.eps Connecting the printer to a terminal Serial communications cable to computer PL4U021.eps Connecting the printer to a PC The next table indicates the Intermec terminals that have been tested with the PL4 printer and the part number for the cable you need to connect the terminal and printer.
Terminals and Cables Terminal Cable Part Number Trakker Antares 2415 BL11757-000 with the communications dock (P/N TD2410A) or serial adapter cable (P/N 069591) Trakker Antares 2425 BL11757-000 with the optical link adapter (P/N 064021) Trakker Antares 2435 BL11537-1 BL11537-2 Trakker Antares 2455/2475 BL16816-1 Trakker Antares 248X BL11757-000 502X BL11757-000 5055 BL11757-000 6110 BL11757-000 6400 BL11757-000 6640 and 665X BL11757-000 700 Series Mobile Computers BL16815-1 RT1100/17
Bluetooth Communications Note: The following section only applies when the Bluetooth Module is installed in the PL4 printer. The radiated output power of this internal wireless radio is far below the FCC radio frequency exposure limits. Nevertheless, this Bluetooth radio must be used in such a manner that the antenna is 2.5 cm (1 inch) or further from the human body such as with a belt clip or shoulder strap. Do not use the printer in an unauthorized manner.
Note: If the printer times out, sending a print request through the Bluetooth connection will not turn the printer on. Make sure the printer is on before sending your print request. To print labels from a Bluetooth-enabled device 1 Create a label file with a .LBL extension, and load it on your device. You can use Intermec PLUS to create your label file. For help, see the online help.
11 Close the Bluetooth print utility, or print another label. Wireless Local Area Network (WLAN) Communications This section provides information about the Compact Flash radio and PCMCIA card radio and procedures for the following setup scenarios: • LPD and TCP printing • WEP encryption • POP3 e-mail printing • Ad Hoc mode WLAN Module Using a Compact Flash Radio Note: The following section only applies when the CF (Compact Flash) WLAN module is installed in the PL4 printer.
LAN’s perimeter. Methods of establishing communications to the PL4 vary with each LAN application. WLAN Module Using a PCMCIA Card Radio Note: The following section only applies when the PCMCIA card WLAN module is installed in the PL4 printer. The FCC ID number label is on the bottom of the printer. Use of the PL4 with the PCMCIA card radio module meets the FCC requirements for radio frequency radiation exposure when worn in the standard configuration.
Setting Up LPD or TCP Printing Host Access point PL4 printer Laptop PC PL4U049.eps You use LPD printing in most Unix environments. LPD printing requires an LPD daemon to be running on the Unix server. TCP sockets printing is supported on most platforms, including Windows and Unix. Before setting up the printer, you need to know the following information about your wireless network. If you are not familiar with this information, please contact your network administrator for assistance.
For more information on using and sending commands to your printer, see the EasyCoder PL-Series Printer Programmer’s Reference Manual. Note: If the printer times out, sending a print request through the 802.11b connection will not turn the printer on. Make sure the printer is on before sending your print request. To set up for LPD or TCP printing 1 Print a configuration label. For help, see “Verifying the Printer Is Working” earlier in this guide.
! U1 SETVAR “ip.gateway” “xxx.xxx.xxx.xxx” ! U1 SETVAR “ip.addr” “xxx.xxx.xxx.xxx” where “xxx.xxx.xxx.xxx” will be replaced with valid values for your network. If you are unsure what values to enter, please contact your network administrator for assistance. 6 Turn the printer off and on. 7 Test the configuration. For help, see the next procedure. To test that the printer is ready for LPD or TCP printing 1 Print a configuration label. For help, see “Verifying the Printer Is Working” earlier in this guide.
For more information on using and sending commands to your printer, see the EasyCoder PL-Series Printer Programmer’s Reference Manual. To set up WEP encryption 1 Print a configuration label. For help, see “Verifying the Printer Is Working” earlier in this guide. 2 Connect to the printer via the serial cable and a communications program (such as HyperTerminal). Ensure your communications software matches the baud rate displayed in the configuration label generated in Step 1.
7 Set the encryption key of the printer via the following command: ! U1 SETVAR “wlan.encryption_keyN” “encryptionkey” where the N is 1, 2, 3, or 4 depending on which index is being used, and encryptionkey is 10 or 26 hexadecimal (0 to 9, A to F) characters depending on whether 40-bit or 128-bit encryption is enabled. The key must match your wireless network’s WEP encryption key. 8 Set the authentication type of the printer via the following command: ! U1 SETVAR “wlan.
2 Ping the IP address of the printer and verify acknowledgement (from a DOS prompt on Windows platforms). 3 Print a test label via Intermec PLUS. Test using TCP sockets (port 6101) and LPD. Setting Up for POP3 E-mail Printing Host Email To: From: Access point PL4 printer Laptop PC PL4U053.eps The PL4 printer is capable of connecting to a POP3 mailbox.
To successfully configure the printer for POP3 support, you need the following information: • The IP address of the POP3 server • The username of the POP3 account • The password of the POP3 account • The poll frequency for the printer. The poll frequency tells the printer how often to check for e-mail. If you are unfamiliar with any of the above parameters and settings, please contact your network administrator for assistance.
5 Set the poll frequency of the printer. The poll frequency determines how often the printer checks for new e-mail. It is recommended that you choose a value greater than 10 seconds; otherwise the printer may be unresponsive to other activity. Set the poll frequency using the following command: ! U1 SETVAR “ip.pop3.poll” “xxx” where “xxx” is the desired time in seconds for how often the printer should check for new e-mail. 6 Enable POP3 via the command: ! U1 SETVAR “ip.pop3.
Setting Up for Ad Hoc Mode PL4 printer Laptop Hand-held computer PL4 printer PL4U055.eps This section explains how to set up your printer for Ad Hoc mode. You use Ad Hoc mode to communicate with a wireless device without using an access point. Before setting up the printer, you need to know the following information about your wireless network. If you are not familiar with this information, please contact your network administrator for assistance.
2 Connect to the printer via the serial cable and a communications program (such as HyperTerminal). Ensure your communications software matches the baud rate displayed in the configuration label generated in Step 1. For help connecting the printer to a PC, see “Serial Cable Communications” earlier in this guide. 3 Reset the printer to the factory network defaults by typing the following two commands in the serial communication program window: ! U1 DO “device.restore_defaults” “wlan” ! U1 DO “device.
where “xxx.xxx.xxx.xxx” is replaced with valid IP address values for your network. If you are unsure what values to enter, please contact your network administrator for assistance. 8 Test the ad hoc connection. For help, see the next procedure. To test the ad hoc connection 1 Print a configuration label. For help, see “Verifying the Printer Is Working” earlier in this guide. 2 Ping the IP address of the printer and verify acknowledgement (from a DOS prompt on Windows platforms).
To open Intermec PLUS 1 Install Intermec PLUS. For help, see the previous procedure. 2 Click Start. 3 Select Programs and then Intermec PLUS. 4 Click Intermec PLUS. The Intermec PLUS main screen appears. Downloading Firmware Use Intermec PLUS to download firmware upgrades to your PL4 printer. To download firmware 1 Connect the PL4 printer to the serial port of your PC. 2 On your PC, open Intermec PLUS. For help, see the previous section.
4 Click Browse to select the firmware file (.HEX file) you want to download. 5 Click Send to download the firmware. 6 Close Intermec PLUS. Using the Accessories There are several accessories available for use with the PL4 printer. This section shows you how to use the belt clip and the shoulder strap.
Using the Belt Clip The PL4 is equipped with a belt clip. To use the belt clip, hook the clip over your belt and ensure that the clip is securely attached to the belt. The belt clip will pivot to allow you to move freely while wearing the printer. Clip printer to belt Printer can pivot freely PL4U025.
Using the Adjustable Shoulder Strap The PL4 comes with a shoulder strap (P/N BT11132-1) for your convenience. To use the shoulder strap, snap each end of the shoulder strap into the shoulder strap rings on the top of the printer. Slide the buckle away from or toward the printer until you achieve the desired length. Pull here to shorten Pull here to lengthen Hold buckle Snap into shoulder strap rings on printer PL4U027.
Maintaining the Printer The easiest way to maintain your printer is to extend the battery life for as long as possible and to perform routine cleaning of the printer parts. Extending Battery Life • Never expose the battery to direct sunlight or temperatures over 40°C (104°F). • Only use the following chargers. Use of any other kind of charger may damage the battery.
• Pull the battery out of the printer if you will not be using the printer for a day or more and you are not performing a maintenance charge. • Consider purchasing an extra battery (P/N AT16293-2). • Remember that any rechargeable battery loses its ability to maintain a charge over time. It can only be recharged a finite number of times before it must be replaced. Cleaning the Printer Use only cleaning agents specified below.
Cleaning the PL4 Printer Printer Part Cleaning Method Cleaning Interval Printhead Use the cleaning pen that came with your printer or 70% isopropyl alcohol on a cotton swab to clean the print elements from end to end (the print elements are located in the thin gray line on the printhead). After every five rolls of media or more often if necessary.
Tear bar Self-strip rollers Label taken sensor Printhead elements Gap sensor Platen surface Self-strip bar Black mark sensor Media rollers (2 places) Edge guides, inner Bearing points (2 places) PL4U029.eps Identifying the parts for cleaning Troubleshooting You may have printer operation, print quality, or printer communications problems at some time during the life of the printer. It is easy to fix most of the problems and not delay operation of the printer for very long.
Understanding the Standard Control Panel LEDs If the printer is not functioning properly, refer to the table below to find the state of the two LEDs on the control panel. Use the “Printer Problems” table later in this guide to find your symptom and solution.
Troubleshooting Printer Problems If you are having a problem with your printer, look for your symptom in the Printer Problems table below and then try the solutions in the order they are listed. Printer Problems Symptom Solution The printer has no power. Make sure the battery is installed properly. Media is not feeding through the printer. Make sure the printhead is closed and latched. Recharge or replace the battery as necessary. Make sure the media is not binding anywhere in the printer.
Printer Problems (continued) Symptom Solution The battery life is reduced. Check the battery date code. If the battery is 1 to 2 years old, the short life may be due to normal aging. Recondition the battery. Replace the battery. The printer is skipping labels. Check the media for top of form sense mark or label gap. Make sure the maximum print field has not been exceeded on the label. Make sure the label gap sensor is not blocked or malfunctioning. The printer is not communicating properly.
Printer Problems (continued) Symptom Solution The printer is not communicating with the network. Print a configuration label to check the following settings: • • • • • • • • • • • eSSID Operating mode Preamble length IP address Network mask Gateway Encryption Authentication LPD TCP TCP/UDP port Check with your network administrator to make sure that the previous settings are configured correctly for your network.
Printer Problems (continued) Symptom Solution The printer prints POP3 e-mail but does not respond to other tasks. The poll frequency is set to low. Make sure the poll frequency is set to more than 10 seconds. For help, see “Setting Up for POP3 E-mail Printing” earlier in this guide. When you open the Print dialog box in Intermec PLUS, the printer advances the media. The Windows operating system is sending a signal to the printer to advance media.
Note: If you do not press the Feed button within 3 seconds, the printer prints “Dump mode not entered” and resumes normal operation. 3 At this point, the printer is in Dump mode and prints the ASCII hex codes of any data sent to it and their text representation (or [.] if not a printable character). Additionally, a file with a .DMP extension containing the ASCII information is created and stored in the printer’s memory. You can view, clone, or delete the file using the Intermec PLUS application.
Memory/Communications Specifications (continued) Optional wireless communications Bluetooth compatible 2.4 GHz link Label/tag width 50.8 mm to 104.1 mm (2 inches to 4.1 inches) Maximum label/tag length 508 mm (20 inches) with standard memory Inter-label gap 2 mm to 4 mm (3 mm preferred) 0.08 inch to 0.16 inch (0.12 inch preferred) Label thickness 0.064 mm to 0.165 mm (0.0025 inch to 0.0065 inch) Wireless LAN capabilities comply with 802.11b protocols Label Specifications Tag thickness 0.
Font/Bar Code SpecificationsFonts Available Five resident scalable and rotatable fonts available from 12 to 48 pt. Downloadable pre-scaled fonts via Intermec PLUS application. Optional international character sets.
Physical/Environmental/Electrical Specifications (continued) Weight with battery, excluding media & wireless options Temperature Operating Storage 0.9 kg. (2.0 lbs.) -15°C to 50°C (5°F to 122°F) -25°C to 70°C (-13°F to 158°F) Relative humidity Operation Storage Electrical 10% to 80% (non-condensing) 10% to 40% for Bluetooth printer 10% to 90% (non-condensing) Battery: 7.2V (nominal) Lithium-Ion Chargers: External single battery charger, 120 to 230 VAC depending on connector selected.
2 5 4 1 3 6 7 8 PL4U031.
For details about accessories, contact your local Intermec representative.
EasyCoder PL4 Printer User’s Guide
Corporate Headquarters 6001 36th Avenue West Everett, Washington 98203 U.S.A. tel 425.348.2600 fax 425.355.9551 www.intermec.