
User`s manual


Chapter 3 — Configuring the CV60
30 CV60 Vehicle Mount Computer With Windows CE User’s Manual
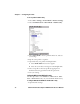
3 Type the address of the printer in the Enter Device Address
text box and then tap OK.The keyword -unknown- appears
in the Device Name field in the Current Wireless Printer box.
4 The name of the printer is not sent to the CV60 when you
manually enter the printer address.
To choose the printer from a list of previously discovered devices
1 Make sure that you have already performed a Bluetooth
device discovery.
Setting Up 802.11 Radio Communications
The CV60 comes with an optional 802.11 b/g or 802.11 a/b/g
radio to transfer data using wireless communications.
If you have a CV60 with an 802.11 a/b/g radio, you can set the
band which you want to operate at.
To configure the 802.11 band on the CV60
1 Go to Start > Settings > Control Panel > Intermec Settings
> Communications > 802.11 Radio > Radio Bands.
2 From here you can choose a/b/g (2.4 and 5 GHz) to allow
dual band operation, b/g (2.4 GHz) for b/g band only
operation, or a (5.0 GHz) for a band only operation.
3 Tap File > Save Settings or tap the disk icon ( ) to save
your settings and exit.
Configuring the Network Parameters for a TCP/IP Network
This section of the manual assumes that you have already set up
your wireless communications network including your access
points. If you are using a UDP plus network, you also need to
have your Intermec Application Server communicating with a
host computer.
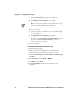
2 Select Start > Settings > Control Panel > Wireless
Printing. The Wireless Printing wizard appears.
3 Select the Device Manager button and tap Acquire Printer.
The Device Manager screen appears with the list of
previously discovered devices.
4 Select the printer you want and tap OK.