
User's Manual Part 2


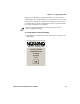
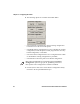
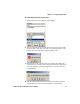
Table Of Contents
- Connecting to the Printer
- Understanding the Font Modules
- Using the Windows 95 or Windows 98 Printer Configuration Utility
- Using the Windows 2000 or Windows XP Printer Configuration Utility
- Understanding Control Code Definitions
- Using Printer Control Codes
- Backspace
- Beeper
- Cancel Line
- Carriage Return
- Delete
- Form Feed
- Select Half-Speed Printing
- Cancel Half-Speed Printing
- Set Inactivity Time for Sleep Mode
- Line Feed
- Perform Master Reset
- Set Print Position (absolute)
- Set Print Position (relative)
- Page Formatting Functions
- Character Style and Text Mode Functions
- Defining Intercharacter Space
- Tabs and Tab Setting Functions
- Using Character Sets and User-Defined Functions
- Single-Byte Character Sets
- Double-Byte Character Sets
- Multi-Byte Character Sets
- Select National Character Set
- Hebrew Character Fonts
- User Defined Characters
- Copy ROM to RAM
- Define User-Defined Characters
- Select User-Defined Character Set
- Select Default Character Set
- Enable Printing of Codes 128-159
- Disable Printing of Codes 128-159
- Expand Printable Code Area
- Enable Printing of Character Graphics
- Disable Printing of Character Graphics
- Printing Character Graphics
- Graphics Functions

Chapter 4 — Configuring the Printer
6822 Series 80-Column Printer User’s Manual 29
When you start the Printer Configuration Utility, it creates a printer
configuration. This configuration has no fonts, parameters are set to the
default values, and there is no printer control program in memory. You
can modify the basic printer configuration to meet your needs and load
the custom configuration to your printer.
To start the Printer Configuration Utility.
1 Run rpgconf.exe and click OK on the first screen to continue to the
Main Menu.
Note: The working configuration is deleted when you exit the
Printer Configuration Utility.