
User's Manual Part 1

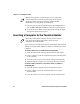
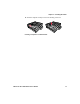

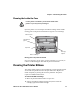
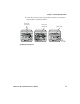

Table Of Contents
- Before You Begin
- Learning About the Printer Models
- Guidelines for Operating the Printer
- Understanding the Control Panel
- Using the Reset Button
- Understanding the Power Supply Options
- Installing the Internal Battery
- Installing the Ribbon Cartridge
- Adjusting the Printhead Gap
- Loading the Paper Tray
- Loading Paper in the Printer
- Inserting a Computer in the Terminal Holder
- Cleaning the Printer Case
- Cleaning the Printer Ribbon
- Cleaning the Mask Spring
- Connecting to the Printer
- Understanding the Font Modules
- Using the Windows 95 or Windows 98 Printer Configuration Utility
- Using the Windows 2000 or Windows XP Printer Configuration Utility
- Understanding Control Code Definitions
- Using Printer Control Codes
- Backspace
- Beeper
- Cancel Line
- Carriage Return
- Delete
- Form Feed
- Select Half-Speed Printing
- Cancel Half-Speed Printing
- Set Inactivity Time for Sleep Mode
- Line Feed
- Perform Master Reset
- Set Print Position (absolute)
- Set Print Position (relative)
- Page Formatting Functions
- Character Style and Text Mode Functions
- Defining Intercharacter Space
- Tabs and Tab Setting Functions
- Using Character Sets and User-Defined Functions
- Single-Byte Character Sets
- Double-Byte Character Sets
- Multi-Byte Character Sets
- Select National Character Set
- Hebrew Character Fonts
- User Defined Characters
- Copy ROM to RAM
- Define User-Defined Characters
- Select User-Defined Character Set
- Select Default Character Set
- Enable Printing of Codes 128-159
- Disable Printing of Codes 128-159
- Expand Printable Code Area
- Enable Printing of Character Graphics
- Disable Printing of Character Graphics
- Printing Character Graphics
- Graphics Functions
- Checking the Power Source
- Aligning the Printer Mechanism
- Troubleshooting System Components
- Understanding Diagnostic Information
- Communications Pin-Out Configurations
- Specifications
- Printer Dimensions
- Media Specifications
- Understanding the Fanfold Paper Page Layout
- Using Configuration Commands
- Operating Modes
- Command and Control Modes
- Set Local Bluetooth Device Name
- Set Class of Device/Service Field
- Set Service Name
- Connectable On/Off
- Specify Page Scan Timing
- Enable Discoverable
- Specify Inquiry Scan Timing
- Set Encryption/Authentication: “PIN CODE”
- Manage Security Modes
- Read Module Version
- Read Local Device Address
- Set Shutdown Timing
- Clear Link Key Table
- Understanding Adapter States or Modes
- Power Management Flow Diagram
- Diagnostics Capabilities
- Applications
- System Qualification
- Default Configuration
- Control Codes and Escape Sequences
- Single Character Control Code Definitions
- Escape Sequence Quick Reference
- Factory-Installed Printer Defaults
- About the Printer Font Jobs
- Big 5 Traditional Chinese Character Set
- Simplified Chinese Character Set
- IBM 437 Code Page Character Set
- Japanese (Shift JIS) Character Set
- Korean Character Set
- International Character Set

Chapter 2 — Installing the Printer
16 6822 Series 80-Column Printer User’s Manual
3 Once the paper is properly positioned, press the Set Page button to
clear the Paper Out light and indicate where the top of the page is.
4 Close the printer lid. Make sure the paper passes through the paper
slot when the printer begins to print.
Inserting a Computer in the Terminal Holder
The fixed mount or portable printers have terminal holder options for the
4000 Series, 61XX, 62XX, 600 Series, 700 Series, CK60, and the CN3
computers.
To insert a 4000 series or a 62XX in the terminal holder
1 Insert the bottom of the computer into the terminal slide retainer.
2 Use the computer to push the terminal slide retainer and make room
for the computer.
3 Lower the connector end of the computer into the terminal holder.
4 Slide the computer to fully seat it in the printer docking connector.
To insert a 61XX, a 600 Series, a 700 Series, CK60, or a CN3 in a
terminal holder
1 Insert the top of the computer into the terminal slide retainer.
2 Use the computer to push the terminal slide all the way in the
direction shown.
3 Lower the connector end of the computer into the terminal holder.
Note: If your paper has a preprinted logo on every page, make
sure the printhead is below the preprinted logo. If not, you can
adjust the position of the paper, either by pressing the Line
Feed button, or by using the green thumb wheel.
Note: When removing the computer, do not press the computer
keys against the terminal slide retainer. Always store the
computer in the terminal holder.