
User's Manual


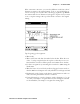
Table Of Contents
- Title
- Contents
- Before You Begin
- Chapter 1: Introduction
- Chapter 2: Pocket PC 2002
- Introduction
- Premium versus Professional Editions
- Where to Find Information
- Basic Skills
- Microsoft ActiveSync
- Microsoft Pocket Outlook
- Companion Programs
- Pocket Internet Explorer
- Getting Connected
- Chapter 3: Installing Applications
- Chapter 4: Network Support
- CORE
- Network Adapters
- Ethernet Communications
- 802.11b Communications
- Profiles
- Basic
- Security
- Advanced
- Certificates
- Import/Export
- Scan List
- Network Selection APIs
- Function Summary
- RadioConnect()
- RadioDisconnect()
- GetMac()
- GetBSSID()
- GetSSID()
- GetLinkSpeed()
- GetNetworkType()
- GetTXPower()
- GetNetworkMode()
- SetNetworkMode()
- AddWep()
- GetRSSI()
- GetAssociationStatus()
- GetWepStatus()
- GetAuthenticationMode()
- SetAuthenticationMode()
- SetChannel()
- EnableWep()
- GetPowerMode()
- SetSSID()
- isOrinoco()
- EncryptWepKeyForRegistry()
- SetRTSThreshold()
- GetRTSThreshold()
- ConfigureProfile()
- StartScanList()
- 802.11b Radio CORE Module
- WWAN Radio Options
- WAN Radio CORE Module
- Wireless Printing
- AutoIP/DHCP
- SNMP Configuration
- Chapter 5: Printer Support
- Chapter 6: Scanner Support
- Scanner Control and Data Transfer
- Automatic Data Collection COM Interfaces
- Multiple ADC COM Object Support
- How to Create and Use the ADC COM Interfaces
- 2D Imager Overview
- Create and Delete ADC COM Object Functions
- IADC Functions
- IBarCodeReaderControl Functions
- IS9CConfig Functions
- IS9CConfig::GetCodabar
- IS9CConfig::SetCodabar
- Codabar Default Settings
- Codabar Enumerations
- IS9CConfig::GetCode39
- IS9CConfig::SetCode39
- Code 39 Default Settings
- Code 39 Enumerations
- IS9CConfig::GetCode93
- IS9CConfig::SetCode93
- Code 93 Default Settings
- Code 93 Enumerations
- IS9CConfig::GetCode128
- IS9CConfig::SetCode128
- Code 128/EAN 128 Default Settings
- Code 128 Enumerations
- IS9CConfig::GetI2of5
- IS9CConfig::SetI2of5
- Interleaved 2 of 5 Default Settings
- Interleaved 2 of 5 Enumerations
- IS9CConfig::GetMatrix2of5
- IS9CConfig::SetMatrix2of5
- Matrix 2 of 5 Default Settings
- Matrix 2 of 5 Enumerations
- IS9CConfig::GetMSI
- IS9CConfig::SetMSI
- MSI Default Settings
- MSI Enumerations
- IS9CConfig::GetPDF417
- IS9CConfig::SetPDF417
- PDF 417 Default Settings
- PDF 417 Enumerations
- IS9CConfig::GetPlessey
- IS9CConfig::SetPlessey
- Plessey Default Settings
- Plessey Enumerations
- IS9CConfig::GetStandard2of5
- IS9CConfig::SetStandard2of5
- Standard 2 of 5 Default Settings
- Standard 2 of 5 Enumerations
- IS9CConfig::GetTelepen
- IS9CConfig::SetTelepen
- Telepen Default Settings
- Telepen Enumerations
- IS9CConfig::GetUpcEan
- IS9CConfig::SetUpcEan
- UPC/EAN Default Settings
- UPC/EAN Enumerations
- IS9CConfig2 Functions
- IS9CConfig2::GetCode11
- IS9CConfig2::SetCode11
- Code 11 Default Settings
- Code 11 Enumerations
- IS9CConfig2::GetCustomSymIds
- IS9CConfig2::SetCustomSymIds
- Custom Identifier Assignments
- Custom Identifier Default Settings
- Custom Identifier Example
- IS9CConfig2::GetGlobalAmble
- IS9CConfig2::SetGlobalAmble
- Postamble and Preamble Defaults
- IS9CConfig2::GetPDF417Ext
- IS9CConfig2::SetPDF417Ext
- PDF 417 Extended: Micro PDF 417 Default Settings
- IS9CConfig2::GetSymIdXmit
- IS9CConfig2::SetSymIdXmit
- Symbology ID Transmission Option
- IS9CConfig3 Functions
- AIM Symbology ID Defaults
- IImage Interface
- Data Collection Configuration
- Tethered Scanner
- Chapter 7: Programming
- Creating CAB Files
- FTP Server
- Full Screen
- Kernel I/O Controls
- Reboot Functions
- Remapping the Keypad
- Appendix A: Control Panel Applets
- Appendix B: Unit Manager
- Appendix C: Bar Codes
- Index
Pocket PC 2002Chapter —2
18 700 Series Color Mobile Computer User’s Manual
Using Letter Recognizer
With Letter Recognizer, you can write letters using the stylus just as you
would on paper.
1 Tap the arrow next to the Input Panel button, then Letter Recognizer.
2 Write a letter in the box.
When you write a letter, it is converted to typed text that appears on the
screen. For specific instructions on using Letter Recognizer, with Letter
Recognizer open, tap the question mark next to the writing area.
Using Transcriber
With Transcriber, you can write anywhere on the screen using the stylus
just as you would on paper. Unlike Letter Recognizer and Block Recogniz-
er, you can write a sentence or more of information. Then, pause and let
Transcriber change the written characters to typed characters.
1 Tap the arrow next to the Input Panel button, and then Transcriber.
2 Write anywhere on the screen.
For specific instructions on using Transcriber, with Transcriber open, tap
the question mark in the lower right hand corner of the screen.
Selecting Typed Text
If you want to edit or format typed text, you must select it first.
S Drag the stylus across the text you want to select.
You can cut, copy, and paste text by tapping and holding the selected
words and then tapping an editing command on the pop-up menu, or by
tapping the command on the Edit menu.